Hi everybody. I have lurked on this site for several years, thinking I'll start "That Canoe" one fo these days. Well it's finally one of these days. I built the strongback and am ready to start cutting the molds for a 16' prospector. I was going to build a 17'6" redbird, and in fact bought the plans for one a couple years ago. I decided to build the prospector instead as my son (6 years old) is growing like crazy and I envision my wife, son and I going on some fun trips. Figured the extra carrying capacity was needed.
You folks have already helped out so much. Your posts and experience has made this task much less daunting. I plan on posting pics of my progress and asking many many questions.
I look forward to interacting with all of you. Thanks in advance for the advice I am sure to receive!
It has begun!!!
-
Glen Smith

- Posts: 3719
- Joined: Sat May 08, 2004 9:08 am
- Location: Baie-St-Paul, Quebec, Canada
Hi Andy, first word of advice: The Prospector has high stems so don't cut your mold material to a 24" width as advised in Canoecraft but rather at a width to accomodate the high stem molds plus at least 2" to keep the tip of the stems above the strongback. This is mentionned in Canoecraft but many builders seem to skip this part and just see the comment about cutting the plywood sheets in half.
Enjoy your project.
Enjoy your project.
Thanks Glen!!! I am a little confused. Are you saying I should make my molds a little taller than in the plans? I haven't unwrapped the plans yet (wanted to get the strongback right before digging in). I don't see anything in CanoeCraft about 24" width for the molds. If I am making the molds taller, would you suggest lowering the strongback for easier access? Thanks for the quick response!!!!
-
Glen Smith
- Posts: 3719
- Joined: Sat May 08, 2004 9:08 am
- Location: Baie-St-Paul, Quebec, Canada
Canoecraft original version page 82:
Canoecraft revised version page 96:I normally use particle board, cutting the 4 X 8- foot sheets into two 2 X 8- foot panels.
If you are working from purchased plans, check the total height of the highest mold which should be the stem. Check it from the highest point to the "baseline" drawn on the plans. This is the height you will have to use for all of the molds for them to line up properly along their waterlines. Just follow the plans and everything should be fine.Note: check your plans first, as this is true only if none of the molds is higher than 24 inches.
Cut the 4- by 8- foot sheets of particleboard in half lengthwise, creating two 2- by 8- foot panels that are laid one on top of the other.
-
Glen Smith
- Posts: 3719
- Joined: Sat May 08, 2004 9:08 am
- Location: Baie-St-Paul, Quebec, Canada

Prospector 16'
The Bear Mountain Prospector 16' plans put the waterline at 20.5". My Prospector is still in progress.
With the WL at 20.5", mold 0 is just a little over 25" high. I used 1/2" MDF and it took just a little over 2 4x8 sheets.
With the stem mold cut per the plans (20.5" WL), the highest shearline point comes very close to the strongback. My strong back is 14' long so there is enough room to work. With a 16' or longer strongback, I'd consider adding another inch to the bottom of the forms. (But there have been plenty of Prospectors built on 16' strongbacks without adding extra material to the molds! )

Ed...
With the WL at 20.5", mold 0 is just a little over 25" high. I used 1/2" MDF and it took just a little over 2 4x8 sheets.
With the stem mold cut per the plans (20.5" WL), the highest shearline point comes very close to the strongback. My strong back is 14' long so there is enough room to work. With a 16' or longer strongback, I'd consider adding another inch to the bottom of the forms. (But there have been plenty of Prospectors built on 16' strongbacks without adding extra material to the molds! )
Ed...
Ed Alger
Thanks Ed. If I had it to do over again I probobly would have made the strongback a foot or so shorter, but in the long run this may be best. I may want to build the 17'6 redbird someday, so I will be happy to have the extra length then. That's a great idea raising all the forms, but I think I will stick to the plans for now. I'll post if this poses any problems so the next builder can try adding the extra inch or so. :frightened
-
davidb54321

- Posts: 214
- Joined: Fri Jan 28, 2005 7:05 pm
- Location: Presque Isle, Maine
- Contact:
Andy,
Welcome! I love my Prospector! I did the exact thing Glen warned you about when I started. I cut my sheet goods in half and then I paid more attention.
The help on this forum is priceless! The only stupid question is that one not asked. Trust me, we have made most of the mistakes at least once, and continue to learn from others.
Enjoy your build, it will be over before you think and then you'll have to do all those projects you put off while "canoeing"!
Best Wishes, David[/b]
David Bartlett
"I don't fully understand everything I know!"
http://photobucket.com/albums/b81/davidb54321/
"I don't fully understand everything I know!"
http://photobucket.com/albums/b81/davidb54321/
Thanks for the welcome David. Your prospector is beautiful! I have resigned myself to the fact I'll need three sheets of 4x8 material for my molds. That was a great piece of preliminary advice from Glen. I'll be buying the MDF tomorrow and hopefully I'll get to cutting my forms by the end of the week (or early next week). The plan is to get them cut, bend the stems and set the whole thing up within a week or two. My timeline for this build is to be ready to glass by October. The weather in the Atlanta area is perfect in October. It should be around 70 and relatively low humidity here. When summer hits and my son is out of school (he's 6) I am sure I won't have as much time to play in the workshop (garage).
Thanks again for the encouraging words. Seeing a completed Prospector like yours really gets me excited to do this. I'll be posting pics along the way so hopefully I'll be able to fix some problems before they become a "real" problem!
Thanks again for the encouraging words. Seeing a completed Prospector like yours really gets me excited to do this. I'll be posting pics along the way so hopefully I'll be able to fix some problems before they become a "real" problem!
Prospector 16'
Very well Andy. Keep us posted.
BTW: Regarding forming the stems: What I like to do is cut my molds from 1/2" MDF and cut my stem material 1" wide. I screw the 2 stem molds side by side and then form the 1" wide stem material over the 1" wide mold pack.
Doing this, I find that it's easy to keep the stems straight and aligned. Some like to steam the stems, but I find cutting 5 pieces of stock to .150" makes them easy to bend. (4 sets of 5 pieces for 2 inner and 2 outer stems).
Cutting stem material 3/4" wide and forming over a 3/4" mold is another way but it takes some extra patience to align. With 3/4" wide strips, if one is sloppy in the lamination, there is a price to pay later when fairing to fit the strips. Using 3 1/4" x 3/4" stock is typical but steaming is called for.
Ed...
Ed Alger

Hi Andy,
I cheated a bit with my stems. I didn't want to fuss with a steaming system, so I simply soaked the 1/4" x 3/4" strips in water for a few days (wrapped in a towel in a garbage bag) and then when it came to bending them onto the stem mold, I soaked them in hot water in a laundry tub. Just be sure a) to wrap MDF stem molds in a plastic bag first, or the MDF will disintegrate, and b) let the stem strips dry completely before gluing (the wood grain expands when wet, so it needs to dry to return to its natural state).
Enjoy the build!
Adam
Here's my Bob's Special Build
Who travels not by water knows not the fear of God --- 17th Century Sailor
Ed and Adam,
Thanks for the advice on the stems. Ed, your idea of 1" stem material formed on the two stems is great! I was wondering how I was going to neatly wrap 3/4" material over a 1/2" form. That clears that up!
My 14" band saw is not great. I am not able to properly tension blades wider than 1/2 inch. Even 1/2 inch is pushing it. I like the idea of thinner strips, but cutting that many on the table saw will lead to a lot of waste. I haven't selected my stem material yet I'll probably use cherry with some thin walnut accent strips. I have a lot of extra walnut in the shop. It will depend on what I find and at what price. I may just make them out of walnut, in which case I don't mind a bit of waste. I really like the idea of 0.15 inch strips and no steamiing. Walnut is a bit brittle, so even very thin strips may still need a bit of coaxing. Adam's idea of soaking the wood is enticing also.
Adam, great job on the Bob's special! Nice boat!!!!
Stems
Andy, Glen showed us the Freud Diablo D0724X saw blade. It's a 7 1/4" blade which cuts a 1/6" kerf. It cuts very smooth.
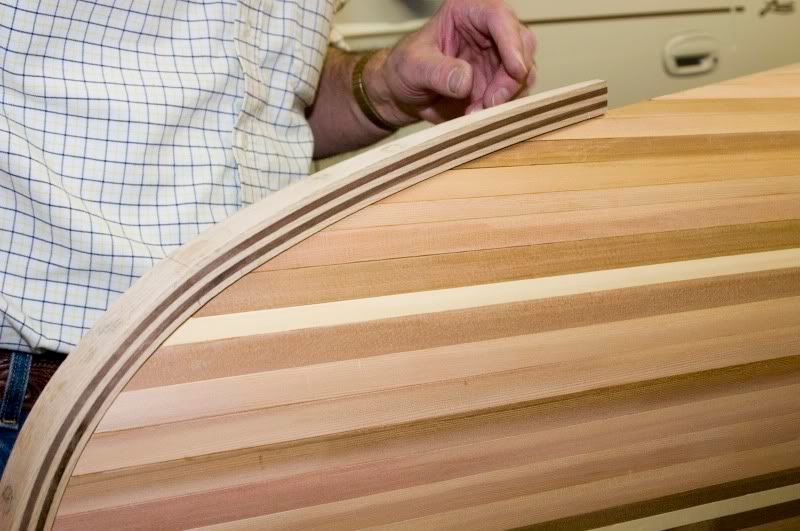
Here's a link to my stems for my Ranger 15'. I alternated Cherry and Walnut. When you laminate, use a sacrifice strip on the outside which will help to protect the outer stem strips from splintering.
http://i12.photobucket.com/albums/a237/ ... C_1609.jpg
A link to my Prospector 16' showing the stem molds and stem lamination.
http://s12.photobucket.com/albums/a237/ ... spector16/
Ed...
Ed Alger
Thanks for the Diablo saw blade tip. I had read that here on this forum several times and was planning on using it for ripping my strips. I just didn't put two and two together and think of using it for ripping thin stem strips! I usually use a thin kerf blade on my table saw with a stiffening disk. Did you use a stiffener, or does the blade hold up well on it's own?
Your photos of the stems on the Ranger were great. A pic is worth a thousand words! Great pic of the rounding off of the bottom of the inside stem. I had questions on that, but one picture cleared it up. Your prospector is looking really good! I was thinking of a similar stripe down the side. Still up in the air on that one. Thanks for all the advice so far! It's nice to have someone at your stage of building to draw info from!
Your photos of the stems on the Ranger were great. A pic is worth a thousand words! Great pic of the rounding off of the bottom of the inside stem. I had questions on that, but one picture cleared it up. Your prospector is looking really good! I was thinking of a similar stripe down the side. Still up in the air on that one. Thanks for all the advice so far! It's nice to have someone at your stage of building to draw info from!