I have an inside stem in the bow of this model I'm working on and I am wondering what is the best way to get this formed down to the stem?
What tools to you use?
I have no power so I can sand it down to the stem to a flat 3/8" so then I can attach the brass stem to it. Would a surform speed things up? I suppose a file could work too.
Most of the intial filling and sanding is done. I still need to sand the whole thing over with 120 grit , or is this neccessary? I have used 80 grit so far.
Have a great day everyone!
Cheers, Robbie,
Forming the bow and stern
-
Sonshine777

- Posts: 21
- Joined: Mon Aug 20, 2007 10:39 am
- Location: Camas, WA
Forming the stem
Robbie,
You mentioned that the canoe model you are working on has an inside stem, which means there should be an outer stem correct?
Have you glued the strips on already or is your question concerning preparing to glue the strips?
I know these are a lot of questions but the answers to your question depend how far you are in the building process.
Tom
Tom

I use one of these for shaping things & it works pretty well. I'm due for new blades though. It's pretty simialr to the surform rasps.
http://www.leevalley.com/wood/page.aspx ... at=1,42524

Cheers,
Bryan
http://www.leevalley.com/wood/page.aspx ... at=1,42524
Cheers,
Bryan
Sorry about the unclear post.
The strips are already glued and there is an inside stem only. The orginal starter of this project did not make an outer stem and I think it's kinda late for that process.(Making them at the same time would have been the best idea).
So my thought here is to sand, file, grind, the strips down to the inside stem and leave about 3/8's of an edge to install the brass protector to the bow and keel. This model has a square stern and is based on the prospector build.
Hope this helps.
I like those from LV. Do they last long?
Cheers, Robbie.
-
Sonshine777
- Posts: 21
- Joined: Mon Aug 20, 2007 10:39 am
- Location: Camas, WA
You can still glue them on, it may take a couple of days to do it this way
So here goes.
I made my outer stem strips 1" x 1/8" (1/8" will bend without steaming)
I then trued the end of the cedar so it was flush with the edge of the inside
stem, this should give you an edge of 3/4" wide.
I then glued the stips on 2 or 3 at a time until I built it up to 3/4"
I then shaped the outer stem until it was fair with the cedar.
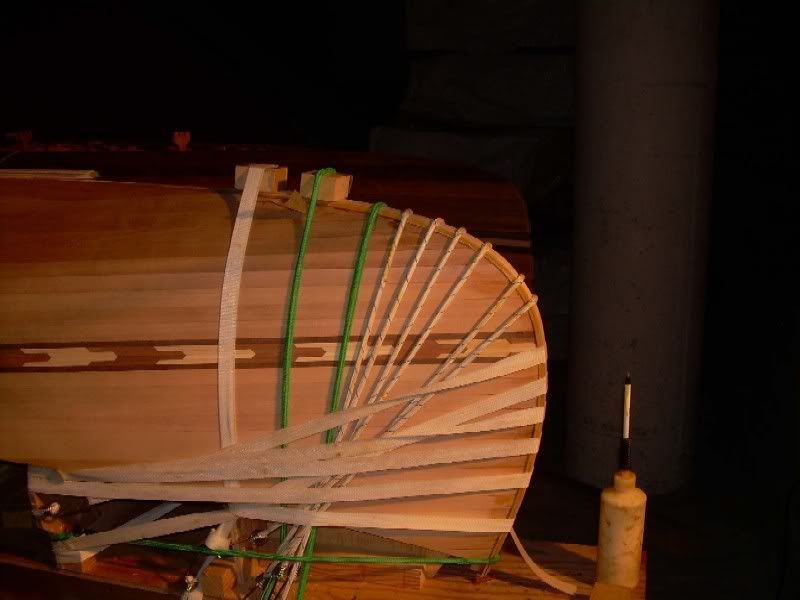
Here is a photo of how I clamped the strips while they dried.
So here goes.
I made my outer stem strips 1" x 1/8" (1/8" will bend without steaming)
I then trued the end of the cedar so it was flush with the edge of the inside
stem, this should give you an edge of 3/4" wide.
I then glued the stips on 2 or 3 at a time until I built it up to 3/4"
I then shaped the outer stem until it was fair with the cedar.
Here is a photo of how I clamped the strips while they dried.
Tom
I did mine after the fact too. Doing it before ala Ted Moore's seems much better in retrospect. Stems are often omitted from kayaks, at least those built using Nick Schade's methods. I decided to add them using the optional method described in Schade's book, which is basically the same as that described by Sonshine, except I did it all at once (6 or 7 strips of ash). I used epoxy thickened with microballoons. What a mess. It was a lot like wrestling a greased pig.
Afterwards, I used the microplane shown above and a block plane to fair it all down. I think that thickened epoxy was pretty hard on the blades. My flat blade lasted long enough for me to put it to a variety of uses on this boat (many involving epoxy coated wood), but now I need to replace the blade.
Cheers,
Bryan
Thanks for the replies. I get it.
I'm glad I posted this question. I'm on to that step now.
As for a small flaw in the cedar strip at the cheek of the bow that I questioned a few days ago I think I have an idea for that too. Someone posted a piece of intarsia (blue heron) on their project. I may do the same except it will be a carving. Possibly a hummingbird. I'm hoping to inset the thin carving into the cheek area where the flaw is. I'm still mulling this over though.
Thanks again for all your help and ideas.
Cheers, Robbie.
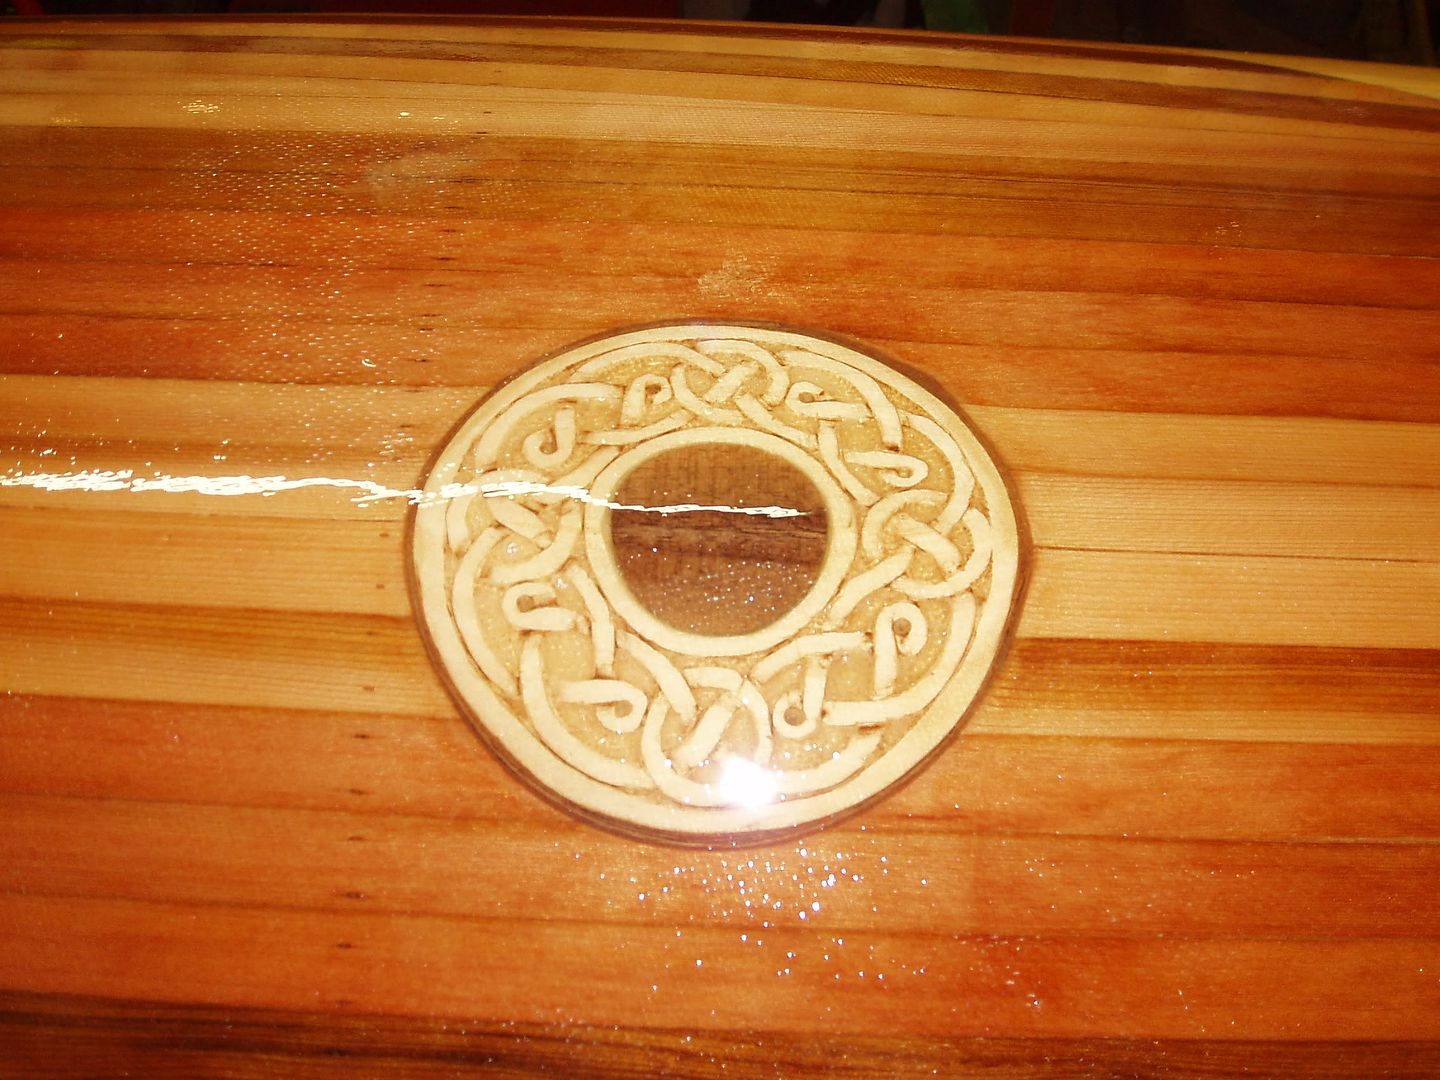
I inserted a carving into the deck of my kayak. I kept the block of wood thick for easier handling during the carving process, then thinned it down to about 1/4" once the carving was complete. It was the full thickness of the strips, so I cut a hole & inserted the carving. It worked out quite well.Robbie wrote:.... I may do the same except it will be a carving. Possibly a hummingbird. I'm hoping to inset the thin carving into the cheek area where the flaw is. I'm still mulling this over though.
I described the process in detail on my blog.
I agree. Real nice. I think it adds character and something different.
I'll keep you posted on my doings.
However, another possible problem may have come up. I bought my epoxy and hardener at the west sytems marine outlet in Kingston the other day. I bought the slow hardener(206) I see that the kit Bear mountain sells uses the 207 hardener. Did I make a mistake?
If so maybe I can take it back.
Cheers, Robbie.
-
Glen Smith

- Posts: 3719
- Joined: Sat May 08, 2004 9:08 am
- Location: Baie-St-Paul, Quebec, Canada
Update: I made a cardboard pattern of the bow curve line after filing to the inside stem. I transfered that to a piece of 1 1/16" wide board and cut the curve on the board. I now have a jig to press the 1/8" thick strips into while gluing 3 at a time (6 total). Then I glued those 2 pieces together and clamped them. Next step is to take it back to the canoe and do some pencil marking and shaping, then glue it on.
I have a 1/16" depression in that one strip now. I have almost sanded it completely out. I'm wondering if that will suffice or if it will show up when I'm glassing the canoe. I;m running out of warm weather to glass so time is crucial now.
I'll keep you posted.
Cheers, Robbie.
I have a 1/16" depression in that one strip now. I have almost sanded it completely out. I'm wondering if that will suffice or if it will show up when I'm glassing the canoe. I;m running out of warm weather to glass so time is crucial now.
I'll keep you posted.
Cheers, Robbie.
-
Bladeforger
- Posts: 9
- Joined: Sat Sep 08, 2007 12:57 pm
pawistik wrote:I inserted a carving into the deck of my kayak. I kept the block of wood thick for easier handling during the carving process, then thinned it down to about 1/4" once the carving was complete. It was the full thickness of the strips, so I cut a hole & inserted the carving. It worked out quite well.
I described the process in detail on my blog.
I've been lurking for awhile, but this deserves definite applause. Lots of hard work went into the blog, and it's nice. Good job!!! Great job on the engagement carving, too!!!
Keith