Freedom 17 Started!

Welcome to the new Bear Mountain Builders Forum - an interactive internet service we provide to encourage communication between canoe and kayak builders
Post Reply
Tim Eastman
Posts: 245
Joined: Sun Oct 23, 2005 12:40 pm
Location: Grand Rapids, Michigan, U.S.A.

Freedom 17 Started!

Post by Tim Eastman »

The wood is standard Western Red Cedar from a big box store (Menards) tight grained 2x6's that I ripped down with a Freud thin kerf. My better half wanted a very pale accent strip so we also ripped up some Aspen which is very pale. Those 2x6 cedar boards were about $20 ea ± and we got around 28 strips per board and very little waste other than sawdust. That will take some splicing on the hull but big deal. It's easy enough to stagger the joints and the color is pretty homogeneous.

Image

The forms are simple 5/8" particle board. The paper templates I entered into my CAD program from the CanoeCraft 2nd Edition and plotted them off my plotter at work (before I was laid off). Spray adhesive mounted and cut out with a handheld Ridgid saber saw and then finish sanded to the line with a disk sander.

Image

Our last canoe (a "38 Special" from Northwest Canoe Co. now renamed to the "Northwest Merlin 160") we did rolling bevel and staples. This time I'm still using the rolling bevel but trying a stapless technique I saw here on our Bear Mountain Boats forum.

I will definitely document that attempt. Happy building!
Tim Eastman
~~~~~~~~~~~~~~~~~~~
Be an example worth following
User avatar
Davesbuild
Posts: 52
Joined: Mon Aug 25, 2008 5:51 pm
Location: Peterborough, Ontario, Canada
Contact:

Post by Davesbuild »

Looks like a good start Tim!

You will n ot be disappointed in the "stapless" construction - little more work - but IMHO the pay-off is excellent.

Just a quick question...maybe a dumb one at that ....What is a "rolling bevel"? :thinking

Davesbuild
Tim Eastman
Posts: 245
Joined: Sun Oct 23, 2005 12:40 pm
Location: Grand Rapids, Michigan, U.S.A.

Post by Tim Eastman »

Davesbuild wrote:Looks like a good start Tim!

You will n ot be disappointed in the "stapless" construction - little more work - but IMHO the pay-off is excellent.

Just a quick question...maybe a dumb one at that ....What is a "rolling bevel"? :thinking

Davesbuild
Dave - hi.

A rolling bevel is an alternate to the bead and cove construction. The bead and cove can rotate as it goes around a hullform and the angles change from strip to strip. Those who don't bead and cove must bevel the strips as they mate to the previous strips. It's called a rolling bevel because the angle of the bevel will change from one end of the strip to the middle of the canoe to the other end of the strip. Especially at the bilge.

Here's a pic to hope fully describe how we did it last time. This is a jig I constructed to facilitate an accurate bevel. The strip on edge vertical is being beveled to mate to the previous strip already on the hull.

Image

Why not bead and cove? I don't have a router table and only a very cheap router. A rolling bevel doesn't take that much time to do and some strips don't need it at all. How about it's strength? Obviously you put a lot of faith in your glue but once the glue is cured (Titebond II) your glue joint is literally stronger than the surrounding wood. We put our previous canoe through some pretty tough paces up in the Minnesota Boundary Waters and it held up just fine. That previous hull (the one at left in my avatar) was constructed of 7/32" cedar and got too thinly sanded in a couple spots. Even so - because of the 6 oz. fiberglass inside and out it was plenty strong enough.

And it's reeeeeaaaaaally therapeutic to watch the curls come off those strips. :wink
Tim Eastman
~~~~~~~~~~~~~~~~~~~
Be an example worth following
sluggo
Posts: 244
Joined: Tue Sep 12, 2006 11:17 pm
Location: Vancouver BC

Post by sluggo »

Fantastic Tim, I hope you have fun with this one!
willo
Posts: 156
Joined: Sun Jul 15, 2007 12:48 pm
Location: Echo Bay ON.

Post by willo »

Enjoy the build Tim. I paddled my Freedom 17 yesterday , 1st time out this year , and it was just the second time I had it in the water since I finnished it so late last fall. I know you will be happy with this boat , It's the nicest design I have paddled
James Hanrahan
Posts: 23
Joined: Thu Sep 13, 2007 6:48 pm
Location: Wiarton Ontario

Post by James Hanrahan »

Hi Tim, On your forms you have several lines, small spaced holes and also large circles spaced evenly apart. Could you please explain the purpose of these markings?
Thanks
James
Tim Eastman
Posts: 245
Joined: Sun Oct 23, 2005 12:40 pm
Location: Grand Rapids, Michigan, U.S.A.

Post by Tim Eastman »

James Hanrahan wrote:Hi Tim, On your forms you have several lines, small spaced holes and also large circles spaced evenly apart. Could you please explain the purpose of these markings?
Thanks
James
Hi James - good catch.

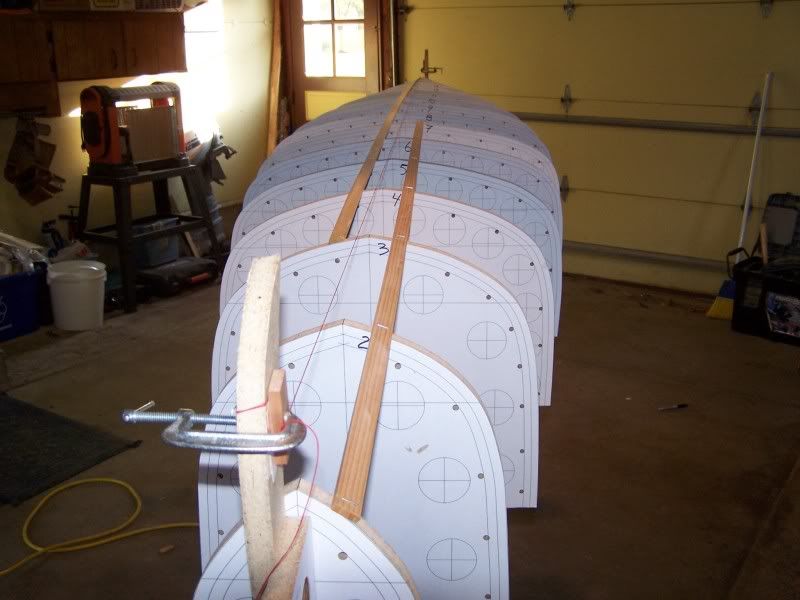
The horizontal lines would be the waterline location on each form (that one you know). The vertical lines are of course the centerlines of the form. There are two offset lines which go around the curve of the forms. Those were "construction lines" where I was thinking of using a router to inset a groove for clamping for stapless building. I elected not to go that route in my stapless attempts but never erased the lines in my software.

The large circles were also a thought experiment for providing clamping opportunities for stapless construction. I would have run dowels through them to provide a clamping purchase with sliced ribbons from tire inner tubes. Again I elected not to go that route and simply forgot to erase them before plotting.

The small holes actually are what I am using for rubber band clamping and it seems to be working. I got the idea and received documentation from Phil Westendorf who has built a couple projects this way.

The holes are drilled on my drill press (ShopSmith) at 1/4" and plugged with 1/4" dowels with 1" exposed on either side of each form. The rubber bands basically start at a dowel and wrap OVER the strip and down around and under the hull back up to another dowel pin tight enough to provide clamping pressure. This provides sufficient clamping pressure and holds the hull fast against the forms. This is done at each form. I'll be able to post pics in a few days to document that.

The rubber bands are sizable. They are #117 sized (7 1/2" x 1/8") at any Office Max type store.

Same as in the last build I'll bevel a strip, glue it to the previous strip, clamp it and go over to the other side and work there. By the time I'm done there I can come back over and add another strip without damaging things. By that time the glue had set up pretty good. Only takes a couple minutes to bevel a strip, then dry fit.

There may be spots where I am forced to do staples but I'll try every other possible means before doing that.

Happy building!
Tim Eastman
~~~~~~~~~~~~~~~~~~~
Be an example worth following
Old750
Posts: 7
Joined: Wed Sep 23, 2009 10:23 am

Re: Freedom 17 Started!

Post by Old750 »

Tim Eastman wrote:The wood is standard Western Red Cedar from a big box store (Menards) tight grained 2x6's that I ripped down with a Freud thin kerf. My better half wanted a very pale accent strip so we also ripped up some Aspen which is very pale. Those 2x6 cedar boards were about $20 ea ± and we got around 28 strips per board and very little waste other than sawdust.
Where did you get 2x6 cedar boards for 20$ each? I payed a fortune for 18foot clear cedar here in Whitby Ontario. I would drive 500 miles for your prices.
Post Reply