Update on Stapless Freedom17 /w Rolling Bevel

Welcome to the new Bear Mountain Builders Forum - an interactive internet service we provide to encourage communication between canoe and kayak builders
Tim Eastman
Posts: 245
Joined: Sun Oct 23, 2005 12:40 pm
Location: Grand Rapids, Michigan, U.S.A.

Update on Stapless Freedom17 /w Rolling Bevel

Post by Tim Eastman »

Been put on hold here folks due to the economy etc etc etc. (still out of work)

But I thought I'd issue an update on the Freedom 17 which we're doing stapless this time. We're also going with a rolling bevel versus a bead and cove. It's actually going pretty good and I'm having to come up with some creative clamping. But the strips are behaving and so far the strips where they meet each other are not showing any gapiosis as one would think.

This first shot shows how the band clamping is doing it's job and it also shows how I've used fishing line and some short 1/4" dowels attached to rubber bands for tension to hold the hull to the forms where it needs to be "convinced".

Image
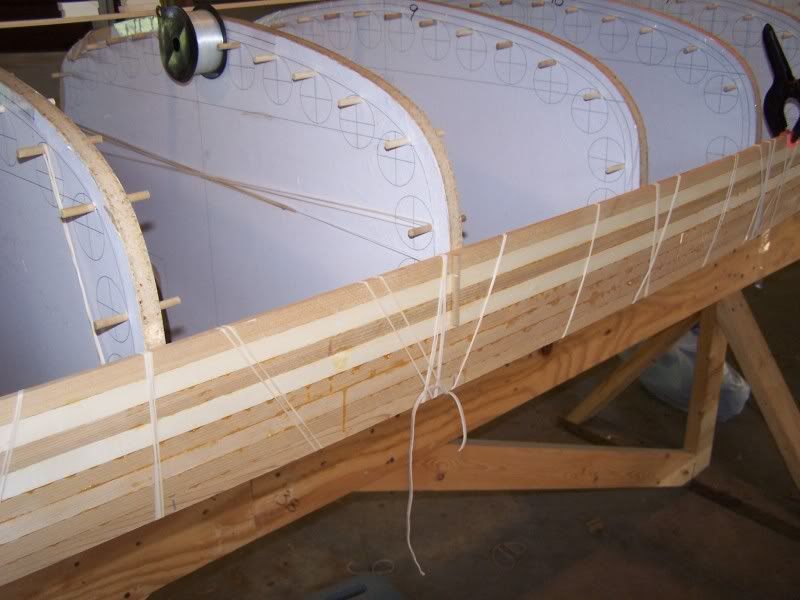
The danglies there are just the breaks - hey it happens. After so many stretchings and wrappings against cedar the band will fail.

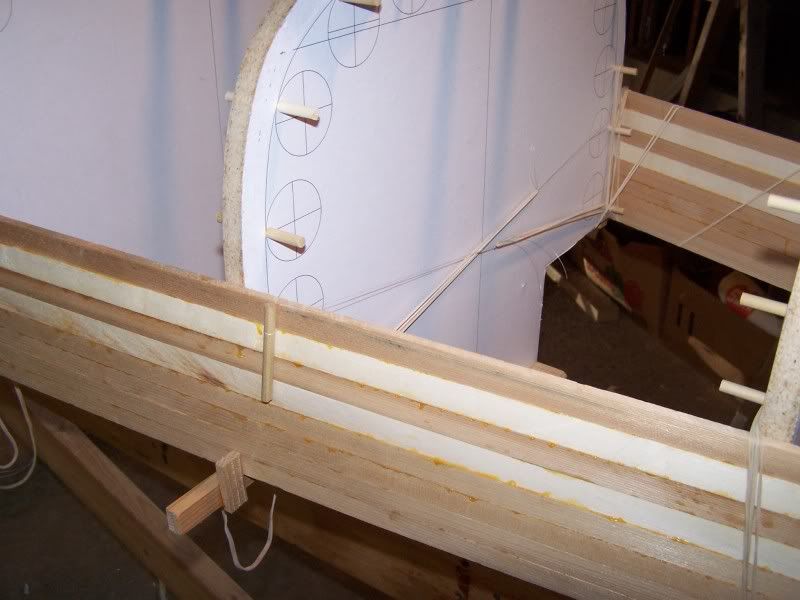
This shows the additional tension bands where they need to be used. Some areas the hull wants to pull away and some places the strips snug right in just fine. (yes the forms are fair) In order for the hull to be true and fair it MUST hold tight to the forms but I am bound and determined to go all stapless this time and this really isn't taking that much more time than when we built Chris' solo.
Image

This one is "inside" the forms looking at the inside skin of the hull to give an idea of how the rubber bands are hugging the strips to the forms while the glue dries.
Image

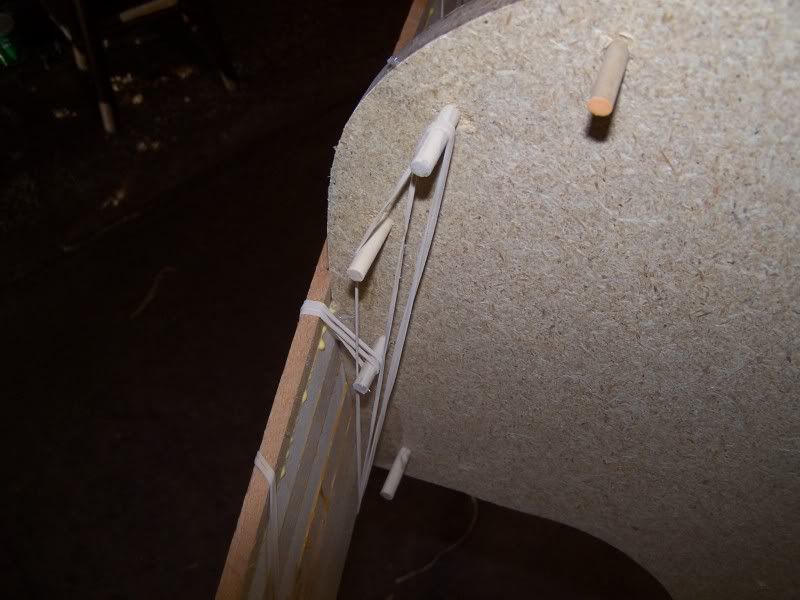
I've found in this humid Michigan weather that the hull moves considerably. So much so that even an experiment with hot glue (to tack the strips to the forms) did not hold due to the hull movement from humidity. The tension bands work remarkably well and the fishing line passing between the strips leaves a negligible hole. I know right where it is and I still cannot see it.

I've seen some users here use the fishing line method to do what I'm doing with the rubber bands but since I'm not doing bead and cove I was sure the fishing line wrapping hard over the strip edges would leave permanent marks. I'm sure that can't happen with bead and cove strips. Or very little.

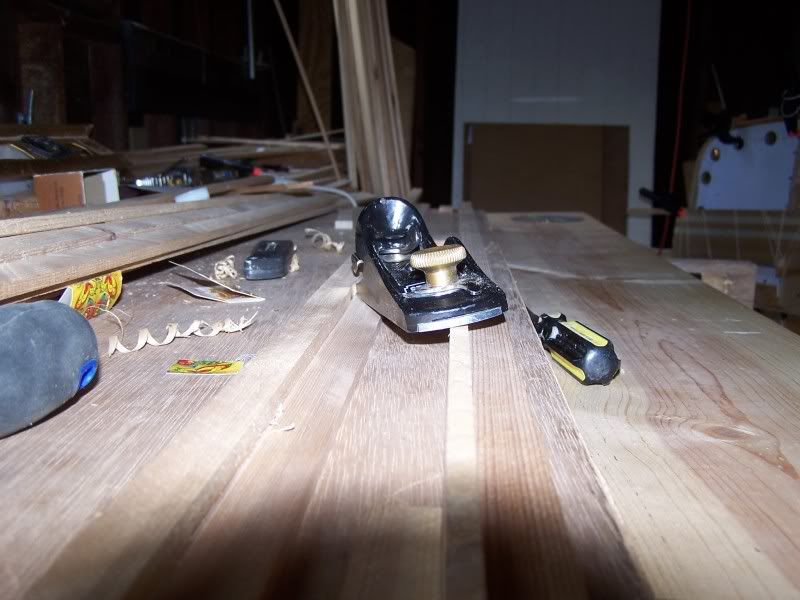
Strips are beveled on a jig - I don't even try to freehand it. The jig is very simple and basically just holds the strip on edge while you ride your low angle block plane down a stepped rail.
Image

It will need to be closed in before winter and unfortunately I will have to raise the hull to the roof trusses to get the cars in for the Michigan winter. I just can't handle the fiberglass and epoxy at this time. But she'll be ready in the spring for final fairing and fiberglass.

Image

Thanks for looking!
Tim Eastman
~~~~~~~~~~~~~~~~~~~
Be an example worth following
bert304
Posts: 47
Joined: Sat Aug 06, 2005 6:26 pm
Location: Mohrsville
Contact:

Post by bert304 »

Looks good so far, How come you did not use the bead and cove?
Tim Eastman
Posts: 245
Joined: Sun Oct 23, 2005 12:40 pm
Location: Grand Rapids, Michigan, U.S.A.

Post by Tim Eastman »

Fair question. Biggest reason is I don't have the setup for routing bead and cove and I'm not about to pay $1200 for a bundle of strips that have been pre-milled. This way I spent about $120 on cedar at Menards and ripped it all on my table saw.

Some say it's not as strong as bead and cove. I think the difference is negligible if you have a decent joint that is fitted well and properly clamped. The rolling bevel takes care of the fitting and the rubber bands do the rest. The glue joint it stronger than the surrounding wood anyway.

We had Chris' solo (left) done with rolling bevel up in the Minnesota / Canadian BWCA last year and she held up just fine.
Tim Eastman
~~~~~~~~~~~~~~~~~~~
Be an example worth following
User avatar
Patricks Dad
Posts: 1476
Joined: Wed Oct 13, 2004 1:11 pm
Location: Warrenville, Illinois

Post by Patricks Dad »

It's looking great Tim. Keep posting thos pictures!
Randy Pfeifer
(847) 341-0618
Randy.Pfeifer1@gmail.com
bert304
Posts: 47
Joined: Sat Aug 06, 2005 6:26 pm
Location: Mohrsville
Contact:

Post by bert304 »

Thank you for your answer. I asked because I am thinking of buying 1 X 8 WRC from a local company. I was told a price of 6.60 per linear foot which I figure is 118.00 for 18 foot boards. I figure I need 3 boards to make the total strips. I do have a nice router station that I can mill my own bead and cove on them.
Tim Eastman
Posts: 245
Joined: Sun Oct 23, 2005 12:40 pm
Location: Grand Rapids, Michigan, U.S.A.

Post by Tim Eastman »

Bert I did seriously consider doing that. I really REALLY wish I had the luxury of such a nice router station. But my budget and shop space as yet do not allow it. Hence - the rolling bevel. And I like the challenge.
Tim Eastman
~~~~~~~~~~~~~~~~~~~
Be an example worth following
mbolton
Posts: 44
Joined: Sat Jan 14, 2006 8:52 pm
Location: Michigan

Routing Jig

Post by mbolton »

I made a jig for routering the strips by using two chunks of 3/4" plywood ( about 24" square) sandwiched together with filler pieces the thickness of my strips. I left a slot through the width of the strips. A hole drilled through the plywood for the router bit and bolt on the router and viola...feed the strips through as fast as you can. And if you have two routers, one on each side and you can do both edges in one pass. Works well!
Tim Eastman
Posts: 245
Joined: Sun Oct 23, 2005 12:40 pm
Location: Grand Rapids, Michigan, U.S.A.

Post by Tim Eastman »

MB I would love to see that jig setup. Do you have old pics laying about?
Tim Eastman
~~~~~~~~~~~~~~~~~~~
Be an example worth following
sluggo
Posts: 244
Joined: Tue Sep 12, 2006 11:17 pm
Location: Vancouver BC

Post by sluggo »

Tim, the boat looks good. Don't be afraid to use hot glue to assist in clamping the strips. That is how I did my stapleless stripping and I would certainly recommend it if help is required. As well, some clear packing tape pulls things together nicely when some extra oomph is needed.


Image
Tim Eastman
Posts: 245
Joined: Sun Oct 23, 2005 12:40 pm
Location: Grand Rapids, Michigan, U.S.A.

Post by Tim Eastman »

Ya know Sluggo I actually tried that and had mixed results. The hot glue would stick to the forms but not the cedar. For sure it does not stick to the packaging tape which is used to edge the forms. So I would tack hot glue to the side of the form where it met the cedar hull and the hull moves in this humidity.

I might just be doing this wrong - that's been known to happen! :laughing
Tim Eastman
~~~~~~~~~~~~~~~~~~~
Be an example worth following
sluggo
Posts: 244
Joined: Tue Sep 12, 2006 11:17 pm
Location: Vancouver BC

Post by sluggo »

I was quite specific in the hot glue that I purchased, I believe it makes a difference. That's not to say that it would work for you though. If anyone is interested I can try and dig up the name of the glue I bought.

cheers
Tim Eastman
Posts: 245
Joined: Sun Oct 23, 2005 12:40 pm
Location: Grand Rapids, Michigan, U.S.A.

Post by Tim Eastman »

Yeah Sloggo - I'd be interested. Besides anyone using the Search Engine would be able to see it as well if they were looking for types of hot glue to use. If you could find it that'd be great.
Tim Eastman
~~~~~~~~~~~~~~~~~~~
Be an example worth following
User avatar
Patricks Dad
Posts: 1476
Joined: Wed Oct 13, 2004 1:11 pm
Location: Warrenville, Illinois

Post by Patricks Dad »

I used hot glue when I built my freedom-15. I used a drop on only 2 or 3 forms for any given strip. Places where the strips weren't following the forms got a drop. The subsequent strips would tend to use other forms. The glue spots tended to get fairly evenly distributed across the hull in both dimensions. I'd put a drop between the strip and a couple of the forms and hold it in place with my thumbs until it set (a few seconds).

I also had clear packing tape on my forms. The hot glue stuck fairly well to the tape but it did tend to pull the tape off of the forms so this combination wasn't ideal. Painting the edges of the forms might have been a better approach to give the hotglue something to adhere to yet avoid the woodglue between the strips sticking to the forms (just a thought).

I used a low temp glue and gluegun.
Randy Pfeifer
(847) 341-0618
Randy.Pfeifer1@gmail.com
Snowman
Posts: 233
Joined: Tue Jan 25, 2005 6:21 pm
Location: Gatineau, QC

Post by Snowman »

Tim/MBolton,

The bead/cove jig you described is similar to the one I built for my first boat. I did a bit of tinkering with it to get it to work well. I found that doing it this worked OK, but it is "sensitive" to any variation in strip thickness. If the strip is too thick relative to your spacers (between the upper and lower pieces), it is difficult to get the strips through. Too thin and you do not have enough friction, making it susceptible to kickback unless you integrate a featherboard (I made sure I always stood off centre!!!). Using just feather boards pretty much takes care of this issue. You can also adjust the thickness/friction by adding shims on the spacer boards - a bit of guessing is involved as everything compresses when you tighten the screws.

Would I use it again - probably not...

If your are interested in photos of my unit, I can dig you up some photos once I get settled in the new house (we moved again - oh, joy!).


Snowman
Snowman back East
Tim Eastman
Posts: 245
Joined: Sun Oct 23, 2005 12:40 pm
Location: Grand Rapids, Michigan, U.S.A.

Post by Tim Eastman »

I think I'm going to have to run some more experiments and/or change my hot glue. And maybe my glue gun does not get hot enough. Don't really know at this point. I'm just not coming up with the same results as those who have used hot glue in this fashion.

For sure it does NOT stick to my tape on the forms but this is not insurmountable. I just need to find another way that works.

Thanks for the input guys!
Tim Eastman
~~~~~~~~~~~~~~~~~~~
Be an example worth following
Post Reply