This is my first post on this very helpful system (thanks for all the contributions- I've learned alot). My son (Patrick Pfeifer) and I are building a Redbird. We have begun the stripping process (just 2 strips) but would like to add an accent to the sides. A pattern has been offered (by mom) to build into the next 6 strips (right at station 0 on each side) which would involve butt joints (or 45 degree angle joints). The pattern would use a mixture of light strips and darker strips (all WRC) to make the pattern. The pattern is localized to only about 6 inches around station 0. It kind of looks like a maple leaf.
My concern is over the strength of the joints and the number of joints in a local area. I built a test joint (45 degrees) and after 24 hours of curing I was able to bend it to match the curvature of the canoe at station 0 but it snapped when pushed a ways beyond that. I've reglued it for another test (the end grain looked kind of dry when it broke so maybe the joint absorbed most of the glue). I will also try epoxy as a choice of glue (using Titebond now).
Am I barking up the wrong tree here? If I can construct and assemble all of the pieces so they don't fall apart when the canoe is stripped, will it hold up after glassing and epoxy? Or should I worry about the joints failing even after glassing?
I've thought about trying to making the angle smaller than 45 degrees to make the overlap of the pieces larger. Is there such a thing as a micro-biscut joiner that would make these joints stronger? Should I convince mom and Patrick that the leaf pattern would look better near the bow where the strip bend is much less?
I'd appreciate advice from the experts.
Thanks
Advice on Butt Joints
-
Patricks Dad

- Posts: 1476
- Joined: Wed Oct 13, 2004 1:11 pm
- Location: Warrenville, Illinois
-
Jeff in Pembroke
- Posts: 83
- Joined: Wed Jun 30, 2004 8:26 am
Hi Patrick's Dad!
Welcome to the forum :D and, I might add, great choice of canoe :!:
I think I understand the problem so I'll make a suggestion. If I've misunderstood, let me know.
Try cutting out all the pieces of the design first. Then test assemble them on the Station 0 mold. You might have to get a bit creative with masking tape and other temporary clamping techniques. However, you should be able to get all the pieces together in the right alignment and following the curve of the station. Once you have figured out how they go together with a dry run, then repeat the process only glue everything together using Station 0 to define the curve, Titebond should be more thatn adequate. When the glue dries, the pattern should follow the curve of the Station with no bending stress at all. Then hold the pattern temporarily in place against Station 0 while you continue stripping the hull. You should be able to cut the exact angle you need to mate the hull strip against the pattern using a simple butt joint. Some small spring clamps that can cross the joint line should be adequate to hold the hull strip and the pattern in alignment so the surface of the hull stays smooth.
I hope this helps.
Happy building,
Jeff
-
Patricks Dad
- Posts: 1476
- Joined: Wed Oct 13, 2004 1:11 pm
- Location: Warrenville, Illinois
Wow, Quick response. Thanks Jeff for the insights.
I had been planning on building each of the strips up one at at time and putting them on the canoe one at a time. Given that, I wasn't worried about following the curve of station 0.
I was worried about each of the joints in the assembled strips (assembled as one "slice" of the pattern) following the curve of the canoe (station 1-fore through station 0 to station 1-aft). This is the stress on the joints I'm worried about. The cove/bead joint between the strips following the curve of station 0 should be fine.
But if I follow you, adjusting the angle of the last pieces of the pattern (in a given strip) to better match the angle of approach from station 1 will lessen the stress on the joint.
Will it still be sufficiently strong to tolerate normal abuse once glassed and epoxied (I'm new at this stuff)?
Thanks again.
-
Jack in Stoughton
- Posts: 56
- Joined: Wed May 12, 2004 1:28 pm
- Location: Stoughton, WI
-
Jeff in Pembroke
- Posts: 83
- Joined: Wed Jun 30, 2004 8:26 am
Hi Patrick's Dad
Sorry I misunderstood.
I think you can use the approach you mentioned in your reply. Depending on how many pieces are involved at each strip level, I would dry fit them all in place first. If you have 4 or 5 pieces for example, a minimal angle at each joint would let the pattern follow the curve more easily than just adjusting the end pieces. Placing a scrap piece of bead and cove stripping temporarily over the top of the pattern could help in holding things in place and aligned straight against the underlying sheer strip. Once everything fits, take it all apart, and then re-assemble, gluing just the pattern pieces together. Once the glue has dried, glue the pattern assembly and the adjacent hull strips in place, again using a piece of scrap bead and cove on top to keep everything aligned. When the glue has dried, repeat the process with the next level of pattern and so on until the whole pattern is complete. Depending on how many pieces are involved in your pattern it might be a bit tedious but I think with some creative use of masking tape, bungee cords, and spring clamps you should be successful.
Jack is right, the strength of these hulls is in the double layer of epoxy/fiberglasss separated by the wood. The separation is a big part of the structural strength. It's a bit like engineered joists - the strength is acheived by separating the wood edges with OSB (oriented strand board). Think of the wood hull as the OSB and the fiberglass/epoxy as the wood edges. The pattern won't affect the strength of your hull.
Happy building and let us know how things work out.
Jeff
-
Bill in Louisiana
I just compeleted my Redbird, and I used an accent strip maded up of many pieces. I think you should have no problem with the way you are planing, applying each individural strip of pattern. Each succeeding strip will add to the integrity. The fiberglass will be your source of strength. Have a go at it and good luck.
-
guest
strength of butt joints
Hi Patrick's Dad,
Don't worry about the strength of the butt joint. Any one of us can break our butt joints we just made. But, add it to the side of your canoe, coated in glass and epoxy on both sides, and it'll be very strong. Remember, the whole bottom of the canoe (even if you use the herringbone method) is one big butt joint, and it's very strong! Take a look at some of the fantastic accent strips on this site, and I'm sure you'll agree there's no problem.
Don't worry about the strength of the butt joint. Any one of us can break our butt joints we just made. But, add it to the side of your canoe, coated in glass and epoxy on both sides, and it'll be very strong. Remember, the whole bottom of the canoe (even if you use the herringbone method) is one big butt joint, and it's very strong! Take a look at some of the fantastic accent strips on this site, and I'm sure you'll agree there's no problem.
-
plannedscapes
but, joints!
And what do you mean, KINDA like a maple leaf? You lay a real maple leaf on top of the full size pattern and tell me how it could look MORE like a maple leaf!!! Patrick's mom.
-
Erich Eppert
Patrick's Dad
One thing that most people forget is that with bead and cove strips the butt joint is held together with the bottom and top strip. Even if you place two close together it still will be as strong as the surrounding area. Where the problems start is the three or four butt joints on top of each other. Then you have a hinge that will create a sharp bend or flat spot. When you sand this area there will definately be a thin spot.
I do inlays of all types and have yet to see an area come apart without being forced. Once the glass is on the strength lies in the glass not in the wood core.
I have tried scarf joints and find that when you sand them the glue joint is more visable than the butt joint. Even when you epoxy the joint it is still there.
Take your time while stripping the canoe and things will fall in place. There are more ways out there to do things. Ask and you shall be rewarded.
Enjoy the building, the best is yet to come.
Regards, Erich.
-
Patricks Dad
- Posts: 1476
- Joined: Wed Oct 13, 2004 1:11 pm
- Location: Warrenville, Illinois
Here's an update on our butt joints and the maple leaves.
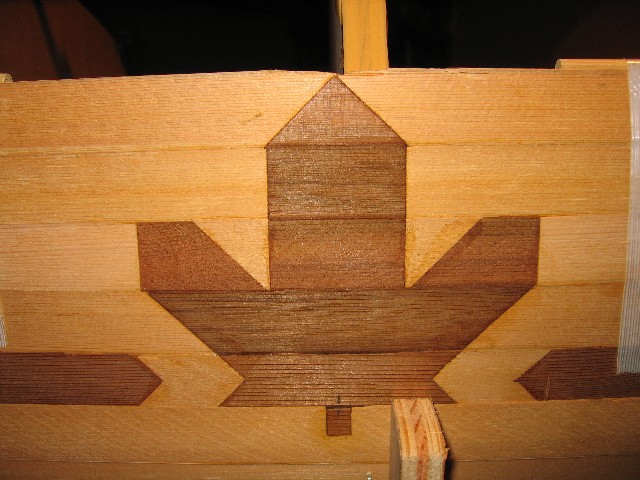
All of the joints are butt joints but we inserted a 1/16" piece of cherry in a slot cut with a router in each joint. We'll have to be careful when we sand to ensure we don't uncover the biscuits. I guess the engineer in me just wouldn't let me leave the joints as simple butts.
The stripping should go a bit faster now that we're past this part.
Now I just need to worry about 1 more butt joint (the one between my butt and the couch).
Thanks for all the advice from the experts. I'm sure we'll be back for more advice as we progress.
-
Glen Smith

- Posts: 3719
- Joined: Sat May 08, 2004 9:08 am
- Location: Baie-St-Paul, Quebec, Canada
-
Juneaudave

- Posts: 522
- Joined: Sat May 08, 2004 12:42 pm
- Location: Juneau, Alaska
- Contact:
-
Patricks Dad
- Posts: 1476
- Joined: Wed Oct 13, 2004 1:11 pm
- Location: Warrenville, Illinois

Question
Hi Patricks Dad,
I hope I am wrong, but is the leaf going to be upside down when you turn the canoe over? :shock: Please tell me I am wrong.
Bud
I hope I am wrong, but is the leaf going to be upside down when you turn the canoe over? :shock: Please tell me I am wrong.
Bud
-
Patricks Dad
- Posts: 1476
- Joined: Wed Oct 13, 2004 1:11 pm
- Location: Warrenville, Illinois
Not sure what upside down really means for a leaf. They tend to fall on my yard in lots of different orientations. But if you're thinking of the leaf on the Canada flag, you're right. It is upside down. It was the Canada flag leaf that made me use the phrase "kind of" in my original post (that got me in much trouble with Patrick's Mom, the artist- so let's not talk about that anymore).
I didn't feel qualified to replicate the Canada flag leaf on our canoe so upside down was one way to help ensure that it wasn't taken as such. I wouldn't want to insult the whole country of Canada with a bad replica on my canoe. After all, it was paddling in Canada that inspired the canoe in the first place and I want to be able to come back.
Thanks