
John,
Thanks for the response. The problems I have had concern the ribs. They did turn out as well as I would have liked. Getting the rib foot shaped has been an issue as well.
They are still a possibility, but I will have to determine that once the striping begins. In any event the bottom will be a mess if I keep the ribs in- one solution for this would be to use duckboards to "cover it up".
In any event I want to have a plan in case the ribs don't work out for me, and ribless is the plan for now. I can promise you I will give the ribs every chance I can- I too would like to keep them if at all possible.
Mark
Non-Bear Mountain Designs
It's been a while- here are where things are at:
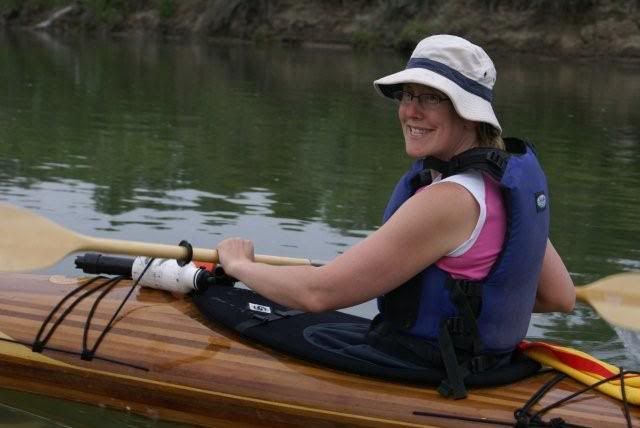
I have placed my two Adirondack projects on hold temporarliy for the summer, in order to be out on the water in my Hiawatha- so far this summer she has seen 4 lakes and two rivers- one set of small rapids left some nice scratches in her! Ahh, memories!
I have been working here and there on the two Adirondacks- you will recall I am refinishing an old one and building a new one from scratch. On the refinish project I attempted to strip off years/layers of varnish with a commercial stripper, with little success so far. I have opted for the heat gun and although it will be a big and slow job, it will strip the boat to the wood.
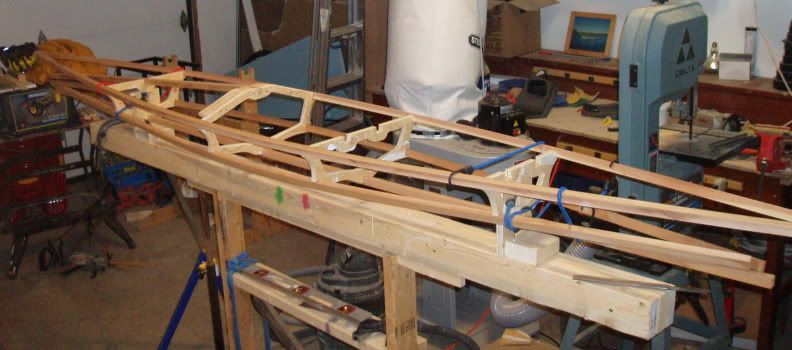
On the one I am building- I have installed 14 sets of ribs on the bottom board, and will be cutting cedar planks (not strips) for the hull. As you can see I am radically altering the building methods, however the actual design (that is shape) will be true to the original. I am far into uncharted territoryt now, however if I can fix my problem with the planking of the hull where the ribs join the bottom board I will be in business- that said I have 3-4 ideas for this and am not anticipating a major issue- just an extra step in the process. It will be a less than "pretty" however it has always been my intention to install duckboards- so the rough bits should be well hidden.
What I need to do now is choose one of the projects and concentrate on it and it alone. I have found it difficult to be running between the two all the time. That said, I will be refinishing the antique one first, with the goal of having her water ready this year. That is a big task considering I will be away on holidays for a month this summer, and plan to be on the water more than in the shop as well. So we shall see if it happens.
As always any and all comments, suggestions, and crtisicms (constructive) on this are welcomed. I will post some photos soon, (still have to take some new ones).
Edit: Here is the link to the photos- check out the "New Project" and "re-finish project" ones just posted, should be first ones at the top.
http://s85.photobucket.com/albums/k63/AdirondackBoat/
Mark,
Cantley, Quebec.
I have placed my two Adirondack projects on hold temporarliy for the summer, in order to be out on the water in my Hiawatha- so far this summer she has seen 4 lakes and two rivers- one set of small rapids left some nice scratches in her! Ahh, memories!
I have been working here and there on the two Adirondacks- you will recall I am refinishing an old one and building a new one from scratch. On the refinish project I attempted to strip off years/layers of varnish with a commercial stripper, with little success so far. I have opted for the heat gun and although it will be a big and slow job, it will strip the boat to the wood.
On the one I am building- I have installed 14 sets of ribs on the bottom board, and will be cutting cedar planks (not strips) for the hull. As you can see I am radically altering the building methods, however the actual design (that is shape) will be true to the original. I am far into uncharted territoryt now, however if I can fix my problem with the planking of the hull where the ribs join the bottom board I will be in business- that said I have 3-4 ideas for this and am not anticipating a major issue- just an extra step in the process. It will be a less than "pretty" however it has always been my intention to install duckboards- so the rough bits should be well hidden.
What I need to do now is choose one of the projects and concentrate on it and it alone. I have found it difficult to be running between the two all the time. That said, I will be refinishing the antique one first, with the goal of having her water ready this year. That is a big task considering I will be away on holidays for a month this summer, and plan to be on the water more than in the shop as well. So we shall see if it happens.
As always any and all comments, suggestions, and crtisicms (constructive) on this are welcomed. I will post some photos soon, (still have to take some new ones).
Edit: Here is the link to the photos- check out the "New Project" and "re-finish project" ones just posted, should be first ones at the top.
http://s85.photobucket.com/albums/k63/AdirondackBoat/
Mark,
Cantley, Quebec.
"The journey is the reward"- Tao saying
Update:
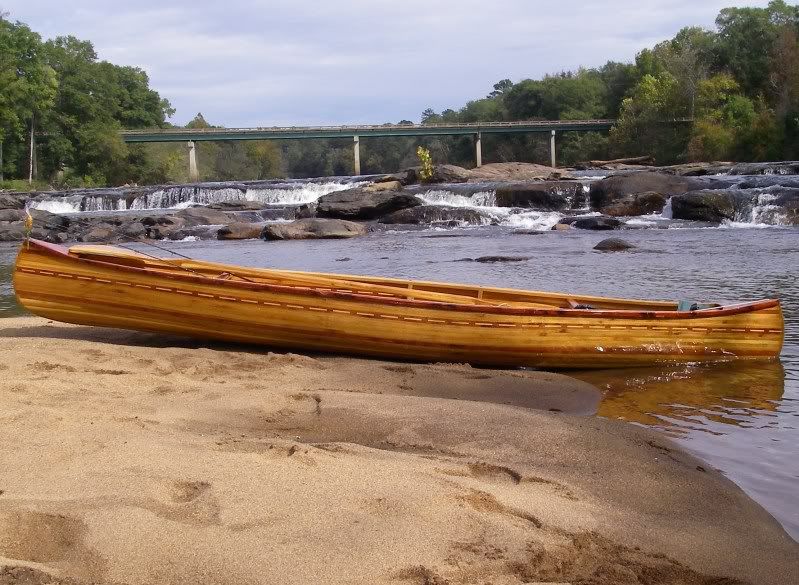
The antique boat is done- work was done in the most environmentally (green) fashion that could be utilized. All cracks were sealed with west system 205, and the hull has three coats of red paint on it- the inside was left in the original wood.
The other boat is on hold indefinitley- too many problems to deal with regarding the ribs right now- and I now have a Guideboat ready for the water as is.
The rest of the summer will be spent on the water rather than in the shop- then on to a stitch and glue kayak kit, still deciding which one.
Thats all for now, and I will close off this thread here- until I take up the challenge of the guideboat once more (some time in the distant future I suspect).
Mark
"The journey is the reward"- Tao saying

As this thread is a "Project Directory", I'll add my boat to the directory list:
17' Guillemot Kayak
Designer: Nick Schade
Finished weight fitted out & ready for use:42 lbs
Wood: mainly Western Red Cedar with Alaskan Yellow Cedar accent on the bow
Built using commercially produced forms. The strips were milled by someone else (WRC cedar strips by I don't know who - bought strips & forms off of a guy who never got around to building the kayak; AYC strips purchased through Rod Tait of Orca Boats).
Started in the fall of 2005, I finished early summer 2007. Two young kids and a change in houses didn't help the progress but it wasn't a race. Still, it is very nice to be done and now I can think of other things.
I kept a blog detailing the building process which can be found at http://pawistik.blogspot.com
Cheers,
Bryan


-
canoeblderinmt
- Posts: 415
- Joined: Sat Jul 03, 2004 12:04 pm
- Location: Butte, MT
-
Glen Smith

- Posts: 3719
- Joined: Sat May 08, 2004 9:08 am
- Location: Baie-St-Paul, Quebec, Canada
Thanks,
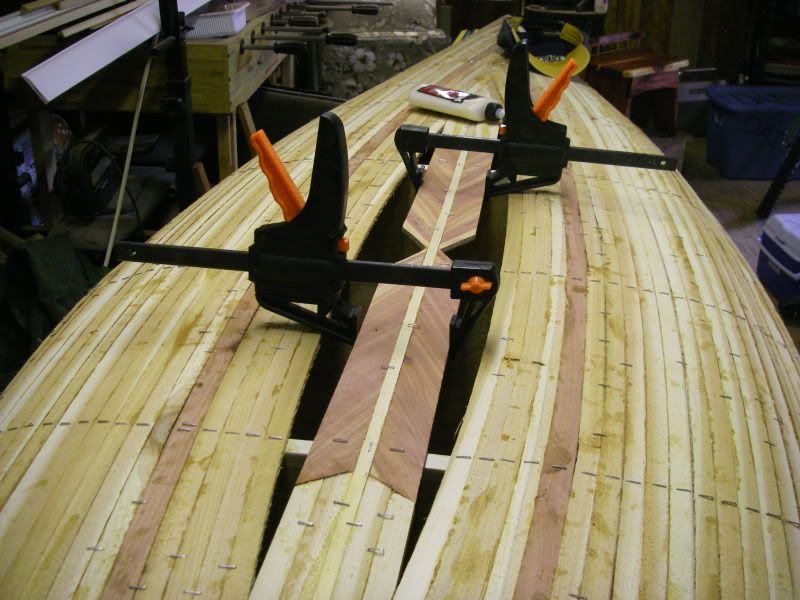
I wish I would have put more thought into what I was doing on the football area, but I am happy with the way it turned out. This canoe has a solid 2x8 block of cedar at the bow and stern. I started the football by adding strips at the center and working my way to the shear line. After I put 15 strips on the bottom I added three strips on each side building up to the center until I said wait, I should add one strip on each side and then one from the center and herringbone them. I should have started the a herringbone pattern about three strips sooner as you can see in the pictures. I am happy with it and it was my first canoe so that means there will always be next time to come up with a better design.... someday
Scott
Yost Sea Flea
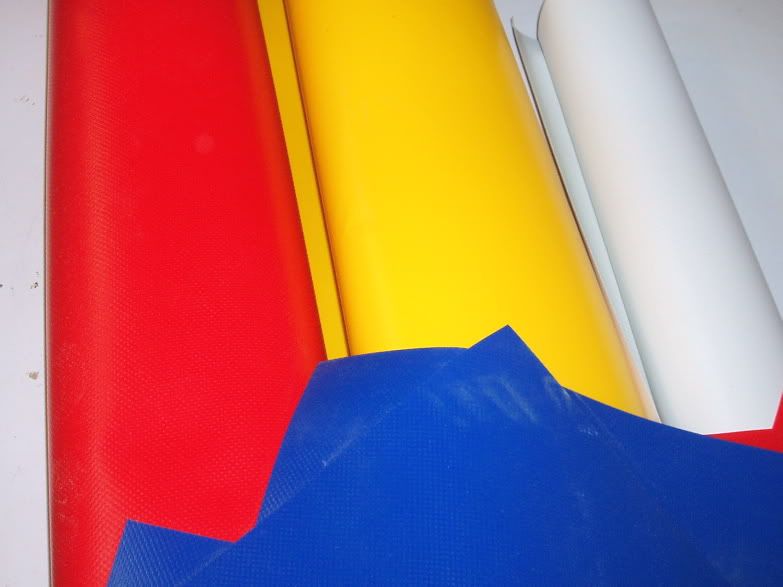
I am building an 11' Tom Yost-designed Sea Flea. It's a non-traditional skin-on-frame where the frame is built of plywood cross sections and cedar stringers. It will be skinned with 18-ounce PVC. This kayak is designed for use by kids and I have a 6 year old and a 2 1/2 year old that are eager to try it out.
As usual, I have been tracking my progress on my blog: http://pawistik.blogspot.com/search/label/kid%20kayak
That link will take you to blog postings specific for the Sea Flea.
Currently, things are farther along than shown in the photo below. I have shaped the stems, trimmed all of the stringers to their final size and shape, and have used zip ties to temporarily secure everything to the cross sections. Tonight or tomorrow (I am home from work, but will be looking after the aforementioned kids) I'll drill pilot holes for the screws that will help hold the stringers in place. I'll then use thickened epoxy to glue/screw the stringers and stems permanently into place. I also intend to coat the entire frame in epoxy to seal it. Once everything has been permanently glued & screwed together, it will be removed from the strongback and I can install the floorboards and get it ready for skinning with the PVC. I think I will paint the cockpit area (probably yellow to match the fabric I will be using for accent).
By the way, I intend to use regular wood screws since this project will not likely see saltwater. Is there any reason to use brass screws on a boat for freshwater use? (The screws will not be visible when the kayak is complete.)
Cheers,
Bryan
-
Glen Smith
- Posts: 3719
- Joined: Sat May 08, 2004 9:08 am
- Location: Baie-St-Paul, Quebec, Canada
Ordinary screws don't even hold up for long on outdoor projects that just see the occasional rain. They eventually rust out. I would go for either: Stainless steel, brass or coated decking screws (if available in the size you need).By the way, I intend to use regular wood screws since this project will not likely see saltwater. Is there any reason to use brass screws on a boat for freshwater use? (The screws will not be visible when the kayak is complete.)
Thanks Glen, I was going to argue that everything is being epoxied anyway, the screws really being there just to hold it all together and maintain alignment until the epoxy sets. However, SOF kayaks are reputed to be very flexible and the flexing at a joint *could* crack the epoxy at the joint and expose the screws to moisture. I suppose I'll find some different screws to use.Glen Smith wrote:Ordinary screws don't even hold up for long on outdoor projects that just see the occasional rain. They eventually rust out. I would go for either: Stainless steel, brass or coated decking screws (if available in the size you need).
Cheers,
Bryan

18.5 White Guide
Here's my canoe. White Guide from Gilpatrick's book. Western Red cedar with ash and red oak woodwork. It took me about two months from start to finish. I used Raka epoxy and cloth. This is addictive! I'm already planning my next one
[/code]


12 ft canoe
Built the "Otter" from NewFound boats for a "prospective" client.
To my delight this gentleman declined to buy due to other comitments.
I saw the last name of "Moores" at Newfound, wonder if it's any relation to Ted ?
It's made with Western Red Cedar, with the accent strips, decks and outer Gunwale made from Easter Red Cedar. The seat and inner Gunwale is White Oak.
40 lbs. 3 oz.