Redbird strongback
-
georgeandpat
- Posts: 32
- Joined: Wed Jul 19, 2006 9:18 pm
- Location: Los Angeles
Redbird strongback
I built my strongback this weekend and it is exactly 16 feet long, top included. I know that I can add a piece in the middle to make the top longer for a 17' 6" Redbird but is this necessary? Thanks, George.
-
Patricks Dad

- Posts: 1476
- Joined: Wed Oct 13, 2004 1:11 pm
- Location: Warrenville, Illinois
No, don't make it longer. Having the stems hang out over the end of the strongback is just fine. In fact it will be an advantage when you are shaping the stems for the stripping process. You could probably stand to make it a bit shorter. Find the right placement for the stem molds and see where the stem will land on the strongback. If the strongback is still too long, you could shorten it or notch the strongback to make access to the stem easier. But 16 feet is plenty long. We built our Redbird 6" shorter at 17' and we wished we had shortened our strongback (we built it 16' as well).
One other consideration is to build your molds a couple inches higher so the stems are farther above the strongback surface. But this will probably require more mold material.
Keep up the good work!
One other consideration is to build your molds a couple inches higher so the stems are farther above the strongback surface. But this will probably require more mold material.
Keep up the good work!
-
georgeandpat
- Posts: 32
- Joined: Wed Jul 19, 2006 9:18 pm
- Location: Los Angeles

georgeandpat,
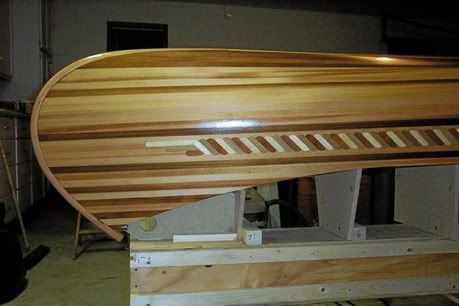
Randy is absolutely correct. 16' is just right for the Redbird. Attached is a photo of my Redbird on my 16' strongback. The strongback could have been shorter by a few inches or the station molds could have been taller by a couple inches. Either of these would have helped, not necessary but would have helped. In the picture you can see how much the stems hung over each end of the strongback. I busted my knuckles a few times while shaping the stems. Keep in mind though that you want the hull at a good hight to work on. Otherwise you will end up bending over too much or always have to reach beyond comfort.
Randy is absolutely correct. 16' is just right for the Redbird. Attached is a photo of my Redbird on my 16' strongback. The strongback could have been shorter by a few inches or the station molds could have been taller by a couple inches. Either of these would have helped, not necessary but would have helped. In the picture you can see how much the stems hung over each end of the strongback. I busted my knuckles a few times while shaping the stems. Keep in mind though that you want the hull at a good hight to work on. Otherwise you will end up bending over too much or always have to reach beyond comfort.
-
Charles G. Clark, Jr.
- Posts: 72
- Joined: Tue Sep 12, 2006 5:06 pm
- Location: Huntsville, AL
Charles,
It's been so long since I did it that I almost forgot some of what I went through. I looked back in the forum and found my post about this and here is what it says.
The accent stripe I made for my canoe is made of Cherry, Sassafras and Pine. It is supposed to look like a rope. The pieces are 5/8" x 2 1/2" x 1/4". I cut lengths of 5/8" thick lumber into 2 1/2" lengths then ran the end grain through a 3/4" round over bit in my router table. Once I had enough of each specie, I ran them through the table saw set at 1/4" which gave me hundreds of little pieces. I made a jig that allowed all the pieces to be glued at a 45 degree angle. The jig was only good for 24" at a time so I had to use it several times. I used it again to attach the 24" lengths together in order to make the stripe long enough for the canoe. Once all the lengths were glued together I layed the rope on top of two WRC strips and aligned the edges so that I could trace the rope onto the strips with a pencil. When this was done I used a 3/4" drum sander in my router table to remove everything up to the line. This created a perfect fit for the rope to mate with the WRC. At this time it was ready to glued together. I had a cove on one side exposed and a bead on the other so I put a 1/4" dowel in the cove and used masking tape to hold everything together while the glue dried.
The stripe was easy to make but was difficult to install. If I had made it smaller it would have bent easier. It's something like 2 3/4" wide. It never felt like it would break but it was difficult to bend it the way I wanted it. I followed the sheer line out to the station #5. I had to have my wife help me with this step. No matter what I tried, I could not install it without extra hands. Part of the problem was that I found it difficult to protect the cove unless she held her end in just the right place until I could work toward her.
I probably have a picture somewhere in this mess of mine that shows the jig I made. I have so many of the project that I just don't remember.
-
georgeandpat
- Posts: 32
- Joined: Wed Jul 19, 2006 9:18 pm
- Location: Los Angeles