Hi guys,
I'm just about to fit and glue the inwales and outwales on my 16' Prospector. I have plenty of clamps and wondered if it still necessary to secure the gunwales with screws as Canoecraft describes. So far I have followed the instructions in the book and have been very pleased with the results. I would like to limit the number of screws I put in the boat but wonder if it will be a strength issue or cause problems later with the seats.
Thanks
Rudy
Gluing the Gunwales
-
Patricks Dad

- Posts: 1476
- Joined: Wed Oct 13, 2004 1:11 pm
- Location: Warrenville, Illinois
-
John Michne

- Posts: 116
- Joined: Sun May 09, 2004 7:36 am
- Location: Clifton Park, NY
- Contact:
You might want to check my web site, http://michneboat.com. Scroll down to the end of the opening page and click on My Web Site, and then click Builder's Corner. There is an article in the list about installing gunwales. The screws are used only until the epoxy cures, then are removed and contrasting plugs installed.
- John
- John

Gunwales
Rudy, here's a few pictures that might help.
Epoxy is pretty slippery and it takes some creative clamping to hold the inwale/outwale in place without screws. This is especially true near the stem ends.
Ed...
http://s12.photobucket.com/albums/a237/ ... /?start=80
Epoxy is pretty slippery and it takes some creative clamping to hold the inwale/outwale in place without screws. This is especially true near the stem ends.
Ed...
http://s12.photobucket.com/albums/a237/ ... /?start=80
Ed Alger
Gluing the Gunwales
Thank you all for the advice. I like the idea of using a few screws and then taking them out and using plugs. I'll let you know how it goes.
Thanks again.
Rudy
Thanks again.
Rudy

-
thechrisperkins

- Posts: 23
- Joined: Sun Mar 19, 2006 6:34 pm
- Location: Alaska
- Contact:
Rudy,
I struggled with this question myself. I too did not want to leave screws in my Redbird. I also did not want to try and struggle with clamping down the gunwales over a notoriously slippery epoxy slurry.
I ended up doing a compromise. I used screws to make a self aligning/clamping jig. Which used spacing blocks (about every 12") to attach the decking and inside gunwale first, to the correct fit. Once everything was aligned, I simply loosened the screws enough to create a 3/16"=1/2" gap, then used a zip lock bag (replicating a cake icing bag) with a corner cut off to squeeze the epoxy-slurry into the gap. Then I just tighten down the screws again as a self aligning pre-made jig. I found it was easiest to work from one end to the other... not starting in the middle.
Once the interior gunwales were set up, I then cut the stripped shell "almost" to flush. I left about 1/16"th of the shell proud.
Then I started with the outside gunwale from the center of the boat and worked (from the previous screw holes) sequentially to the ends of the boat. This effectively completed the self aligning jig from the inside out. Again I backed the screws off enough to create a gap for the epoxy-slurry and tightened it down, mindful of the squeeze out.
When everything was set up and cured, I enlarged the screw holes to accept a 1/4" dowel, pre-coated the interior of the hole, and the dowel and plugged the holes. I intentionally left the dowels long so that I had enough leverage to contol the grain (parallel to the water line...details) direction of the dowel. Once everything was set up, I trimmed the dowels flush to both sides, and sanded the top for a seamless transition from inside to out.
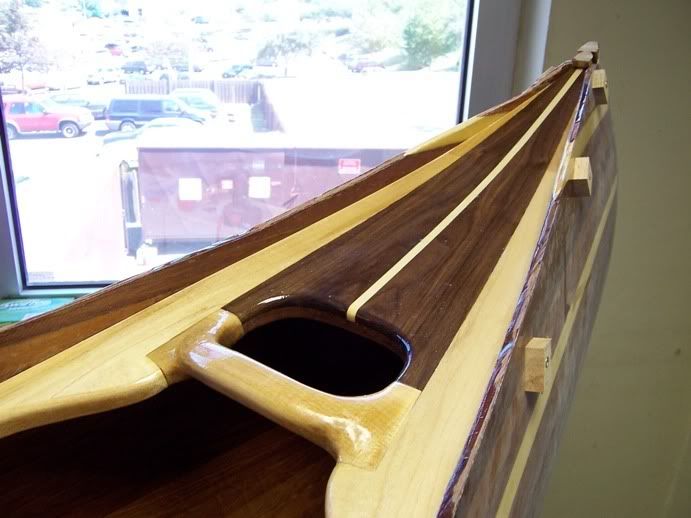
Below is a picture of fitting the deck with the spacer blocks (to protect the shell), unfortunately, I didn't take any pictures of the gunwale fitting.
http://i68.photobucket.com/albums/i40/t ... detail.jpg
I hope this helps your process in some way, Other pictures can be found at http://s68.photobucket.com/albums/i40/t ... s/?start=0
-Chris
I struggled with this question myself. I too did not want to leave screws in my Redbird. I also did not want to try and struggle with clamping down the gunwales over a notoriously slippery epoxy slurry.
I ended up doing a compromise. I used screws to make a self aligning/clamping jig. Which used spacing blocks (about every 12") to attach the decking and inside gunwale first, to the correct fit. Once everything was aligned, I simply loosened the screws enough to create a 3/16"=1/2" gap, then used a zip lock bag (replicating a cake icing bag) with a corner cut off to squeeze the epoxy-slurry into the gap. Then I just tighten down the screws again as a self aligning pre-made jig. I found it was easiest to work from one end to the other... not starting in the middle.
Once the interior gunwales were set up, I then cut the stripped shell "almost" to flush. I left about 1/16"th of the shell proud.
Then I started with the outside gunwale from the center of the boat and worked (from the previous screw holes) sequentially to the ends of the boat. This effectively completed the self aligning jig from the inside out. Again I backed the screws off enough to create a gap for the epoxy-slurry and tightened it down, mindful of the squeeze out.
When everything was set up and cured, I enlarged the screw holes to accept a 1/4" dowel, pre-coated the interior of the hole, and the dowel and plugged the holes. I intentionally left the dowels long so that I had enough leverage to contol the grain (parallel to the water line...details) direction of the dowel. Once everything was set up, I trimmed the dowels flush to both sides, and sanded the top for a seamless transition from inside to out.
Below is a picture of fitting the deck with the spacer blocks (to protect the shell), unfortunately, I didn't take any pictures of the gunwale fitting.
http://i68.photobucket.com/albums/i40/t ... detail.jpg
I hope this helps your process in some way, Other pictures can be found at http://s68.photobucket.com/albums/i40/t ... s/?start=0
-Chris
Air and Water, we need both to survive. The medium is irrelevant, movement is life.