Further update on stapless Freedom incl. tips and tricks

Welcome to the new Bear Mountain Builders Forum - an interactive internet service we provide to encourage communication between canoe and kayak builders
Post Reply
Tim Eastman
Posts: 245
Joined: Sun Oct 23, 2005 12:40 pm
Location: Grand Rapids, Michigan, U.S.A.

Further update on stapless Freedom incl. tips and tricks

Post by Tim Eastman »

[This post is also posted in the builder's tips area].

Ran into some issues last year with trying stapless method of only rubber bands. Try as I might the rubber bands were not holding the strips tight to the forms. Even hot glue was not holding the strips to the forms and was messy, time consuming etc. (could be wrong glue used too).

Money ran out (unemployed still) and temperatures went down (unheated garage for a workshop) so I had most of a winter to think this over.

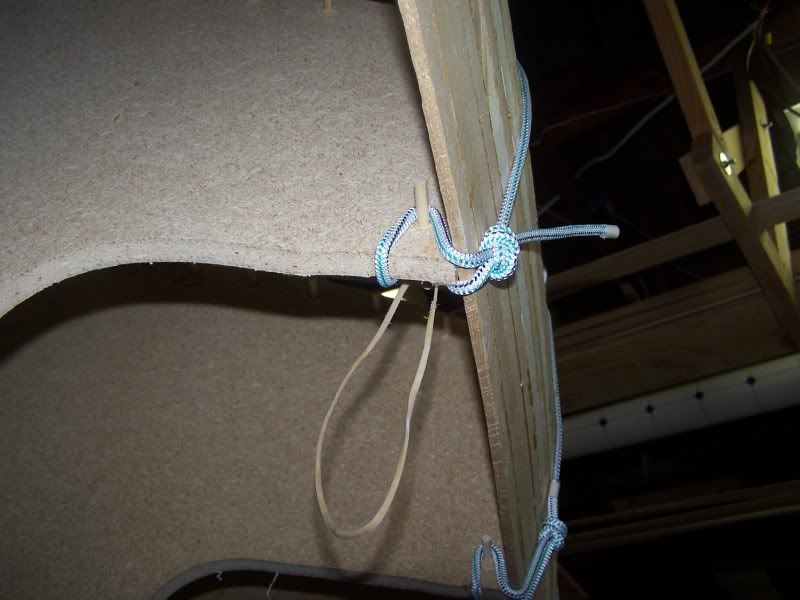
The rubber band Idea is not new and is explained in other areas of this board. But the idea for the bungee cord clamping to the forms was borrowed from Bear Mountain Boats' stapless kit. Frankly I couldn't afford it but it looked like a great idea. But their idea was for bead and cove strips and would be difficult to use on rolling bevel without damaging the "corners" of the strips.

So I stayed with the rolling bevel but kinda borrowed their idea of clamping the hull to the forms.

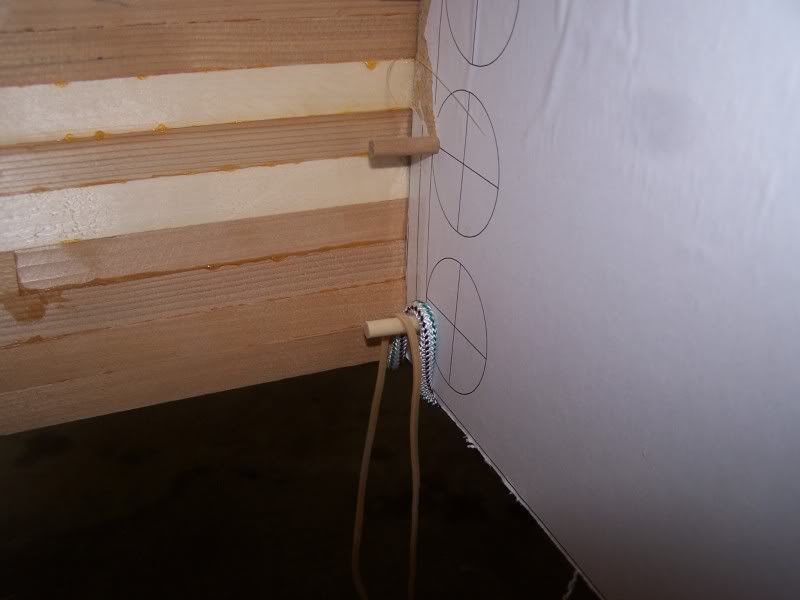
If you have a drill press (or a Shopsmith) drill some 1/4" holes around the perimeter of the forms about a fist distance apart. These will contain 1/4" dowels which hold the rubber bands. This is a little extra effort but you'll get a lot of mileage out of doing this later on.

Image


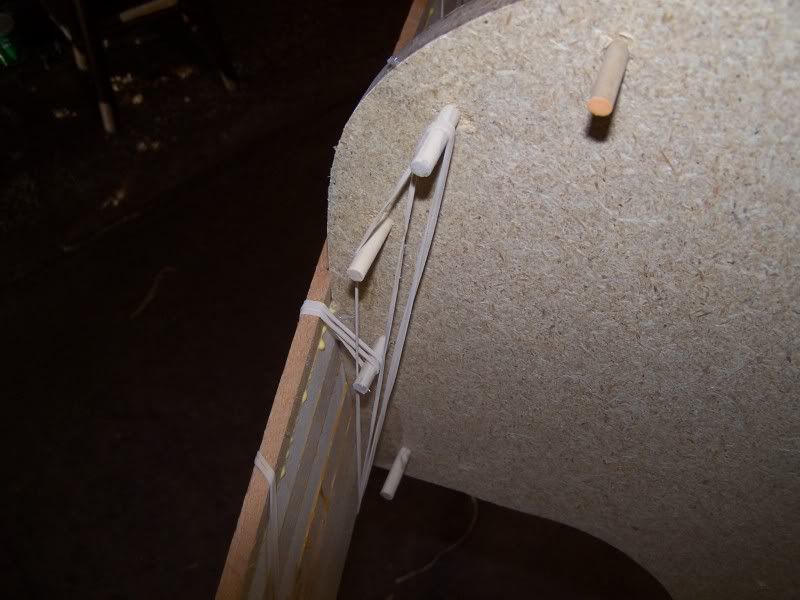
Important note! I did staple the beginning strip to the hull forms to keep the above strips from sliding off the bottom of the form. The gunnels will cover it anyway so I figured why not.

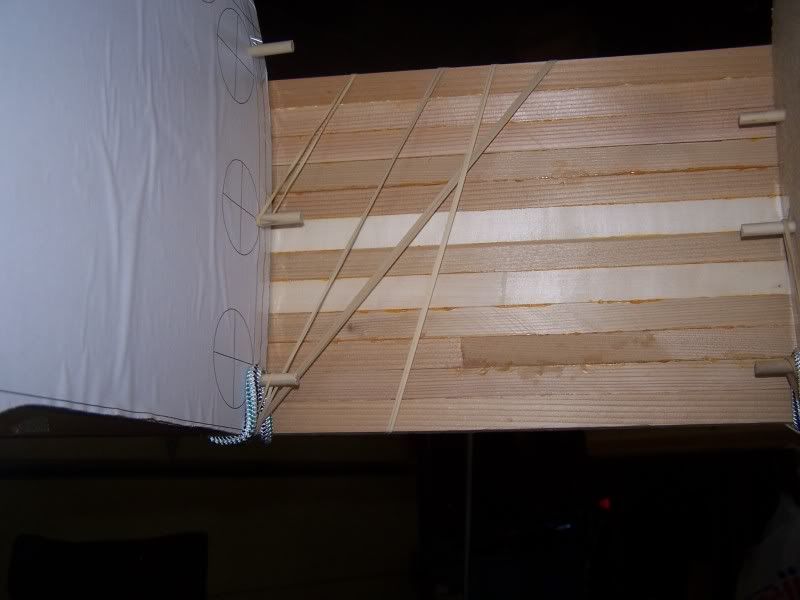
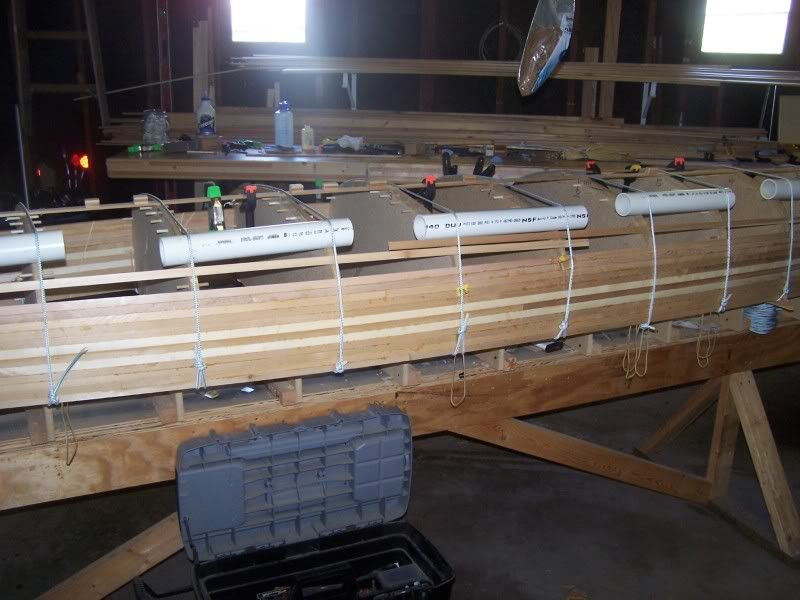
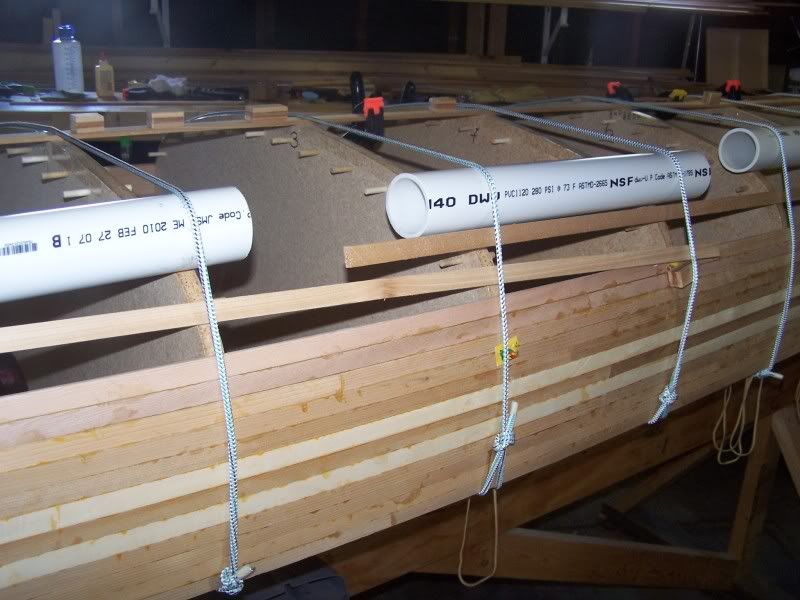
The bands will give you a LOT of grief when adding new strips unless you do something to hold the bands up and away from the hull forms. This is where some 2.5" PVC pipe comes in handy. The pipe sections go under the bands so the strips can be slipped in and out along the length of the canoe. Ten foot section of PVC pipe was around $6 at a local big box store.

Image

The neat thing about this is the glued strips with the rubber bands get bungee clamped to the hull forms and then the pipes get slid over to the other side to slip in the next strip. Which increases band pressure on the newly glued strips and further presses them against the hull forms.

Image

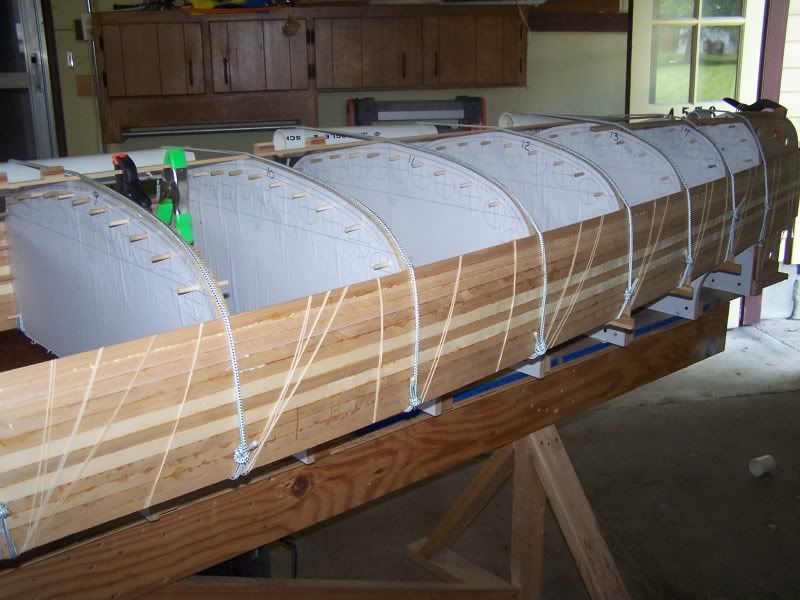
Strips get dry fit and checked for proper splice location...
Image

Image

Extra bonus; the bands actually hold up the new strips while you run your glue line.
Image

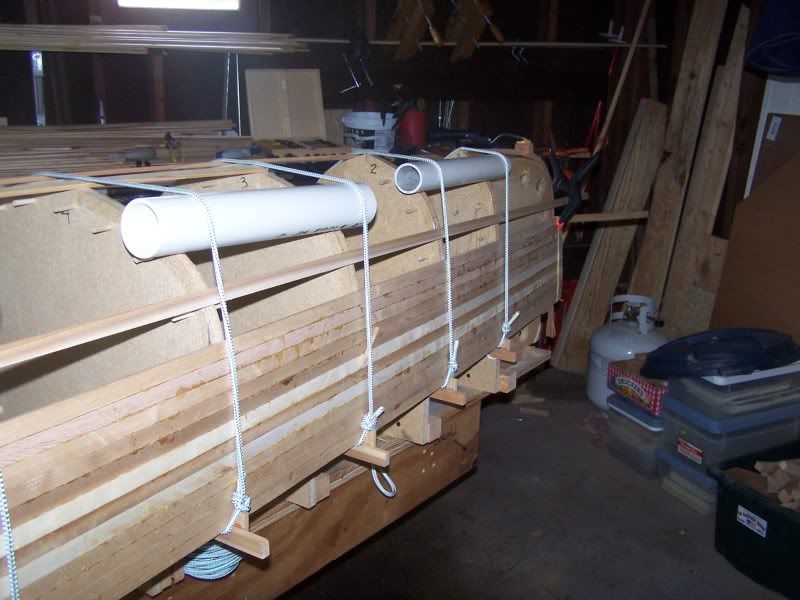
Functional shots of attaching the bands to the forms;
Image

Image

Image

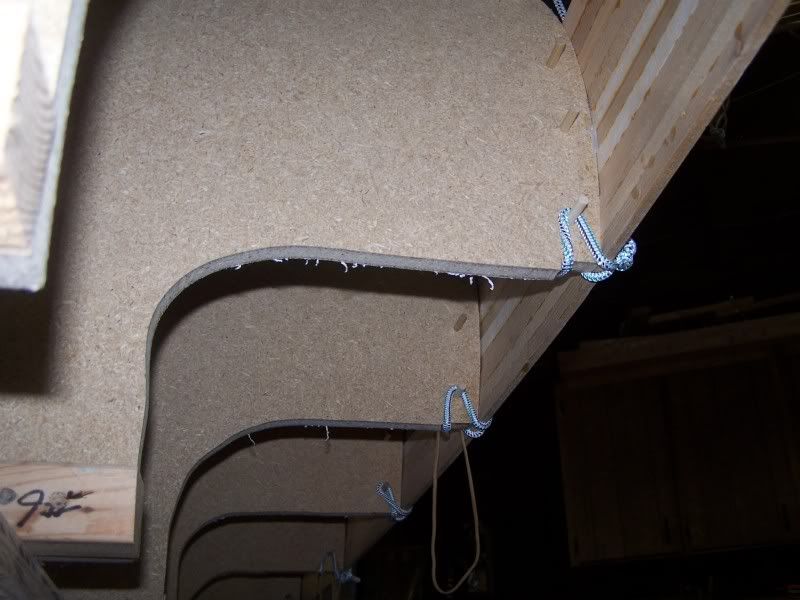
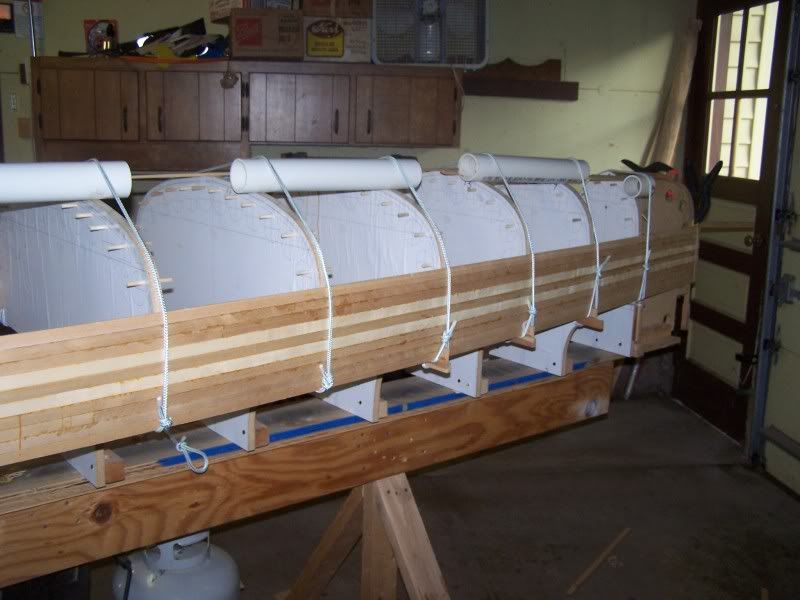
Final shot showing rubber bands in use and bungee clamps in place.
Image
Tim Eastman
~~~~~~~~~~~~~~~~~~~
Be an example worth following
pumpkin
Posts: 59
Joined: Fri Jan 22, 2010 9:18 pm
Location: North Dakota

Post by pumpkin »

I just finished my canoe. I beveled my strips and found it quite easy to get a good fit. I used a clamp on each form, large binder clips and string type packing tape. After the glue on each strip set I pulled off the binder clips and tape and used a dot of hot melt glue in the V between the form and the strip and removed the clamp. The binder clips hold the strips in good alignment.

My first strip was held in place with hot glue. I used no staples.

Occasionally in the chine area I found that strips wanted to pull away (bulge) a bit so I put a piece of tape down a half a dozen strips on the outside and ran it into a nail in the strongback. I could adjust tension on the tape to eyeball everything into a fair curve. I left these pieces of tape in and kept adding strips. There were about a dozen total and when the stripping was done I cut the tape close to the strip and pulled from the inside. The tape all popped through with no visible “hole”.

The hot glue was stuck to the form tape so getting the forms out turned out to be easy. Then I pulled the form tape out of the inside of the canoe hot glue and all. There was a bit of hot glue left but it was proud enough that I was able to grab it with pliers and pop it from the strips.

My stripping supplies cost about $20. for binder clips, tape and glue sticks. The clamps I already had. It takes about a gallon bucket full of binder clips to do a pair of strips but I think we paid around $2. for 6.

Honestly, the best tool was the packing tape.

I looked at lots of methods and tried a few before I found what I liked. I say use what you have and what works for you. I don’t think any of this is written in stone.


I don’t think that I could slip a strip in from the end as you are. I just don’t have the room. It looks like an interesting set up.Thank for sharing and the pictures.

Matthew
Tim Eastman
Posts: 245
Joined: Sun Oct 23, 2005 12:40 pm
Location: Grand Rapids, Michigan, U.S.A.

Post by Tim Eastman »

Matthew - the tape is intriguing. I also tried various experiments with fishing line but found I couldn't keep the tension constant or controlled. But the tape does not produce a (noticable) gap? Sounds good.

My garage (shop) gets quite hot. Do you think the glue from the tape would be an issue trying to get it out of the wood fibers? Would the tape pull some of the wood fibers out when removing?

And how are the binder clips used? Do they clamp one strip to the previous one or are you clamping the new strip to the form somehow?
Tim Eastman
~~~~~~~~~~~~~~~~~~~
Be an example worth following
pumpkin
Posts: 59
Joined: Fri Jan 22, 2010 9:18 pm
Location: North Dakota

Post by pumpkin »

I tried fishing line for 30 seconds before I figured out it wasn’t for me. I had no ill effects from the tape, tape glue or tear out. Even after it was on for a month it came right off. It is great for putting tension on the strip glue line. I found myself binder clipping a strip in place, then putting tape every foot or so and clamping the strip to the form as a final step all in about 3 to 5 minutes. Come back in twenty minutes and repeat starting with removing tape.

The binder clips hold the strips in alignment along the length. I had strips that turned almost 90 degrees from boat stems to center. The clips made it easy to twist the strips. I didn’t have any strips break or split. I made sure to align the inside edge of all of the strips to make sanding easier. http://forums.wcha.org/attachment.php?a ... 1269827588 shows the binder clips. I don’t think I have any pictures showing the tape.

Some final construction pictures can be seen here. http://forums.wcha.org/showthread.php?t=5748 I think you would have to look pretty hard to see tape damage or gaps.


Matthew
Tim Eastman
Posts: 245
Joined: Sun Oct 23, 2005 12:40 pm
Location: Grand Rapids, Michigan, U.S.A.

Post by Tim Eastman »

Well Matthew I looked pretty close at your final fair and your glassing shots. You do good work and I may yet swipe some ideas. :applause
Tim Eastman
~~~~~~~~~~~~~~~~~~~
Be an example worth following
pumpkin
Posts: 59
Joined: Fri Jan 22, 2010 9:18 pm
Location: North Dakota

Post by pumpkin »

I’m not sure you noticed but looking for gaps should be easy. In the outer hull glassing pics there are two 500 watt lights inside the hull heating things up. Any gaps left by the tape should show pretty well. I have no fear using it again.

Thanks for the complement. I'm hiding from the sun today after a day at the lake yesterday.

Matthew
Post Reply