
Hi guys,
I finally took the time to start a photo-journal of my pending Huron Cruiser project. So far I've only completed my strips, but as a relative newbie to carpentry, I found this to be a big undertaking. I want to continue building canoes in the future, so I've also been experimenting with jigs, etc, as I go.
All told it's already been 5-6 weeks since starting the strips. It's surprisingly difficult to find workshop time with 2 young daughters, work, etc!
I should add that I wouldn't even be attempting this project without CanoeCraft, the Bear Mountain Builders forum, and John Michne's Builders Corner, so thanks very much to everyone for helping me get started.
I'll update this regularly through the winter as I make progress (and/or mistakes...)
Photo-Journal Link:
http://imgur.com/a/H1QQ4#25
Huron Cruiser Project Log
-
Patricks Dad

- Posts: 1476
- Joined: Wed Oct 13, 2004 1:11 pm
- Location: Warrenville, Illinois
Re: Huron Cruiser Project Log
Keep those pictures coming!

Re: Huron Cruiser Project Log
Nice work !
Looks like you've got a great start !
Jim
Looks like you've got a great start !
Jim
Keep your paddle wet and your seat dry!
Re: Huron Cruiser Project Log
Thanks guys!
I'm planning to get strips for the stems cut this weekend, and pick up a few sheets of 1/2" MDF to start tracing the molds.
I'm planning to get strips for the stems cut this weekend, and pick up a few sheets of 1/2" MDF to start tracing the molds.
-
Phantom Power
- Posts: 5
- Joined: Thu Jan 15, 2009 5:07 pm
- Location: Gulf Islands, BC
Re: Huron Cruiser Project Log
Photos look great so far !
I'm woefully behind on my own build log as well. Perhaps I'll get inspired and bring it up to date.
I'm woefully behind on my own build log as well. Perhaps I'll get inspired and bring it up to date.
Re: Huron Cruiser Project Log
Hey Guys,
I haven't posted an update in a while (progress has been slow), but this weekend I hit a nice milestone. I finished filling in one side of my football and got my center line cut!
I considered a few options, for the cutting process, but ended up just following the CanoeCraft suggestion of roughing the cut with a sharp chisel, then used a rabbet plane to take it down to the line.
I was nervous while cutting, and using the rabbet plane was a new experience, but overall it went well!
I'm preparing to fill the other half of the football next. Is it just me, or does the process of fitting these strips sound extremely tedious/finicky? Any tips would be appreciated!
Anyways, onto some pictures.
All strips in place for the first half:

After the cut:

A few perspectives:


I haven't posted an update in a while (progress has been slow), but this weekend I hit a nice milestone. I finished filling in one side of my football and got my center line cut!
I considered a few options, for the cutting process, but ended up just following the CanoeCraft suggestion of roughing the cut with a sharp chisel, then used a rabbet plane to take it down to the line.
I was nervous while cutting, and using the rabbet plane was a new experience, but overall it went well!
I'm preparing to fill the other half of the football next. Is it just me, or does the process of fitting these strips sound extremely tedious/finicky? Any tips would be appreciated!
Anyways, onto some pictures.
All strips in place for the first half:
After the cut:
A few perspectives:
-
Patricks Dad
- Posts: 1476
- Joined: Wed Oct 13, 2004 1:11 pm
- Location: Warrenville, Illinois
Re: Huron Cruiser Project Log
The other side is a bit more tedious. But if you follow the directions in Canoecraft you will quickly get the hang of it and each one will be a rewarding experience when it slides into place with a perfect fit. I found the description in Canoecraft to be a bit confusing the first time I read it. I eventually gave up and invented my own approach to do it. Then later when I re-read the book I found that I had (re)invented the exact same procedure described in Canoecraft!
The use of benchmarks with a sharp pencil is the key to success. Get one end to fit perfectly and then dry fit it as far as you can (it will be longer than needed as the other end hasn't been cut yet). Once partially dry fit, make a small pencil mark across the new strip and it's adjacent neighbor near the cut & fit end (you will line these 2 marks up when you install the strip with glue). Also make a similar mark near the other end (yet to be cut) across the new strip and it's neighbor (about 2' from the end - somewhere it's easy to find as you work to cut the 2nd end). This mark will help you ensure you are cutting the strip to the overall right length.
Now, start cutting the 2nd end of the strip to the right angle and dry fit it. Check to see how far off you are with your marks (If you are still x" long, shorten the strip by x"). Shorten the strip and dry fitting it until you have the benchmarks lining up. Once you get to this point, you know that both ends of the strip will fit perfectly and the strip is the right length. You can dry fit the whole strip if you like (later on you won't bother because you will be confident). Apply glue and install the strip. Clamp as you have all the other strips. With practice, you will develop a feel for where to cut and there won't be too much trial and error. You'll get good at it and each strip will fit nicely without a lot of fiddling around.
I cut my angles with a small rotary sawblade on a dremel tool and the used a block plane to get both angles just right. Be sure to check both angles on any given strip end by looking at the inside as well as the outside as we you go. Dry fit the first few to make sure you have the process down right. You will find that once the joint has glue on it, the strip will slide in easier. As the strips get shorter, they require a bit more patience. Don't get frustrated.
If you find that you accidentally cut a strip too short, set it aside and use it later on a shorter location.
Enjoy the rest of your build.
Re: Huron Cruiser Project Log
You might find Nick Schade's video on Youtube helpful. I know for me, it's easier to see something done, than to figure it out from a book.
The nice thing about this method, is you only have to fit one side, as opposed to a Herringbone pattern, where you have to hand fit both sides !
Once you have a few under your belt, it becomes a lot easier, until you get to the last few.
I found it easier to make a design at the very middle, and fit the pieces in.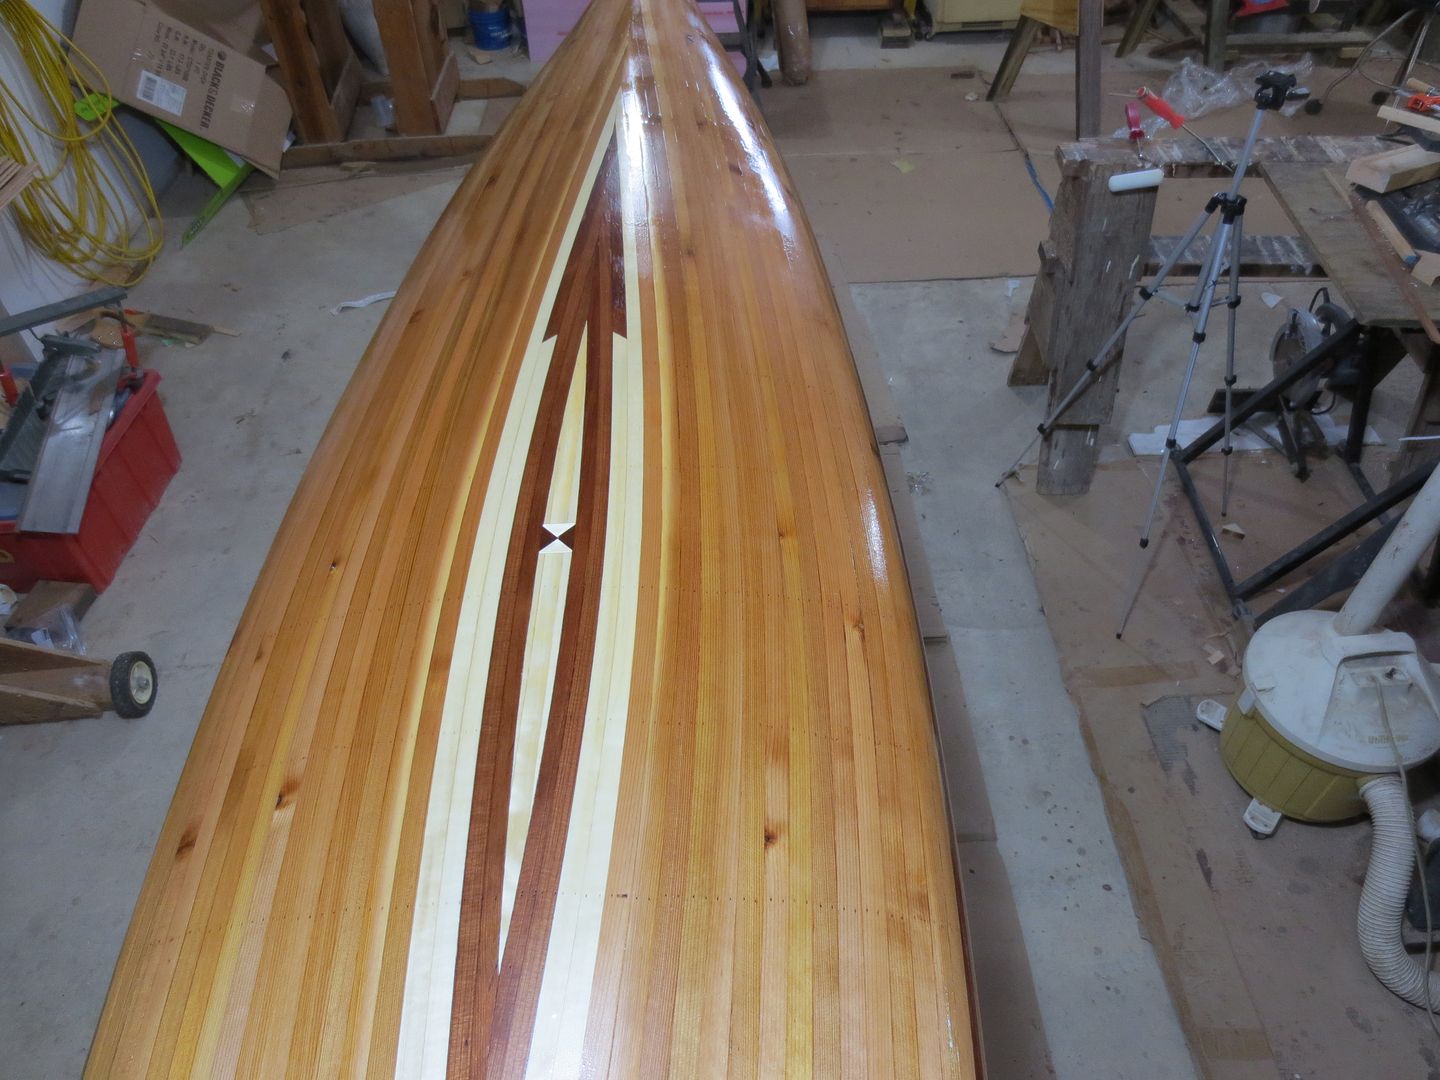
Jim
Keep your paddle wet and your seat dry!
Re: Huron Cruiser Project Log
I toured your journal, Your strips looked great And your canoe isn't too shabby either !
Nice to have a little helper sometimes.
Keep up the good work !
Jim
Nice to have a little helper sometimes.
Keep up the good work !
Jim
Keep your paddle wet and your seat dry!
Re: Huron Cruiser Project Log
Thanks very much for the suggestions, guys. The method you describe sounds very good, Randy. I like the idea of using the marks to fit one end at a time.
Jim, I went looking for that video you referenced by Nick Shade, and I ended up watching it, plus about a dozen others of his. He's good, eh? I love how easy he makes it look, although I think I am going to try to stick to full length strips for this one as opposed to butting separate segments. Not that it really matters I guess, but so far I've managed to only have a few butt joints (The black walnut).
Thanks for the kind words, too. It means a lot coming from such an experienced builder!
P.S. - I might have said it before, but damn that football design looks sharp! I might try to get fancier on canoe #2, but this time around I'll be proud as a peacock if I can just close the bottom up tight.
Re: Huron Cruiser Project Log
I just reviewed some of Nicks videos, the sped up ones won't help you much.
Filling in a kayak, normal speed should make more sense.
Every builder develops their own technic ! Mine varies from Nicks a lot. And yours will be yours !
Have fun, and keep the pictures coming !
Jim
Filling in a kayak, normal speed should make more sense.
Every builder develops their own technic ! Mine varies from Nicks a lot. And yours will be yours !
Have fun, and keep the pictures coming !
Jim
Keep your paddle wet and your seat dry!
Re: Huron Cruiser Project Log
So I just did a test run of fitting a strip on the open side of my football. I'm not going to lie...it was pretty frustrating, and I ended up deciding to take a breather for the evening and will try again tomorrow. At some point you just know that you have to walk away. =P
I was able to get the first end of the strip shaped reasonably well and dry fit, but I find at this stage the strip still has enough stress bending across the hull that for whichever end I'm working on, the other end is being a real pain in the arse to manage (at this stage my strip is still 15' long).
I also had a horrible setup for trying to plane the end of the strip, and so that was more difficult than it should have been, with the strip bending/flopping around as I tried to work with it. I might have to clamp them down ala CanoeCraft after all.
Even more troublesome, after getting the first end dry-fit, I could hardly get it to stay still long enough to mark the other side given the stress the strip is under. I was being a bit impatient, so maybe tomorrow I'll try actually clamping the fitted first half of the strip right down in place while I go mark the other, then unclamp it to shape that second end.
Am I missing something obvious. or is it just a matter of more practice/patience? Even after all the time filling in the first side, I felt like a bull in a china shop as this strip (with its delicate cove!) constantly banged/flopped around on the side canoe lol.

Re: Huron Cruiser Project Log
Just be patient, there is a knack you will develop ... you are doing exactly what you should... walk away and come back calmer with a new plan of attack.
I use straps when I do the stripping, when I get to this stage I fit one end, then use the straps to secure the fitted end in place. I use a couple more straps to hold it in place while I mark the other end for fitting.
It works for me, you will need to figure what will work with your setup.
Good luck
Brian
Re: Huron Cruiser Project Log
That's a good suggestion, Brian, thanks. I might experiment with using my straps tomorrow as well. I eyeballed them tonight and nearly went that route.
The only reason I hesitated was due to a previous incident with straps that weren't quite tight enough. As the pressure on the strip increased while bending into place, it suddenly 'flipped up' under the strap, and the cove took a nasty beating. Since then I generally only use the surgical tubing/L-shaped jigs for most of the heavy work of pulling strips into the cove/holding against the forms, respectively.
I think I might try using a few of my L-jigs tomorrow, even if it will be a bit slow to fit/remove. If it works I'll go with it...at least until I get my training wheels off/figure out something better. ;)
Re: Huron Cruiser Project Log
Here's a post that seems relevant to your problem. viewtopic.php?f=1&t=1725#p10542
Rob Macks has some advice on bending strips with a heat gun, but apparently kiln-dried wood will often scorch a bit before bending (he prefers air-dried): http://www.laughingloon.com/shop.tips.html
Rob Macks has some advice on bending strips with a heat gun, but apparently kiln-dried wood will often scorch a bit before bending (he prefers air-dried): http://www.laughingloon.com/shop.tips.html