Okay, as requested ... this will be a basic "how to" for the Double I made ... feel free to critique, but I will just respond with "it was the first one I made", but to be honest, there isn't much I would change ... a few things, but over all it is light and works really well.
I modeled it after the GreyOwl Tempest 250 cm that I currently own, I picked that up at the factory, within driving distance of my house, they are pretty great folks to deal with. This one is 260 cm, I wanted just a little bit more length. This is not a kayak paddle, but a canoe paddle ... they are not the same, the water entry angles and the lengths are usually significantly different. I say this not to debate the point, but to point out that if you weren't aware, then maybe it is an area you may want to research a bit to satisfy yourself that you know what you want. The outline here is the same regardless of type, the only difference will be the shaft length and shape of the blade ... which is exactly the 2 things all paddles need to have fitted to the user and task.
I picked up the carbon fiber ferrules from Duckworks, they aren't too expensive and are well made.
When making wooden paddles, you can just carve the whole thing from a single piece of wood or build the paddle blank from multiple pieces of wood, I am pretty firmly in the multiple piece camp.
First pic and step one ... I make the shafts from multiple pieces and oppose the grains to make it warp resistant, in this build the shafts are white cedar , the blanks were made of white cedar and western red cedar. The pic is actually from another batch, but turns out it is the only pic of the shaft form I think I have, piled on top are paddle blanks for otter tail paddles. The narrow side (you can see the clear tape) is aligned with the outside edge of the strong back and then screwed into position, this pulls it down to give a flat bottom, the raised piece on this is screwed and glued to the base and has been trimmed in the saw, to give a vertical, flat surface, creating a 2 plane straight edge.

If you decide to try and make laminated shafts, please take this warning. If you simply glue and clamp strips, they will warp .... you need to use a form that clamps them straight in both directions, hence my form screwed down to the strongback. Doing paddle blanks is straight forward, decide the shape, figure the maximum width of the blank (paddle width - shaft width, divided by 2) ... glue up a blank and resaw it in mirrored halves. Resaw rig for Radial saw .... you get the idea, whatever works for your shop

Join the halves to the shaft ... there are shims under each blade half to center it on the shaft ... you also mark, on the shaft, where each blade ends to help keep it all aligned .... before you ask, no ... we don't worry about the blade shape yet, just that we have sufficient material for the desired shape.

This double blade will have a convex shape, so that is the next task ... make up a router setup to give us the shape, a base with the required curve

A guide plate on the router bottom to allow the router to follow the curve

I did a test to check that the curve cutting would work as planned ... it seems to

Clamp in the paddle blank, align ends to balance where the curve ends, so that it is even ... basically, you want the curve to start and end at a specific local on your paddle, adjust it to make that happen ... notice the stops I added on the bottom of the router plate, to keep the router just on the paddle

Both blades have been "curved" or carved in this pic, although it is after the blade shape was added, pretend they look square ... don't worry about the rough patch at the handle side, that gets smoothed and carved to look pretty .... this worked better than expected and I will definitely use it again

Take the paddle pattern and trace it on the carved blade .... trim to the outside of the line, then sand to get the final shape (sand to the line), be careful here, the blades have a right and left side, make sure you trace the pattern properly (basically with the blade curve facing up, trace one, flip pattern, trace other)

I don't have a picture of the next step. The curve has been added to the blade, you need to curve the other side, this involves rasping the front area and rear area to continue the curve parallel to the existing curve we just made ... it is not worth using a power tool as much less material is being removed, this is what the final profile will look like (and you can see how that nasty roughness at the handle join gets carved)

Add the epoxy tip for protection ... Jim, I won't repeat this here as you just read it in the CanoeTripping forums ... builder, if that interests you, I can post the link

I will assume you know how to round the shaft, 4 bevels on each corner, bevel those 8 corners to form 16 and almost a round shaft. Sanding strip to get it round.
This is a pic of the fitting of the carbon fiber ferrules for joining the two halves (mmm ... I guess some folks may try a 1 piece, but at 260 cm that isn't practical IMO for this one). I want the OD of the ferrule to match the OD of the paddle shaft, so a step must be created. Getting a smooth step, which is also even isn't always easy ... but this little trick worked really well

Little cleanup with a chisel and this became a very clean step

The paddles are sanded out to 120 grit, 2 oz fiber glass is added to the blades and up the shaft for about 4" ... the end of the fiberglass is feathered to the shaft, and a final coat of epoxy added to the entire shaft ( not on the mounting steps). Once this coat is set, add the ferrules, lay the paddle out on a flat surface (strongback comes to mind), saturate the step portion of the paddles and lightly coat inside portion of ferrules (don't go crazy) ... thicken the remainder of the epoxy batch and use it to coat those surfaces and slip the ferrules in place. They should be locked together, in the neutral position (middle, these are 3 position) and the paddle laying flat. This will align the paddle blades and ferrule position.
Pic of finished blades ... when the epoxy is fully cured, put some painters tape on the ferrule, at the shaft/ferrule joint, sand the epoxy with 220 grit, wipe tac and varnish per your preference (mine is 2 gloss, final semigloss)

Ferrule mounting

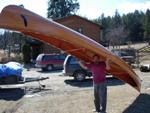
Final finished pic
Any questions, let me know
Brian