
This will be a somewhat ambitious build ( at least for me), the design will be a 15' solo cedar strip with a max weight of 30 pounds and still be tripping tough. I also want to take a hand in the design portion and I don't intend to resort to one of the standard CAD programs as they are just a tad confusing and seem to suck the joy out of the design process (again, for me).
I thought it may also be useful to include some of the thought behind the decisions, the time it took to do some of the operations and the cost of various materials/decisions.
My last solo weighed 39 pounds and was a 16' modified Freedom Solo .... so before I do anything, I need to figure out a way to achieve a 9 pound weight reduction on paper to make sure the build is even doable.
My last WRC hull weighed in at ~19 pounds using 1/4" strips ..... so I changed materials to Northern White Cedar to get a 10% density advantage and save 1.8 pounds off the top.
Next do I really need 16', the answer is that a 15' should do fine, that will save another 1.5 - 2 pounds.
Now the hull composite, can I change that up to save some weight?
First thoughts are moving to 4 oz fiberglass and maybe reducing the strip thickness, but this all could be a slippery slope as far as strength and integrity for the planned usage.
During my research, I found this nice little table on the epoxy works site ( https://www.epoxyworks.com/index.php/ho ... -are-they/ ) and it provided the information I needed, going from 6 oz to 4 oz cloth will give a nice weight reduction at the cost of significantly reduced hull strength. Surprisingly, with 6 oz cloth, reducing the strip thickness from 1/4" to 3/16" gives the best weight reduction with virtually no loss in hull strength.
So moving from 1/4" to 3/16" strips should provide a further 4.75 pound reduction.
That brings the potential weight savings to 8.5 pounds, almost there (on paper at least) and eliminating decks will put the reduction about where it needs to be (fingers crossed).
Since I want to have some hand in the design, most of the software programs suggest starting with a known design and modify from there. On paper, I will start with the basic shape of a friends 14' solo I like and modify the bow and stern sections to incorporate a re curve, stretch the length to ~15' and modify the width to be slightly less than my Freedom Solo.
Next post I will actually start on the build process.
Brian
Light Weight Solo Tripper
Re: Light Weight Solo Tripper
Moving right along with this build, it is obvious these strips are not being done this time of year. I did them last fall knowing that I would be building in the winter and knowing I didn't want to try this in the snow.
I selected Northern White Cedar as the strip material, as I understand, it is one of the best materials for weight and strength. Some 10% lighter then WRC, only down side is that it is generally not available in longer clear lengths and it's a bit more regional in availability.
Lucky for me ... I know a guy (lol). There is a small sawmill a few hours north of me that specializes in NWC and I have made several purchases from there and the owner is just a great guy. I called and asked about longer lengths of select NWC and he said he had a few pieces, I said , hold it, I am on my way.
Scored 4 - Rough 1" x 4" x 16'and 1 rough 1" x 6" x 16'

These are "rough" boards and are not all the same thickness, so although I don't need to plane them for finish, I do need to plane them for a uniform thickness, for sawing, knot evaluation etc. ... so that gives us these

I am a big believer in "order of operations", so the next step is to mark any knots and stabilize them. There are a few knots and some of them will loosen during the strip cutting process, so I mark, tape and saturate each knot with epoxy. No broken strips, no knots flying anywhere, if I don't like the look of the knot in the strip, I can still just cut it out and butt join on the boat. But for prep and cutting, it just makes strip handling much easier (IMO).
There where only a few pencil size knots, here they are marked out (FYI, the other side is sealed with tape)

Once the epoxy setup, I scrape each knot so it's smooth and we are ready to get the strongback setup to cut strips.

Step 1, mark the boards, so I can put the strips back in cut order and board source.

Strongback setup is pretty standard for the skilsaw method, add the sacrificial strips for the boards to rest on, I used one of the other boards as a rest board to get the most strips from each 1 x 4. The rest board is held by clamped wood piece that just jutt above the sacrificial strips along the 1 x6's length. To hold the board that is being cut a piece is added to the end at an angle that catches the board being cut and prevents it from moving during each cut operation (nearest end shows this).

With the strips now cut, we move on to the beading and coving operation
To setup the router, I first take a spare batten and blacken the edge.

Now when i do adjustments to get the cuts correct, it is much easier to see when the router setup is good (I learned this on Nick Shade's site)

This is a shot of the stabilized knots after strip cutting, I believe this would have broken if it hadn't been stabilized, the advantage is that the knots don't fly apart and disrupt the sawing operation, plus it gives me the choice of using the knots or just removing them later, without having to try and keep the broken bits together for matching.

Bead and cove setup, strip production

Bundling strips to store in racks. Since the wood is pretty uniform in colour, texture and grain, I will be foregoing book matching the strips and just use them as I go.

A little discussion on the strip process is likely warranted at this time.
Since weight is one of the design parameters, I decided to calculate the density of the white cedar I purchased, I labeled the 4 - 1 x 4s as boards 1 thru 4, and the 1 x 6 as 5. The 1 x 6 was too heavy for my kitchen scale, so I passed on that one, the others measured 1 - 23.0, 2 - 21.6, 3 - 20.6 and 4 - 21.6 (lbs/cubicft). This pretty well spot on to the 22 listed in the wood database.
The rough lumber was ~1" and a bit thick, with one piece at just over 1.25" .... I planed them down to 7/8", which will yield a fitted strip of 3/4". This is a little wider than I usually use and I hope it doesn't come back to bite me in the rear. I just couldn't keep taking more and more of the cedar planks, it felt like wasting wood.
The purchase cost of the wood was $89 and yielded 77 strips, of which I will likely toss 5 or 6, leaving a cost per strip of ~$1.25 .... and this should be more than enough to complete the boat. I did a quick search about buying strips and came up with costs in the range of $1200 Canadian for enough strips to complete a "standard" boat.
I spent 14.5 hours getting the strips done, which includes planing the rough lumber, cutting strips and bead/cove, bundling and making a set of accent strips from some leftover WRC .... if I paid myself $20/hr, bought a router and bits, bought a decent home planer, I think i would still have money leftover compared to buying the strips, plus I would have new toys.
However, since i do have those toys, my cost stands at $89 and 14.5 hours so far ... I intend to keep updating the dollar and time costs as I go along, I think it will provide some useful info on building, that I don't recall reading elsewhere.
Brian
I selected Northern White Cedar as the strip material, as I understand, it is one of the best materials for weight and strength. Some 10% lighter then WRC, only down side is that it is generally not available in longer clear lengths and it's a bit more regional in availability.
Lucky for me ... I know a guy (lol). There is a small sawmill a few hours north of me that specializes in NWC and I have made several purchases from there and the owner is just a great guy. I called and asked about longer lengths of select NWC and he said he had a few pieces, I said , hold it, I am on my way.
Scored 4 - Rough 1" x 4" x 16'and 1 rough 1" x 6" x 16'
These are "rough" boards and are not all the same thickness, so although I don't need to plane them for finish, I do need to plane them for a uniform thickness, for sawing, knot evaluation etc. ... so that gives us these
I am a big believer in "order of operations", so the next step is to mark any knots and stabilize them. There are a few knots and some of them will loosen during the strip cutting process, so I mark, tape and saturate each knot with epoxy. No broken strips, no knots flying anywhere, if I don't like the look of the knot in the strip, I can still just cut it out and butt join on the boat. But for prep and cutting, it just makes strip handling much easier (IMO).
There where only a few pencil size knots, here they are marked out (FYI, the other side is sealed with tape)
Once the epoxy setup, I scrape each knot so it's smooth and we are ready to get the strongback setup to cut strips.
Step 1, mark the boards, so I can put the strips back in cut order and board source.
Strongback setup is pretty standard for the skilsaw method, add the sacrificial strips for the boards to rest on, I used one of the other boards as a rest board to get the most strips from each 1 x 4. The rest board is held by clamped wood piece that just jutt above the sacrificial strips along the 1 x6's length. To hold the board that is being cut a piece is added to the end at an angle that catches the board being cut and prevents it from moving during each cut operation (nearest end shows this).
With the strips now cut, we move on to the beading and coving operation
To setup the router, I first take a spare batten and blacken the edge.
Now when i do adjustments to get the cuts correct, it is much easier to see when the router setup is good (I learned this on Nick Shade's site)
This is a shot of the stabilized knots after strip cutting, I believe this would have broken if it hadn't been stabilized, the advantage is that the knots don't fly apart and disrupt the sawing operation, plus it gives me the choice of using the knots or just removing them later, without having to try and keep the broken bits together for matching.
Bead and cove setup, strip production
Bundling strips to store in racks. Since the wood is pretty uniform in colour, texture and grain, I will be foregoing book matching the strips and just use them as I go.
A little discussion on the strip process is likely warranted at this time.
Since weight is one of the design parameters, I decided to calculate the density of the white cedar I purchased, I labeled the 4 - 1 x 4s as boards 1 thru 4, and the 1 x 6 as 5. The 1 x 6 was too heavy for my kitchen scale, so I passed on that one, the others measured 1 - 23.0, 2 - 21.6, 3 - 20.6 and 4 - 21.6 (lbs/cubicft). This pretty well spot on to the 22 listed in the wood database.
The rough lumber was ~1" and a bit thick, with one piece at just over 1.25" .... I planed them down to 7/8", which will yield a fitted strip of 3/4". This is a little wider than I usually use and I hope it doesn't come back to bite me in the rear. I just couldn't keep taking more and more of the cedar planks, it felt like wasting wood.
The purchase cost of the wood was $89 and yielded 77 strips, of which I will likely toss 5 or 6, leaving a cost per strip of ~$1.25 .... and this should be more than enough to complete the boat. I did a quick search about buying strips and came up with costs in the range of $1200 Canadian for enough strips to complete a "standard" boat.
I spent 14.5 hours getting the strips done, which includes planing the rough lumber, cutting strips and bead/cove, bundling and making a set of accent strips from some leftover WRC .... if I paid myself $20/hr, bought a router and bits, bought a decent home planer, I think i would still have money leftover compared to buying the strips, plus I would have new toys.
However, since i do have those toys, my cost stands at $89 and 14.5 hours so far ... I intend to keep updating the dollar and time costs as I go along, I think it will provide some useful info on building, that I don't recall reading elsewhere.
Brian
Re: Light Weight Solo Tripper
Next on the task list are the gunnel blanks.
I picked up a 10' length of 4/4 x 7" rough cherry at my local lumber yard ($33). A quick plane to smooth the sides a bit, followed by marking and cutting it length wise to give me 2 pieces of ~ 3.5" x 7/8" x 10'.
I need about 16' for the boat, this includes some allowance, less would likely work, but when it comes to stuff like this I am not big on "likely". The 2 pieces will be skarfed together, using the 36" allowance, yielding a final length of 17' and a skarf ratio of just over 10:1.
This pic is the pieces ready to be epoxied together, they have been aligned and marked (you can see the pencil marks if you look carefully). When I do this kind of joint I like to use outside stringers and alignment blocks to keep it all straight.
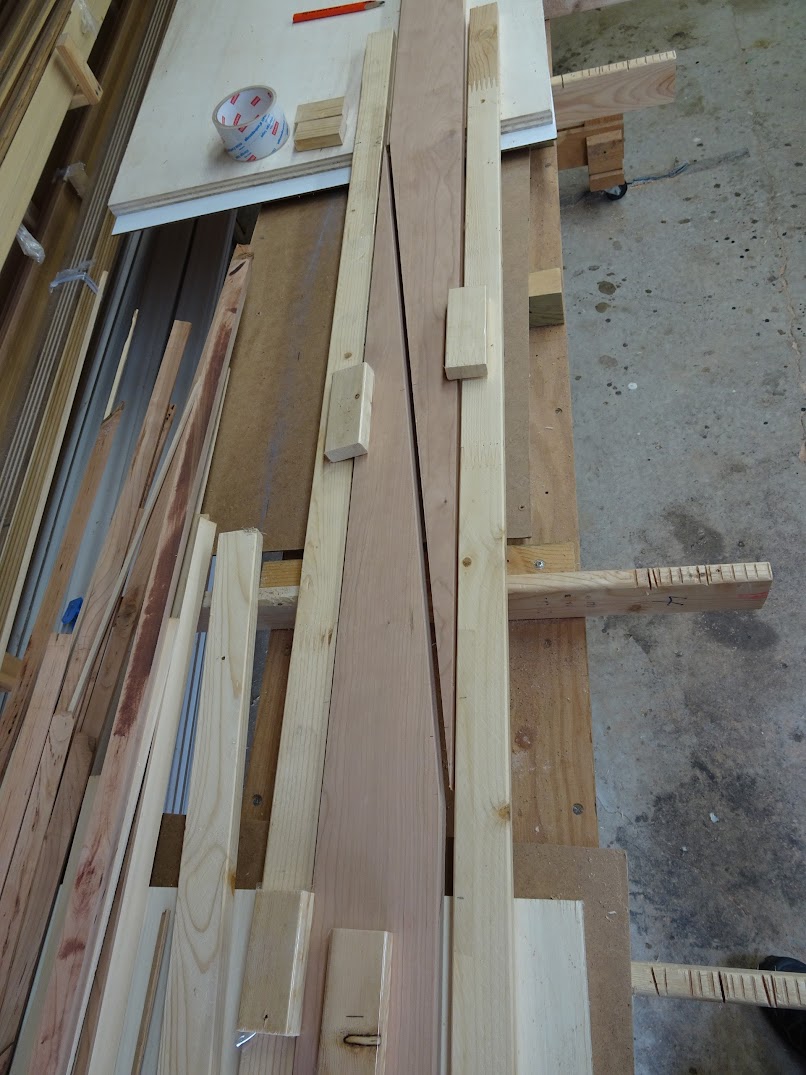
The cut is saturated with epoxy and then I lightly butter with thickened epoxy... in this case it is thickened with cabosil and cherry wood dust. The clamping order is:
- the left bar clamp to lock the left piece
- align the pencil marks
- right bar clamp to lock the right piece ... this effectively locks the piece horizontally, it can't slide left or right
- place the cut blocks and lightly C clamp them to align vertically
- center bar clamp, then left and right to close joint

Close up of alignment marks, notice how the epoxy line shows up, that is the colouring I added and should be almost gone when a finish is applied.
Finished joint, just a little light scraping is enough for now.

The new long length is very straight and ready to become gunnels

I glued on a keeper to one end to keep the long piece of cherry from sliding during cutting

Using the Skillsaw method for cutting strips, it is adjusted to ~3/8" ... gunnel blanks are born

They get a quick plane down to 5/16", ripped to 5/8", then 2 for the inners are separated out and a 45 degree chamfer is added.

Gunnels complete
Brian
I picked up a 10' length of 4/4 x 7" rough cherry at my local lumber yard ($33). A quick plane to smooth the sides a bit, followed by marking and cutting it length wise to give me 2 pieces of ~ 3.5" x 7/8" x 10'.
I need about 16' for the boat, this includes some allowance, less would likely work, but when it comes to stuff like this I am not big on "likely". The 2 pieces will be skarfed together, using the 36" allowance, yielding a final length of 17' and a skarf ratio of just over 10:1.
This pic is the pieces ready to be epoxied together, they have been aligned and marked (you can see the pencil marks if you look carefully). When I do this kind of joint I like to use outside stringers and alignment blocks to keep it all straight.
The cut is saturated with epoxy and then I lightly butter with thickened epoxy... in this case it is thickened with cabosil and cherry wood dust. The clamping order is:
- the left bar clamp to lock the left piece
- align the pencil marks
- right bar clamp to lock the right piece ... this effectively locks the piece horizontally, it can't slide left or right
- place the cut blocks and lightly C clamp them to align vertically
- center bar clamp, then left and right to close joint
Close up of alignment marks, notice how the epoxy line shows up, that is the colouring I added and should be almost gone when a finish is applied.
Finished joint, just a little light scraping is enough for now.
The new long length is very straight and ready to become gunnels
I glued on a keeper to one end to keep the long piece of cherry from sliding during cutting
Using the Skillsaw method for cutting strips, it is adjusted to ~3/8" ... gunnel blanks are born
They get a quick plane down to 5/16", ripped to 5/8", then 2 for the inners are separated out and a 45 degree chamfer is added.
Gunnels complete
Brian

Re: Light Weight Solo Tripper
Nice set up Brian.
I like the gluing of the cleat on the end, and extending the cleats that support the plank, out from the strongback, keeps you from tripping over the leg supports.
Jim
I like the gluing of the cleat on the end, and extending the cleats that support the plank, out from the strongback, keeps you from tripping over the leg supports.
Jim
Keep your paddle wet and your seat dry!