17' 6" RedBird
-
Joan and Ted

- Site Admin
- Posts: 63
- Joined: Wed May 05, 2004 10:58 am
- Location: Peterborough, Ontario
- Contact:
17' 6" RedBird
Use this forum to post information specific to your 17' 6" RedBird project. Use POST REPLY when posting information. Please stay on topic. For general boatbuilding discussions, please use the Builders Forum instead.
Last edited by Joan and Ted on Mon Nov 15, 2004 11:34 am, edited 1 time in total.
-
Joan and Ted
- Site Admin
- Posts: 63
- Joined: Wed May 05, 2004 10:58 am
- Location: Peterborough, Ontario
- Contact:
archive: REDBIRD
The following has been unarchived from our previous project directory
REDBIRD
built by: VOLKER HAGIN
GERMANY D-64354 REINHEIM ZIEGELBUSCH 5
inge.volker.hagin@onlinehome.de
REDBIRD
built by: VOLKER HAGIN
GERMANY D-64354 REINHEIM ZIEGELBUSCH 5
inge.volker.hagin@onlinehome.de
-
Guest
Jeff's Redbird
I've convinced a friend of mine to post pictures of my Redbird experience on his website so, for what it's worth, I'll share them here.
I'll try to limit the construction photos to specific parts of the construction process that hasn't had a lot of other pictures. Many others far more skilled than I have posted details of wet-out, trim, inlay, etc.
Being an inveterate tinkerer, I made some modifications to the original plans. I raised the sheer line by one inch along the length of the canoe from stations 1 - 5 as I found other Redbirds I have paddled seem to sit a little low in the water. I also lowered the sheer line of the stem station by one inch to try and reduce sensitivity to crosswinds.
I also wished to make the canoe a bit assymmetric. I used an exponential function to modify the placing of the molds to situate Station 0 (the widest point) 6 inches aft of the middle of the canoe. Going from Station 0 forward, the separation of stations 1, 2, 3, and 4 were 12 3/32, 12 5/32, 12 8/32, and 12 10/32 respectively (all dimensions in inches). This progression continued through to Station 8. Going from Station 0 aft to stations 1, 2, 3, and 4, the separations were 11 5/16, 11 6/16, 11 8/16, and 11 9/16. Again, the progression continued to station 8 with each station separation being slightly larger than the one preceeding it. I also used the same formula to modify the horizontal 2"spacing on the stem molds so my bow stem was slightly longer than the stern stem.
The woods used were:
Hull: Eastern White Cedar
Inner Stem: Eastern White Cedar
Outer Stem: Black Walnut
Accent Stripe: Black Walnut
Accent Stripe Centre Panel: Birdseye Maple
Inner and Outer Gunnels: Black Walnut
Thwart: Black Walnut
Seats, Seat Rails, and Spacers: Ash
Decks: Birdseye Maple
Coamings and Handles: Black Walnut
The other materials were:
Glue: Titebond II
Epoxy: WEST 105/205 for bonding
WEST 105/207 for wet-out
Fiberglass: 6 oz for hull exterior
4 oz with a double layer for interior
Varnish: Interlux Perfection 2 Part LPU
Colloidal Silica: WEST
Graphite Powder: WEST
And Now The Pictures!
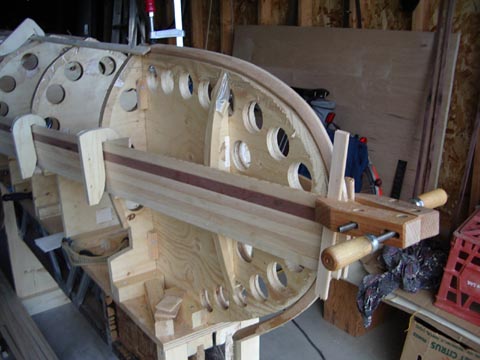
Stripping underway. This photo shows the strongback from engineered joists with a plywood plate and the infamous Redbird Station 8
Using crosscuts to a maximum width of 3/4" to prepare for the outer stem mortice

Outer stem installed and shaped
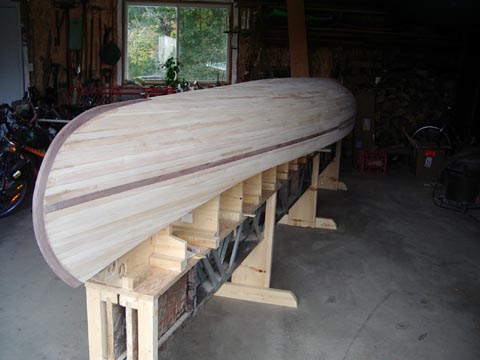
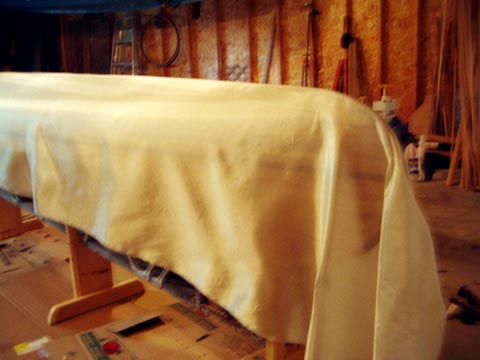
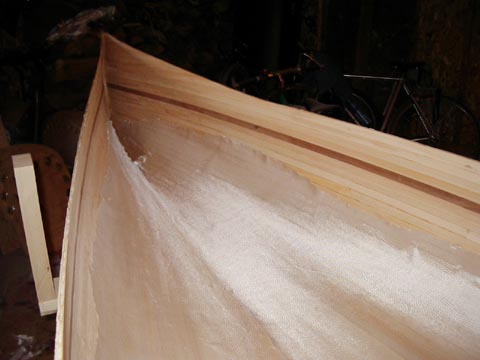
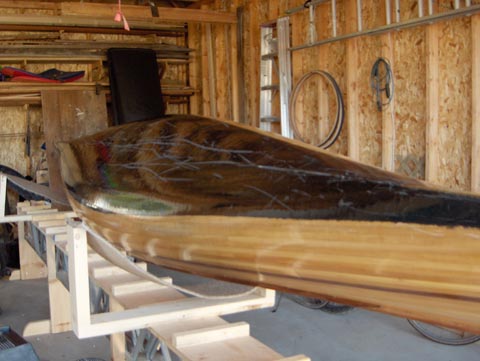
6 oz fiberglass over hull prior to wetout
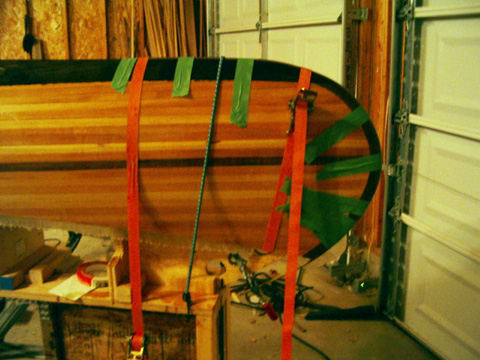
Exterior hull wetout finished, graphite up to 3"waterline finished, and brass stem band being epoxied into place
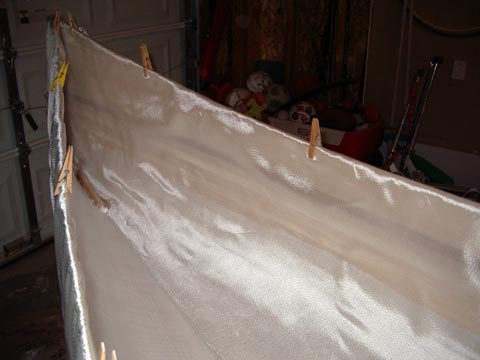
4 oz fiberglass over lower 1/3 of interior of hull
4 oz fiberglass over whole interior of hull
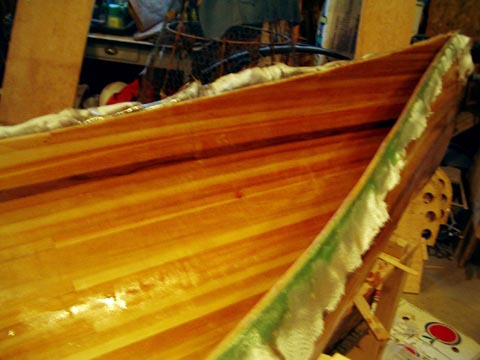
Interior after simultaneous wetout of both layers
Profile of the outer gunnels showing cap to cover cedar edge at top of hull
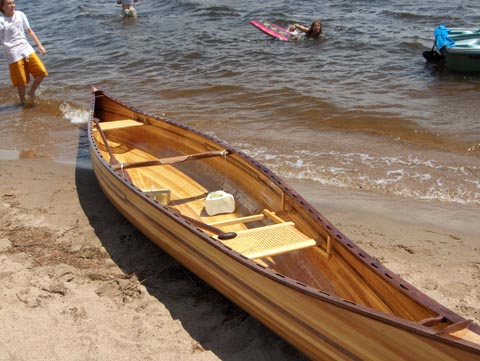
Trim, thwarts, and seats installed, varnished and ready to go!

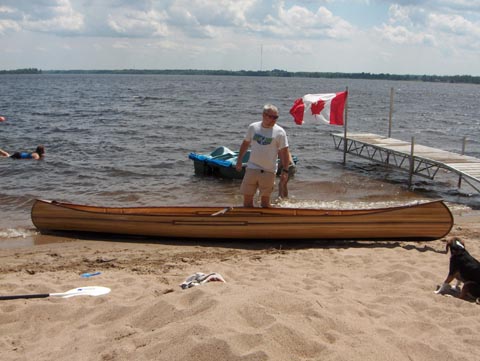
Launch day, July 1, 2004 (Canada Day for all you Canucks out there!)
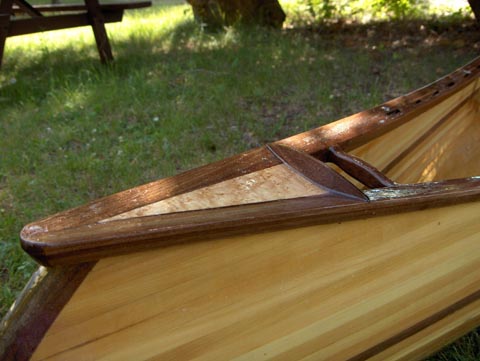
A view of the birdseye maple deck, feathered coaming, and carrying handle (with a few drops of water for effect)
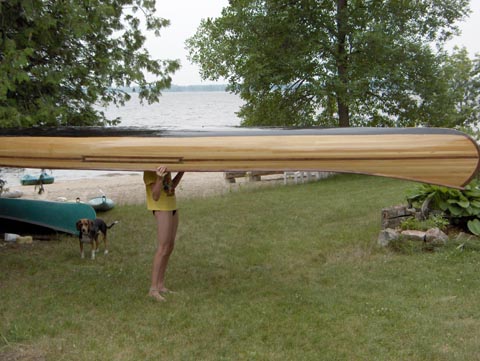
It's not too heavy - the canoe on the shoulders of my 12 year old.
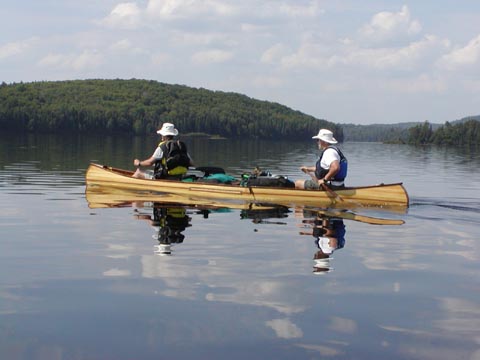
The Redbird in her natural habitat. This was a 5 day trip in Algonquin Park. There were 5 men and two canoes on this trip. The other canoe got the extra paddler and we got the extra gear. We are carrying enough gear for 3 people on a 5 day trip. No problem for the canoe, either in weight carried or ability to keep up.

A close-up of the hull bottom after a summer of tripping, bouncing off some rocks, pulled up on beaches, and dragged over beaver dams. A few scuff marks but the graphite was more than tough enough!
All in all, it's a fabulous boat, a joy to build and paddle. The next trip can't come soon enough!
I'll try to limit the construction photos to specific parts of the construction process that hasn't had a lot of other pictures. Many others far more skilled than I have posted details of wet-out, trim, inlay, etc.
Being an inveterate tinkerer, I made some modifications to the original plans. I raised the sheer line by one inch along the length of the canoe from stations 1 - 5 as I found other Redbirds I have paddled seem to sit a little low in the water. I also lowered the sheer line of the stem station by one inch to try and reduce sensitivity to crosswinds.
I also wished to make the canoe a bit assymmetric. I used an exponential function to modify the placing of the molds to situate Station 0 (the widest point) 6 inches aft of the middle of the canoe. Going from Station 0 forward, the separation of stations 1, 2, 3, and 4 were 12 3/32, 12 5/32, 12 8/32, and 12 10/32 respectively (all dimensions in inches). This progression continued through to Station 8. Going from Station 0 aft to stations 1, 2, 3, and 4, the separations were 11 5/16, 11 6/16, 11 8/16, and 11 9/16. Again, the progression continued to station 8 with each station separation being slightly larger than the one preceeding it. I also used the same formula to modify the horizontal 2"spacing on the stem molds so my bow stem was slightly longer than the stern stem.
The woods used were:
Hull: Eastern White Cedar
Inner Stem: Eastern White Cedar
Outer Stem: Black Walnut
Accent Stripe: Black Walnut
Accent Stripe Centre Panel: Birdseye Maple
Inner and Outer Gunnels: Black Walnut
Thwart: Black Walnut
Seats, Seat Rails, and Spacers: Ash
Decks: Birdseye Maple
Coamings and Handles: Black Walnut
The other materials were:
Glue: Titebond II
Epoxy: WEST 105/205 for bonding
WEST 105/207 for wet-out
Fiberglass: 6 oz for hull exterior
4 oz with a double layer for interior
Varnish: Interlux Perfection 2 Part LPU
Colloidal Silica: WEST
Graphite Powder: WEST
And Now The Pictures!
Stripping underway. This photo shows the strongback from engineered joists with a plywood plate and the infamous Redbird Station 8
Using crosscuts to a maximum width of 3/4" to prepare for the outer stem mortice
Outer stem installed and shaped
6 oz fiberglass over hull prior to wetout
Exterior hull wetout finished, graphite up to 3"waterline finished, and brass stem band being epoxied into place
4 oz fiberglass over lower 1/3 of interior of hull
4 oz fiberglass over whole interior of hull
Interior after simultaneous wetout of both layers
Profile of the outer gunnels showing cap to cover cedar edge at top of hull
Trim, thwarts, and seats installed, varnished and ready to go!
Launch day, July 1, 2004 (Canada Day for all you Canucks out there!)
A view of the birdseye maple deck, feathered coaming, and carrying handle (with a few drops of water for effect)
It's not too heavy - the canoe on the shoulders of my 12 year old.
The Redbird in her natural habitat. This was a 5 day trip in Algonquin Park. There were 5 men and two canoes on this trip. The other canoe got the extra paddler and we got the extra gear. We are carrying enough gear for 3 people on a 5 day trip. No problem for the canoe, either in weight carried or ability to keep up.
A close-up of the hull bottom after a summer of tripping, bouncing off some rocks, pulled up on beaches, and dragged over beaver dams. A few scuff marks but the graphite was more than tough enough!
All in all, it's a fabulous boat, a joy to build and paddle. The next trip can't come soon enough!
-
Dean in Eureka, CA

- Posts: 267
- Joined: Mon May 10, 2004 10:23 am
- Location: Eureka, CA
Project: 17'-7 1/2" 50/50 Redbird.
Bead & Cove Stripping: Western Red Cedar, Redwood and Basswood.
Stems & Trim: White Ash, scarf joint to be used on gunnels.
Decks: Undecided. Attempting to Locate The "Right" Redwood Burl. Contemplating Obsidian Arrowhead and or Abalone Shell Inlay.
Fiberglass: 6oz. Cloth.
Epoxy: West System; #105 Resin, #207 Hardener.
Adhesives: Accent strip-Weldwood Plastic Resin Glue, Strips-Elmer's Carpenter Wood Glue, Strips to Stems-Titebond 3, Stems and Scarf Joints-#105 Resin with #206 Hardener and #403 Microfibers.
Additional Materials: Martin Step's Navigation Light Kit, 46 Sq. Ft. Standing Lugsail by Todd Bradshaw.
Sail Rig: Mast: 10', Boom: 7'-11", Yard: 7'-1", Mast Thwart: Undecided, Lee Board Bracket: Undecided, Rudder: Kick Up.
Notes: Western Red Cedar strips to be bookmatched, Accent Stripe to be two-piece Tolowa Indian Friendship Basket Weave Design; Basswood to be used for the design, Redwood to be used for the field. Waterline Stripe to be Basswood w/scarf joint. Rudder Gudgeons to be cast bronze by builder similar in design to Willit's Bros. "V-Type" gudgeon. Leeboard Clamps to be cast bronze by builder similar to Todd Bradshaw's cam lever design. Rudder gudgeons and mast step to be only perminantly mounted sailing equipment.
Other Considerations: Seat Material: Undecided, either natural cane or plastic cane. (leaning towards natural cane) Mast Thwart: Undecided, either Dedicated or Seat Type. Spray Covers: Undecided.
Objective: Build a great paddling canoe that also has good sailing capabilities.
Construction Photographs:

Family Project, This Boat Building Thing Was The Kids Idea

Start Of The Rolling Bevel Using John Michne's Technique

Checking The Sheer Strips With A Level, Strongback Was Repositioned, Station Forms Now Include Martin Step's Stapleless
Setup (Notice The Outer Stems Clamped Ane Ready To Go, On A Previous Set Of Basswood Inner Stems)

Sheer Strips Completed, Notice Overhead Extended Stringline

Tolowa Friendship Basket Weave Design Accent Strip, Comprised Of 576 Total Pieces, Taking My Patience To A New Plateau

Accent Strip Close Up View

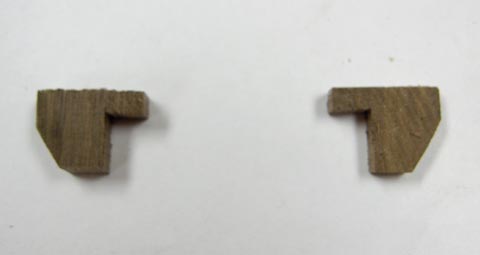
Accent Strip Parts

Accent Strip Layout Guide

More Stripping, After Some Advice From Glen I'm Going To Insert The Basswood Waterline Strip Next.

Before adding The Waterline Strip, I Needed To Install 15 Hull Hold Down Blocks, Which Are One Of Martin Step's Techniques.
These Blocks Will Be Sheered Off With A Quick Blow Of A Hammer, Proir To Sanding The Inside Of The Hull.
I would like to thank Glen Smith, John Michne, Todd Bradshaw and Martin Step for all their input, help and advice. Thanks to
my wonderful children for planting the seed.
Bead & Cove Stripping: Western Red Cedar, Redwood and Basswood.
Stems & Trim: White Ash, scarf joint to be used on gunnels.
Decks: Undecided. Attempting to Locate The "Right" Redwood Burl. Contemplating Obsidian Arrowhead and or Abalone Shell Inlay.
Fiberglass: 6oz. Cloth.
Epoxy: West System; #105 Resin, #207 Hardener.
Adhesives: Accent strip-Weldwood Plastic Resin Glue, Strips-Elmer's Carpenter Wood Glue, Strips to Stems-Titebond 3, Stems and Scarf Joints-#105 Resin with #206 Hardener and #403 Microfibers.
Additional Materials: Martin Step's Navigation Light Kit, 46 Sq. Ft. Standing Lugsail by Todd Bradshaw.
Sail Rig: Mast: 10', Boom: 7'-11", Yard: 7'-1", Mast Thwart: Undecided, Lee Board Bracket: Undecided, Rudder: Kick Up.
Notes: Western Red Cedar strips to be bookmatched, Accent Stripe to be two-piece Tolowa Indian Friendship Basket Weave Design; Basswood to be used for the design, Redwood to be used for the field. Waterline Stripe to be Basswood w/scarf joint. Rudder Gudgeons to be cast bronze by builder similar in design to Willit's Bros. "V-Type" gudgeon. Leeboard Clamps to be cast bronze by builder similar to Todd Bradshaw's cam lever design. Rudder gudgeons and mast step to be only perminantly mounted sailing equipment.
Other Considerations: Seat Material: Undecided, either natural cane or plastic cane. (leaning towards natural cane) Mast Thwart: Undecided, either Dedicated or Seat Type. Spray Covers: Undecided.
Objective: Build a great paddling canoe that also has good sailing capabilities.
Construction Photographs:
Family Project, This Boat Building Thing Was The Kids Idea
Start Of The Rolling Bevel Using John Michne's Technique
Checking The Sheer Strips With A Level, Strongback Was Repositioned, Station Forms Now Include Martin Step's Stapleless
Setup (Notice The Outer Stems Clamped Ane Ready To Go, On A Previous Set Of Basswood Inner Stems)
Sheer Strips Completed, Notice Overhead Extended Stringline
Tolowa Friendship Basket Weave Design Accent Strip, Comprised Of 576 Total Pieces, Taking My Patience To A New Plateau
Accent Strip Close Up View
Accent Strip Parts
Accent Strip Layout Guide
More Stripping, After Some Advice From Glen I'm Going To Insert The Basswood Waterline Strip Next.
Before adding The Waterline Strip, I Needed To Install 15 Hull Hold Down Blocks, Which Are One Of Martin Step's Techniques.
These Blocks Will Be Sheered Off With A Quick Blow Of A Hammer, Proir To Sanding The Inside Of The Hull.
I would like to thank Glen Smith, John Michne, Todd Bradshaw and Martin Step for all their input, help and advice. Thanks to
my wonderful children for planting the seed.
Everything will be OK[img::]http://www.mikenchell.com/forums/images ... uryi3b.gif[/img]
Dean in Eureka, CA
Dean in Eureka, CA
-
Dean in Eureka, CA
- Posts: 267
- Joined: Mon May 10, 2004 10:23 am
- Location: Eureka, CA
Patrick,
I'll post a "latest" pic soon.
Speaking of pictures.... When are we going to get to see some of yours?
I'll post a "latest" pic soon.
Speaking of pictures.... When are we going to get to see some of yours?
Everything will be OK[img::]http://www.mikenchell.com/forums/images ... uryi3b.gif[/img]
Dean in Eureka, CA
Dean in Eureka, CA
well, my dad posted some somewhere on here, and i believe he also posted a link to the shutterfly page where we have them. All 500+ pictures we have taken so far are stored on shutterfly, and if you have the link, you can go see all 500 something. i dont know right now, but i just sent him an email asking what it is, as soon as i get a reply from him, i will post the link.

Finished Redbird
John and I are near completion - only the stem band is left to place on the canoe. Next Tuesday will be her maiden voyage.
Specs: 3/16" redwood strips, cherry outwales, cherry inwales with walnut scuppers; walnut deck and thwarts; cherry seats with plastic cane; 5oz Raka cloth; West system 105/207 epoxy; Interlux Spar Varnish (4 coats)
Weight: 55lbs

Specs: 3/16" redwood strips, cherry outwales, cherry inwales with walnut scuppers; walnut deck and thwarts; cherry seats with plastic cane; 5oz Raka cloth; West system 105/207 epoxy; Interlux Spar Varnish (4 coats)
Weight: 55lbs
-
Glen Smith

- Posts: 3719
- Joined: Sat May 08, 2004 9:08 am
- Location: Baie-St-Paul, Quebec, Canada
-
Patricks Dad

- Posts: 1476
- Joined: Wed Oct 13, 2004 1:11 pm
- Location: Warrenville, Illinois
-
Patricks Dad
- Posts: 1476
- Joined: Wed Oct 13, 2004 1:11 pm
- Location: Warrenville, Illinois
-
Glen Smith
- Posts: 3719
- Joined: Sat May 08, 2004 9:08 am
- Location: Baie-St-Paul, Quebec, Canada
-
Patricks Dad
- Posts: 1476
- Joined: Wed Oct 13, 2004 1:11 pm
- Location: Warrenville, Illinois
-
Glen Smith
- Posts: 3719
- Joined: Sat May 08, 2004 9:08 am
- Location: Baie-St-Paul, Quebec, Canada
Ok Randy, since you are away from "the book" what Ted says is that multiple thwarts are recommended for a canoe that is 18 feet or longer. Shorter than that, a single thwart is all you need. However, Bassbug's Bird is built with 3/16" strips so maybe the additional thwarts are a good idea to stiffen the structure.
-
Patricks Dad
- Posts: 1476
- Joined: Wed Oct 13, 2004 1:11 pm
- Location: Warrenville, Illinois