Hi -new here and to canoe building!
I have some 108 x 38mm (4 1/4 x 1 1/2") WRC boards that I was going to make some strips from. I'm planning on ripping them down to 108 x 18mm (allowing 2mm for the cut) and then ripping the strips. I 'think' I might lose 2mm routing the bead/cove onto the strips which will bring them down to 16mm (5/8").
My questions are:
Are these too narrow? Most strips I've seen seem to be between 18-22mm
If they are ok will it be ok to alternate them with 19mm (3/4") strips? I'll be purchasing some commercial ones to make up the shortfall I'll have.
Thanks!
Ian
Strip size

Re: Strip size
Actually 5/8" strips will follow the shape of a hull better than 3/4" strips, it will just take more of them.
I have used 5/8" strips on a few occasions and was pleased with the results.
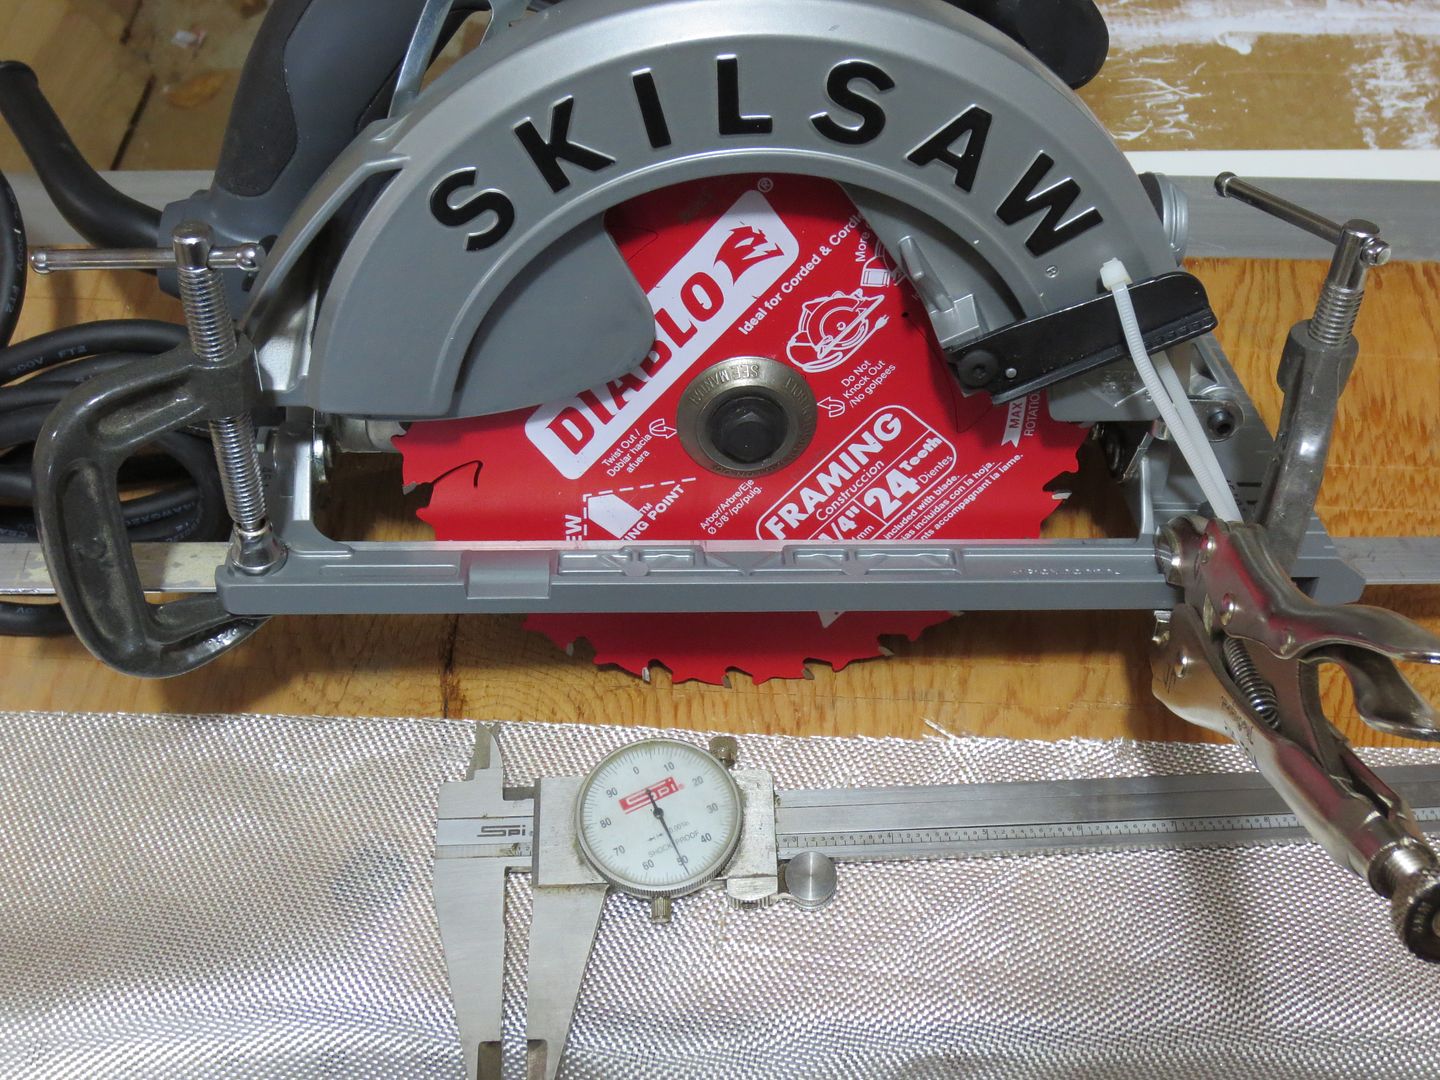
I believe Skilsaw method of cutting strips, is by far the best way to cut strips. I have cut every strip for my canoes for years using this method. It is inexpensive, and accurate, while minimizing waste !
Table saws, unless you have a power feed, require a lot more fusing, and are more difficult to obtain the uniformity and consistency I require in my strips !
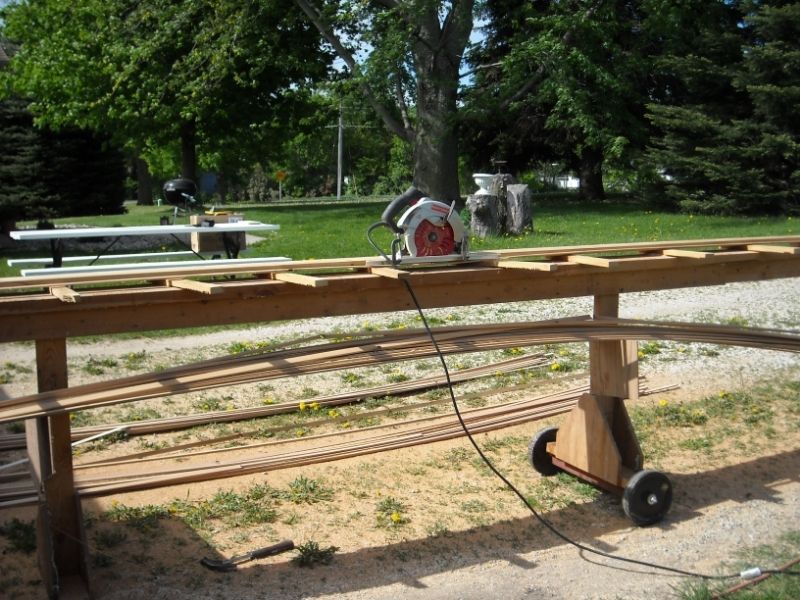
I would edge glue two or three 4 1/4" planks together, set up my Strongback up with sacrificial cleats, (every foot or so) tack or hot melt them to my strongback so they don't move around.
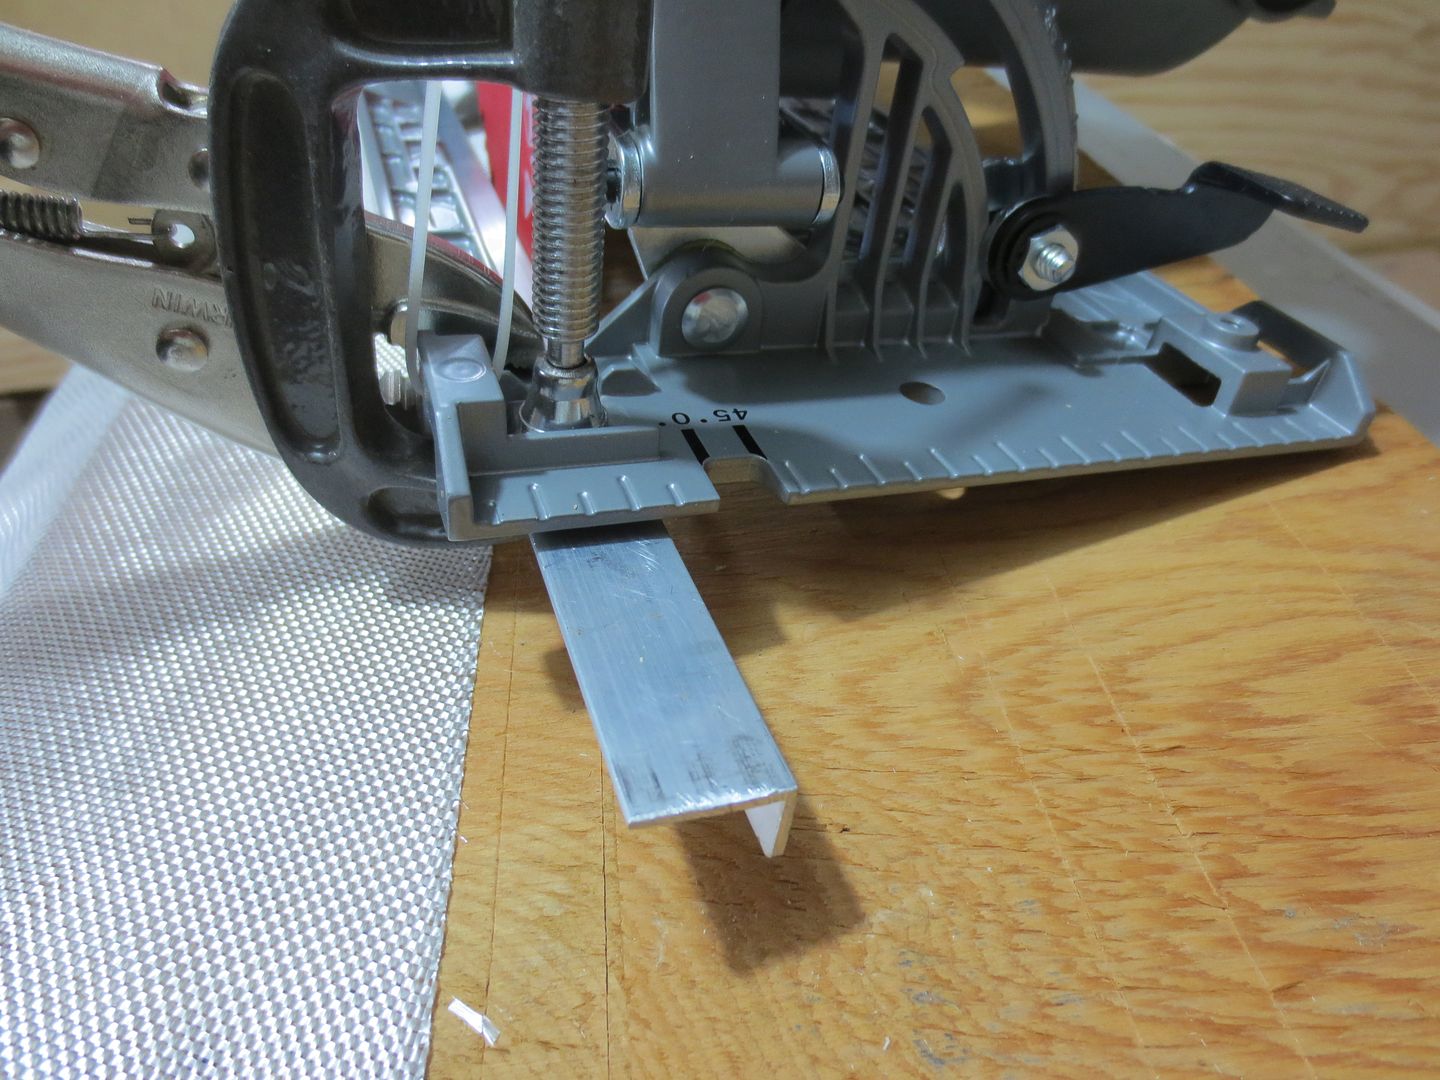
Clamp a aluminum angle to the base of a 13 amp or more Skilsaw at the desired strip thickness. Use a good Freud Diablo 24T blade ($10), And cut strips. You will impressed at how good they come out.
I'm also an advocate of bead and coving strips !
A few pics that I hope will be helpful !
Jim
I have used 5/8" strips on a few occasions and was pleased with the results.
I believe Skilsaw method of cutting strips, is by far the best way to cut strips. I have cut every strip for my canoes for years using this method. It is inexpensive, and accurate, while minimizing waste !
Table saws, unless you have a power feed, require a lot more fusing, and are more difficult to obtain the uniformity and consistency I require in my strips !
I would edge glue two or three 4 1/4" planks together, set up my Strongback up with sacrificial cleats, (every foot or so) tack or hot melt them to my strongback so they don't move around.
Clamp a aluminum angle to the base of a 13 amp or more Skilsaw at the desired strip thickness. Use a good Freud Diablo 24T blade ($10), And cut strips. You will impressed at how good they come out.
I'm also an advocate of bead and coving strips !
A few pics that I hope will be helpful !
Jim
Last edited by Jim Dodd on Mon Dec 02, 2019 9:28 am, edited 1 time in total.
Keep your paddle wet and your seat dry!
Re: Strip size
Thanks for such a detailed reply Jim! Much appreciated.
I like your technique for cutting the strips and I think I'll use it for mine.
Looking forward to starting this project but will have to build that strongback first.
Ian
I like your technique for cutting the strips and I think I'll use it for mine.
Looking forward to starting this project but will have to build that strongback first.
Ian
Re: Strip size
Instead of alternating wide and narrow you might use the wider strips on the flatter sides of the hull and save the narrow ones for going around the bilge. Whatever you do, make sure you match strip width on both sides.
For years I got stock from a BC mill and it was planed to less than 3/4 inch. Might have been a Canadian standard. Strips covered 5/8th after the bead and cove. I liked the narrow strips. I prefer a band saw to rip strips, but I am definitely in the minority on that point. Jim's method is a good one for sure.
For years I got stock from a BC mill and it was planed to less than 3/4 inch. Might have been a Canadian standard. Strips covered 5/8th after the bead and cove. I liked the narrow strips. I prefer a band saw to rip strips, but I am definitely in the minority on that point. Jim's method is a good one for sure.
Re: Strip size
Now that my strip cutting tutorial is over. Ha
You will next want to consider bead and coving your strips. I highly reccomend !
The very best bit of information I can give you, is there is No need to plane your planks or strips.
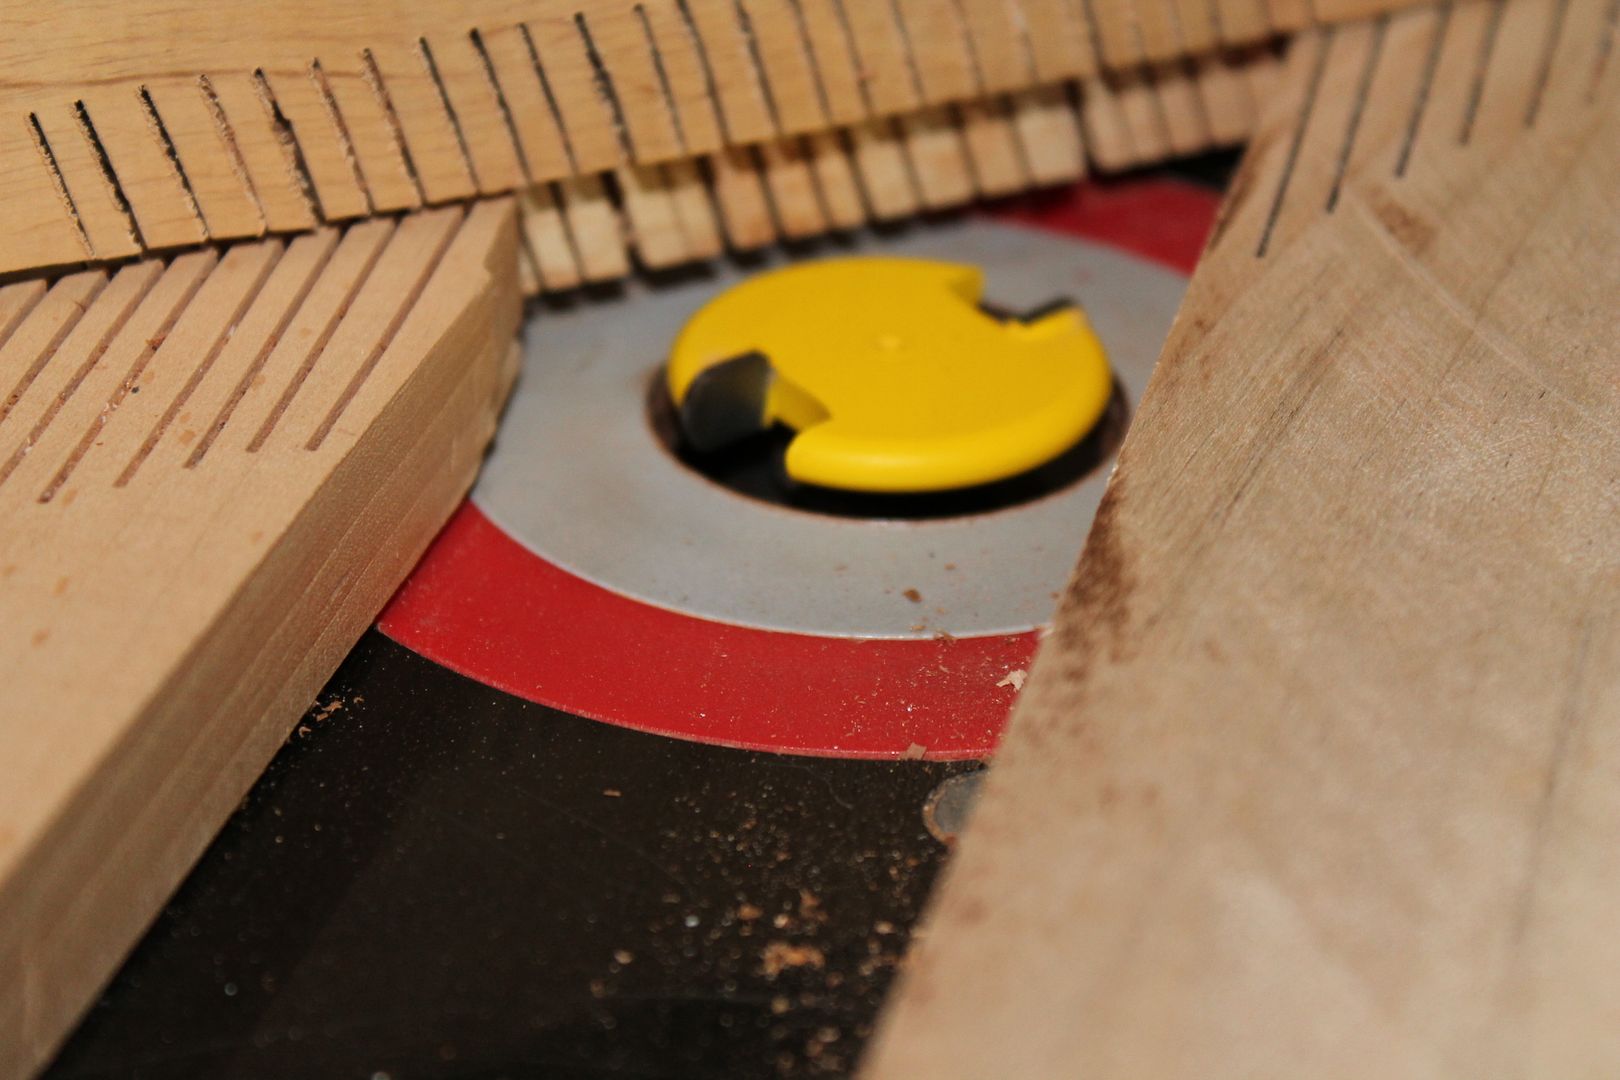
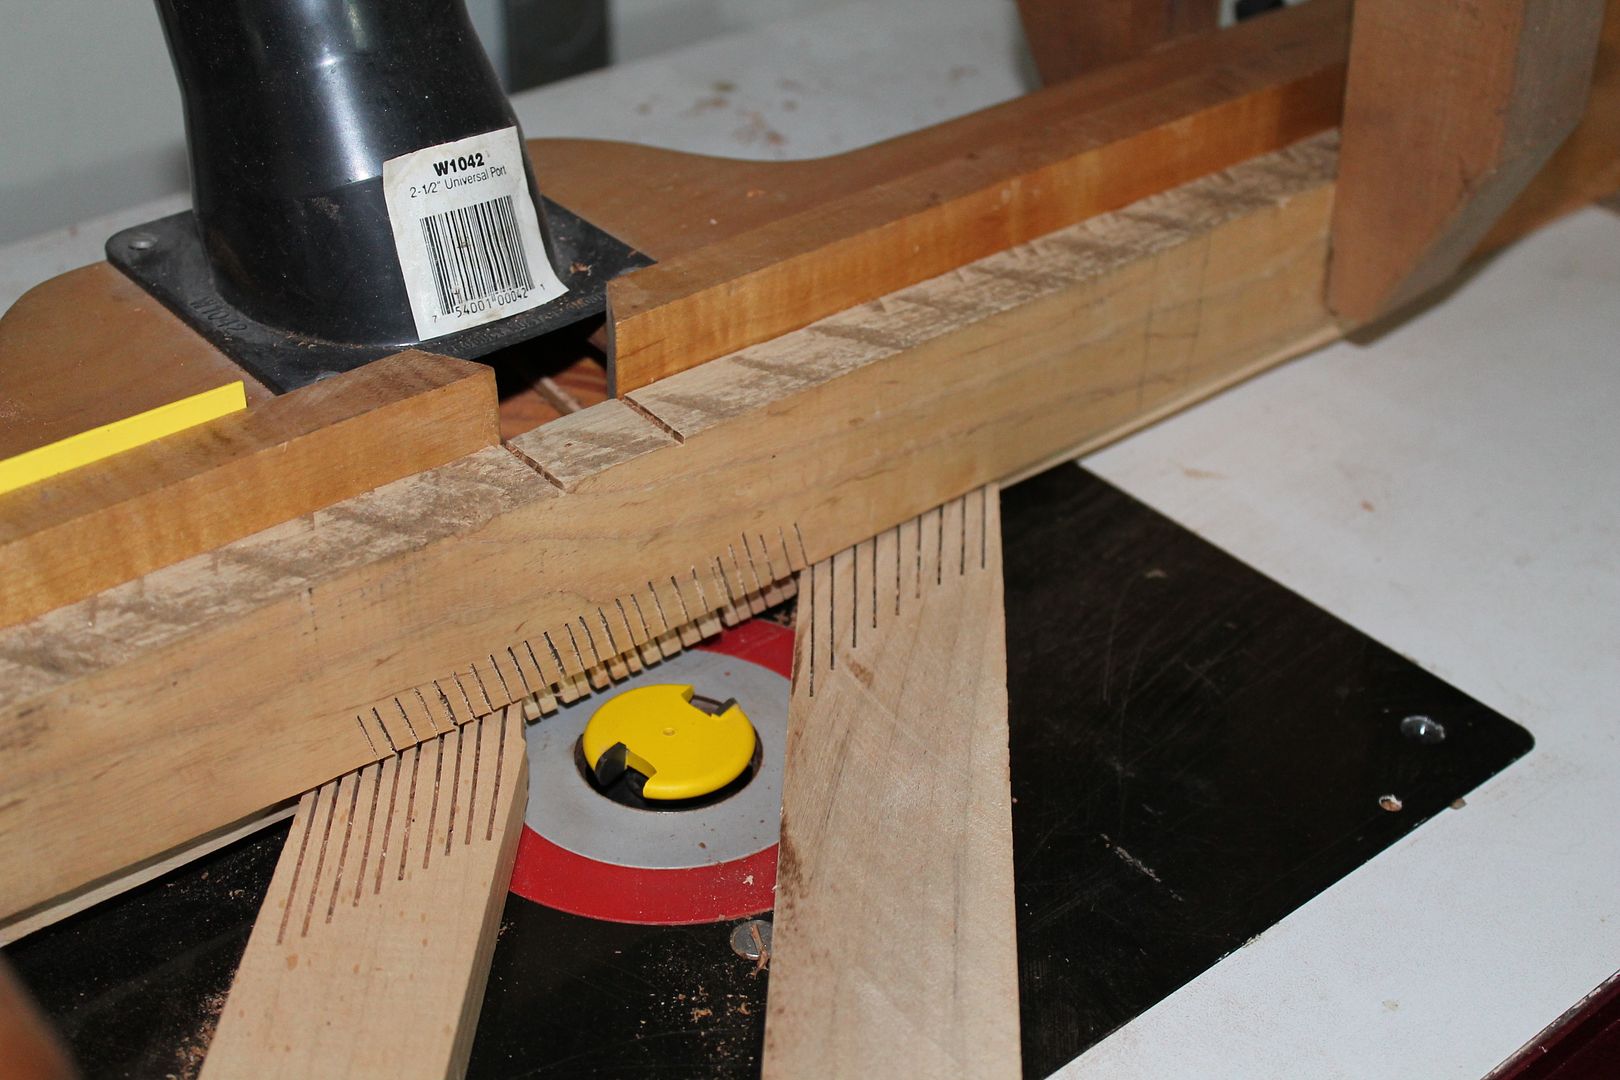
Set up your router to run your strips Between the bit and your fence ! This will make your strips uniform in height ! This is critical if you want your strip seem to be aligned at the center of your canoe.
A pic of my bead and cove router setup.
Jim
You will next want to consider bead and coving your strips. I highly reccomend !
The very best bit of information I can give you, is there is No need to plane your planks or strips.
Set up your router to run your strips Between the bit and your fence ! This will make your strips uniform in height ! This is critical if you want your strip seem to be aligned at the center of your canoe.
A pic of my bead and cove router setup.
Jim
Keep your paddle wet and your seat dry!
Re: Strip size
One more pic. of my router setup, for strip B &C.
Jim
Jim
Keep your paddle wet and your seat dry!
Re: Strip size
OK ! Another router setup, just a different router setup, from when I did strips at the Nokomis Wood shop ( non profit shop).
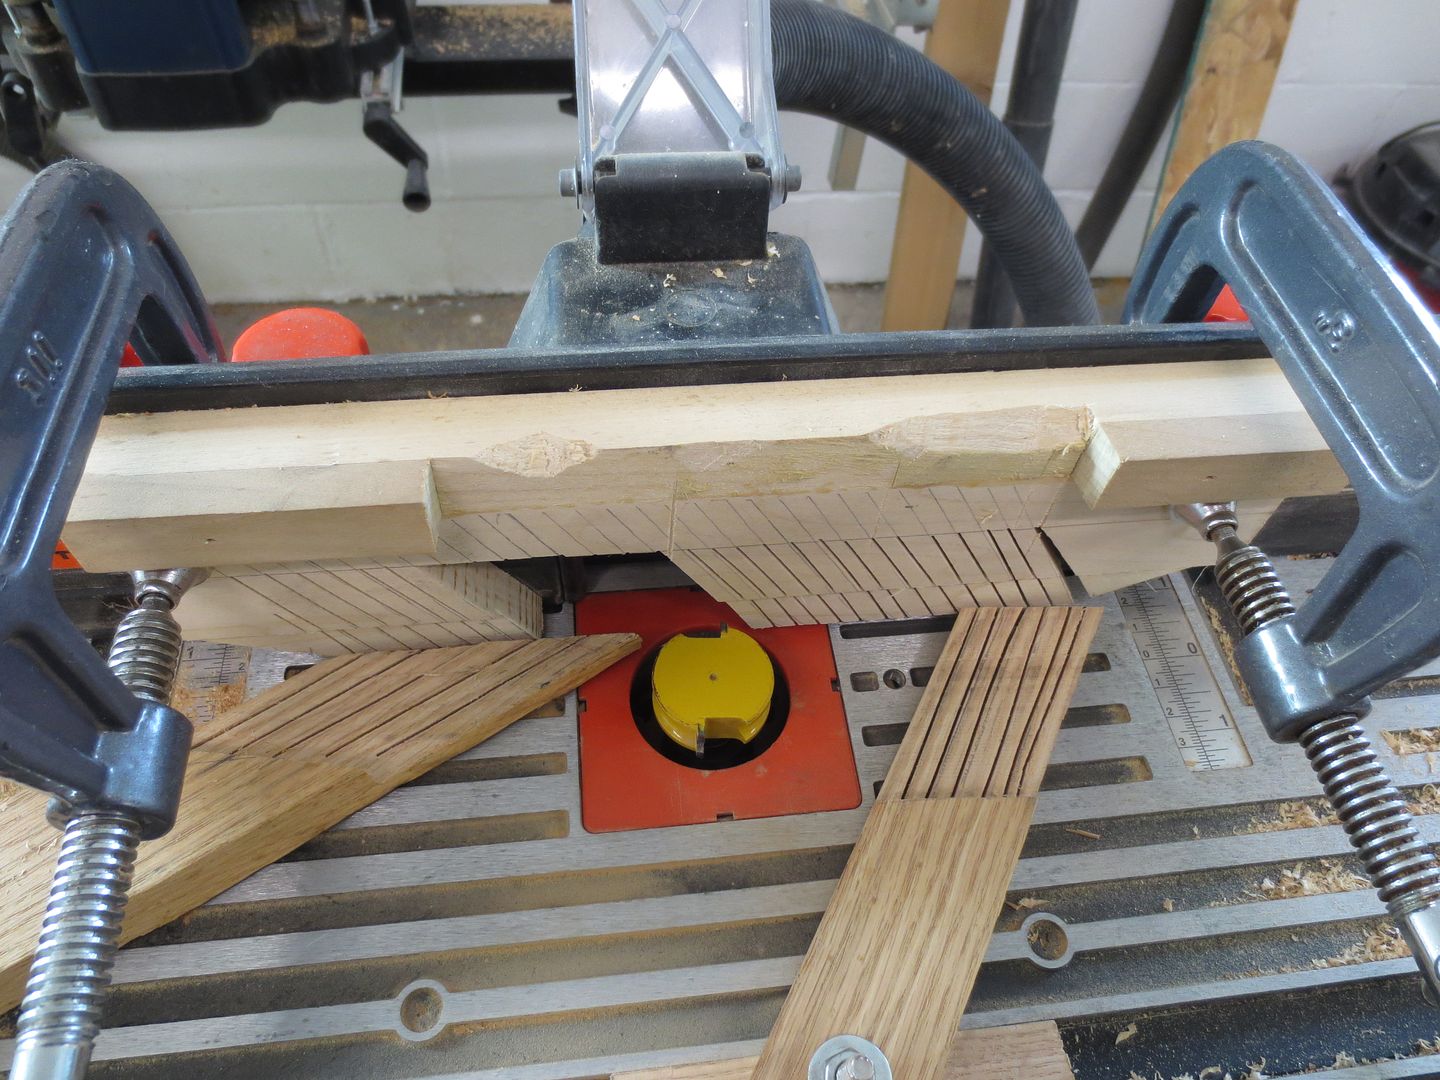
Jim
Jim
Keep your paddle wet and your seat dry!

Re: Strip size
Hi Irose and welcome to the site.
Not sure of your location, but mixing metric and imperial is always a fun exercise, being from Canada, I am used to that.
I agree with using the skilsaw method for strips, it is hands down the easiest, fastest and IMO produces the best results. I do advise you to take the process as Jim outlines and adapt it to your shop and skillset (your "bag-o-tricks as it were) ... there is room for variation in the setup. An important point is to use a "thin kerf" low tooth count blade .... Freud is popular. Cuts faster and minimizes waste.
Just a note on your math ...going from 38 mm thick to 2 strips will give you the 18 mm thick strips (38 mm minus blade width 2 mm / 2), but you will also lose another 1/8" (~3-4 mm) for the beading coving operation, yielding strips just over 1/2" once they are installed. Not the end of the world, just a little more work, as you will be installing more strips.
A word on supplementing your strip stock with commercial strips .... I suggest you do the math before you purchase. Since you will be doing some strip cutting already, you don't really need to make any additional equipment purchases ...so the math is simple ... buy more wood or buy strips. I just did this exercise and I believe buying strips will bump the strip cost by at least a factor of 10. To put this in context ... for the cost of buying the strips for my next boat (solo/15foot/northern white cedar) versus making my own, I could purchase a new planer, the canoe bits for beading and coving , a new router and still pay myself ~$20/hr. for the time to make the strips.
Once you do the math on buying wood, you may decide the incremental cost for enough of the wood which will yield wider strips makes the idea of re-purposing the wood you have for another project (or cutting it differently) more attractive. I am not saying "don't use the thinner strips", just that you are in the planning stages and you can afford a little flexibility in your plan ... as you figure/learn stuff, apply it to the project.
Brian
Re: Strip size
Brian brought up very important point ! Buying strips versus cutting your own ! Yeah do the math !
I think That is why I've built so many canoes ! Just think how much I'm saving ! Ha !
I'm able to purchase #3 and better 1X stock. 1" x 8" x 16', are what I buy most often, but go all the way down to 1" x 4".
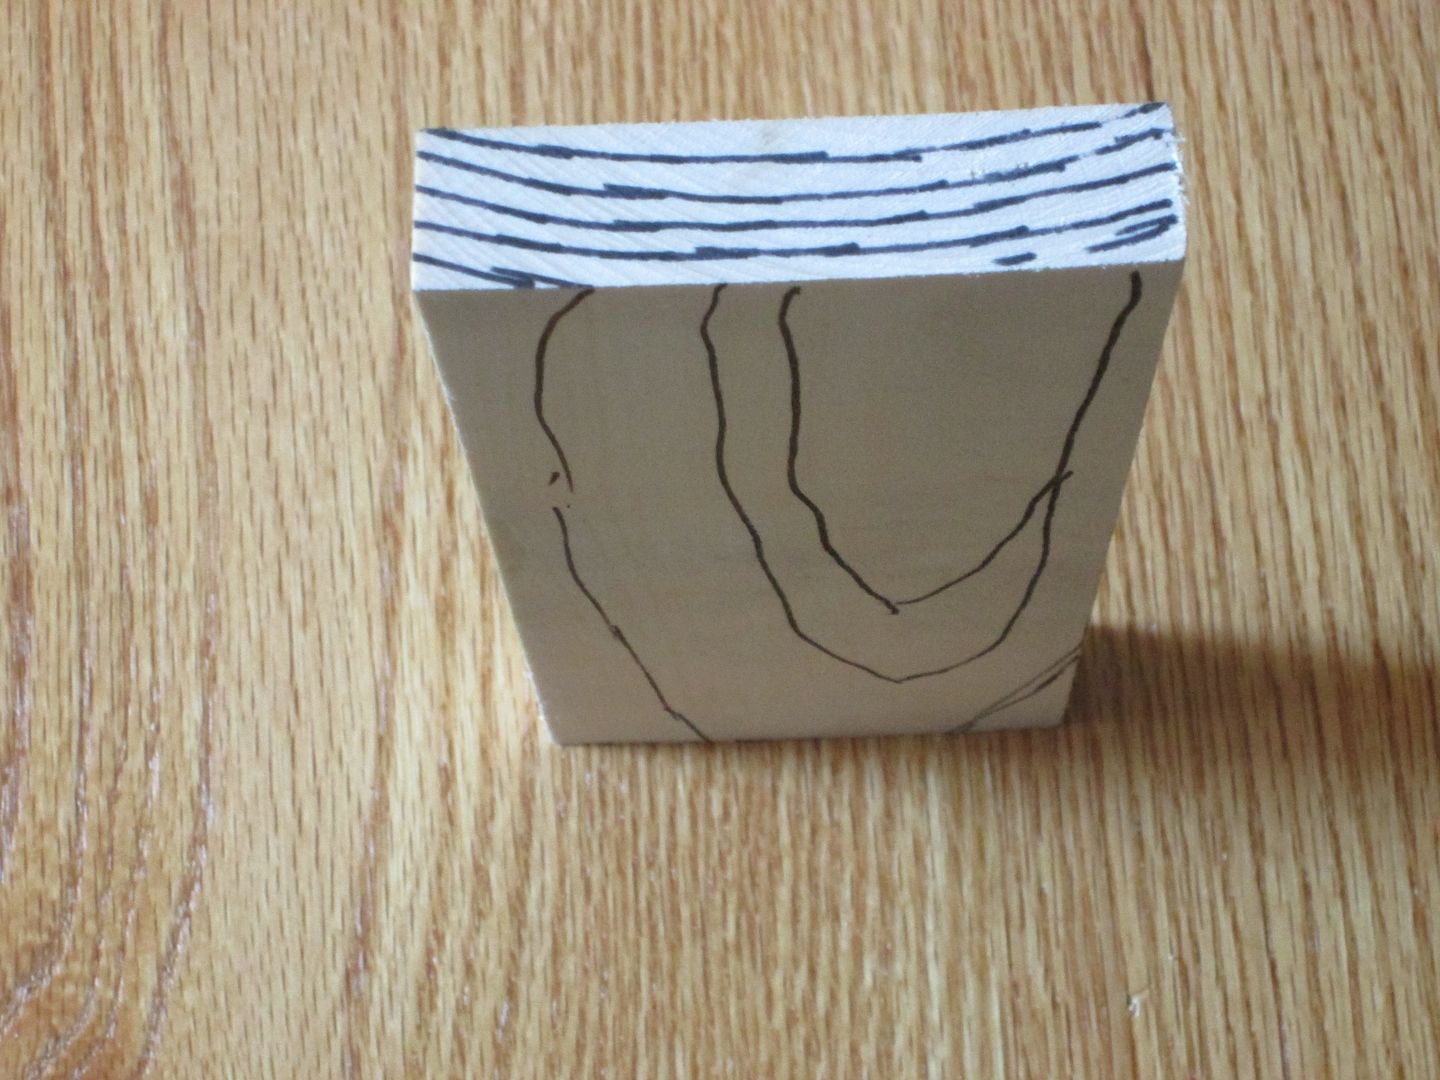
Learning to sort planks is the next thing to learn. When your strips are cut, it's most desirable to end up with Quarter sawn strips.
Here is a pic of the correct grain orientation of a plank. You want to cut from flat grain planks, if at all possible.
Jim
I think That is why I've built so many canoes ! Just think how much I'm saving ! Ha !
I'm able to purchase #3 and better 1X stock. 1" x 8" x 16', are what I buy most often, but go all the way down to 1" x 4".
Learning to sort planks is the next thing to learn. When your strips are cut, it's most desirable to end up with Quarter sawn strips.
Here is a pic of the correct grain orientation of a plank. You want to cut from flat grain planks, if at all possible.
Jim
Keep your paddle wet and your seat dry!
Re: Strip size
Great information guys! Thanks a lot for this - it'll make life a lot easier.
I'm in Australia -east coast - where all the bushfires are!
Jim, like the router setup and will emulate that.
Sedges, sounds like a good idea and I will make sure they are matched side to side.
Brian - yes, I only allowed 2mm for the bead/cove and it looks like 3-4mm from what you're saying.
Take your point on buying strips and will investigate prices. I will use the timber I already have as there's a bit of sentimental value with it and it would be nice to have it as part of a canoe.
Also, it's a Bob's Special I'm building.
Off-topic but how do you calculate the number of strips you need? Doesn't mention it with the plans.
Ian
Re: Strip size
Roughly, take your center mold and measure the active perimeter, divide that by the working width of your strips and add a bit for waste (say 5-10%) and you will be in the right ballpark, with a little to spare.
Brian
Brian
Re: Strip size
My first build and I am using redwood 1 x 6s. I have one white cedar 1x6 for a contrasting stripe. I will need to joint the white cedar as it is not long enough to make the canoe length. Do you recommend jointing the 1x6 before cutting the 1/4" planks or wait till the plank is cut then joint?
Re: Strip size
Personally, I like to do a single skarf joint before I cut strips, however, since this is to be used as a strip on the canoe, a butt joint on the fly will work as well.
I would suggest you think about whether you want full length strips that allow you to simply put the strip on the boat OR the idea of making a small skarfing jig, to allow you to cut and join "on the fly" as you strip.
Both will work and both are suitable options, in the end I usually go with what "feels" best for me ... we don't all do jobs the same way, to get to the same point, so you just pick one this time. Next time you may want to try what you didn't pick this time.
When I did my first build, I was always looking for the "best" way and what I found, is that there are usually a few ways and there isn't a single way that is best for everyone.
Brian
Re: Strip size
Cool. Thank you. I don't have many white cedar strips to make or use so that helps.
This project has been on my woodworking list for 29 years. I always said I'd do it next year... now it's in progress and I'm having a ball.
This project has been on my woodworking list for 29 years. I always said I'd do it next year... now it's in progress and I'm having a ball.
-
cedarphile
- Posts: 18
- Joined: Sun Jan 22, 2017 11:41 am
Full-length strips vs half strips
I live in norhern Wisconsin, close to the Wisconsin Canoe Heritage Museum (https://wisconsincanoeheritagemuseum.org/index.html) in Spooner of which I am a charter member. That dedicated wooden canoe museum also has arguably the largest and most well-equipped canoebuilding workshop in the nation. We rent out building stations to people wanting to spend a month or so of evenings and weekends building either a cedarstrip or traditional cedar/canvas canoe.
Spooner is in an area of white cedar swamps so some builders use that ideal traditional wood. The old-growth white cedar giants in Wisconsin went to build the Great Lakes schooners of the last century are long gone so the only white cedar left rarely yeilds clear boards over 10'' long. So builders using white cedar are by necessity using half strips.
I've used both, long 18' red cedar strips and shorter 8'-10' whit cedar. I now greatly prefer the shorter strips for several reasons:
1) If you create a boogle when milling edges and ruin a foot or two of a cove or bead, discarding an 18' strip for a short mistake is a major loss.
2) 10' strips are much easier to handle and store in the shop.
3) Scarfing at the butt joints is totally unneccesary. The glued cove-and-bead joint securely holds the two strips together.
4) Using simple butt joints, the joint is nearly invisible. And if you're that picky about aesthetics, remember that you ain't building a damn piano, you're building a boat–so get it wet and forget the tiny details.
5) Gluing on an 18' strip can be a real problem if you have trouble at one end that requires some attention. If you have to spend some minutes working on the strip in that area, it may take so long that the glue on the other end of the long strip may have partially dried and lost its tackiness. With shorter strips, you have plenty of time to deal with problems on one end of a strip only 8'-long.
6) Gluing the last few strips into position to close up the football on the bottom is simplicity itself if you use two short strips joined in the middle with a butt joint. Using full strips and calipers, it would often take me an hour or more to get the final 2-3 strips perfect. Using half-strips, no calipers are required to ttranser dimensions so it takes about 5 minutes.
We could simplify and cheapify the whole process of building a cedarstrip if we learned to use half strips efficiently. People wouldn't have to pay outrageous prices for 18' strips and the exorbitant shipping of them; we could pay 1/4 as much and use clear 10' stuff. 18' canoe wood is doubly expensive because the grain must be perfectly straight for 18' in addition to being very long. That requires a very special tree. It's much easier to find all staight-grain in a 8' or 10' board than to find 18' of straight grain.
We could use a whole new bunch of wood species that aren't available in long clear lengths. How would a brazillian mahogany canoe look? I helped a friend build a butternut canoe on my forms from 10' strips that was a work of art when done. I use native white cedar in all my canoes, the traditional beautiful boatbuilding wood, with no boards longer than 12'. No one, when standing back awed at the striking beauty of a cedarstrip canoe, has ever mentioned the few tiny 3/4" vertical lines they see. The overall effect of a strikingly beautiful wood canoe on a viewer is such that tiny, miniscule things like a few poorly done butt joints fade into obscurity. The only ones that see them guys are the builder.