
Jim, I appreciate the kind words.
Brian
PS: I am planning another canoe, no stems
New Composite Paddles for 2020
Re: New Composite Paddles for 2020
Time to get some shaping done, the single blades will be tackled first.
First off, this is the book I started with and it has a lot good information and techniques ... it will give you a good base to grow from, once you go through the process, you quickly develop new ideas and processes to get the job done for your situation. I still use a few of the templates and I have also created some of my own. There are other books available, this just happens to be the one I settled on and I liked what it provided.

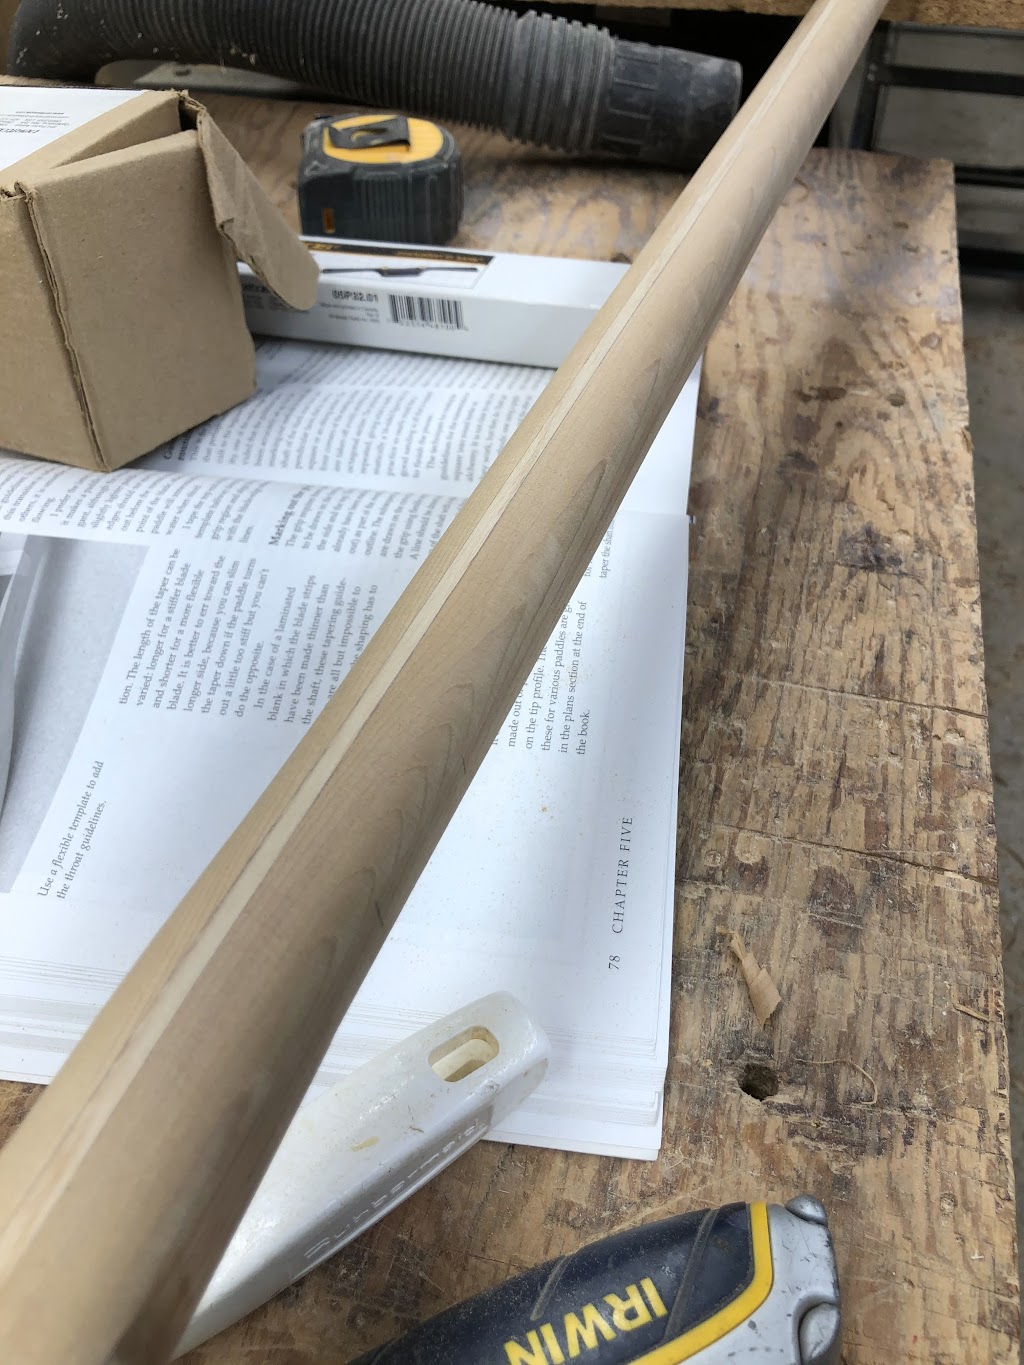
Before wood starts flying, we need to draw in a few guidelines, one for the throat area (where the blade turns into shaft) and another set for the blade thickness.
The throat area template comes straight out of the book, I like to use heavy cardboard for this one, because it needs to bend with the blade shape

Put the base of the template in place and draw in the shape centered on the shaft/blade

Next we draw in the guide lines on the paddle blade, these will have 3/16" edges, I setup my Incra marking tool ... take 1/2 blade thickness + 1/2 edge thickness (3/32" in this case) and draw lines from either side of the blade, check that the lines do indeed give the desired 3/16" gap/guideline.


This is how the marked up paddle will/should look before we start removing stuff.

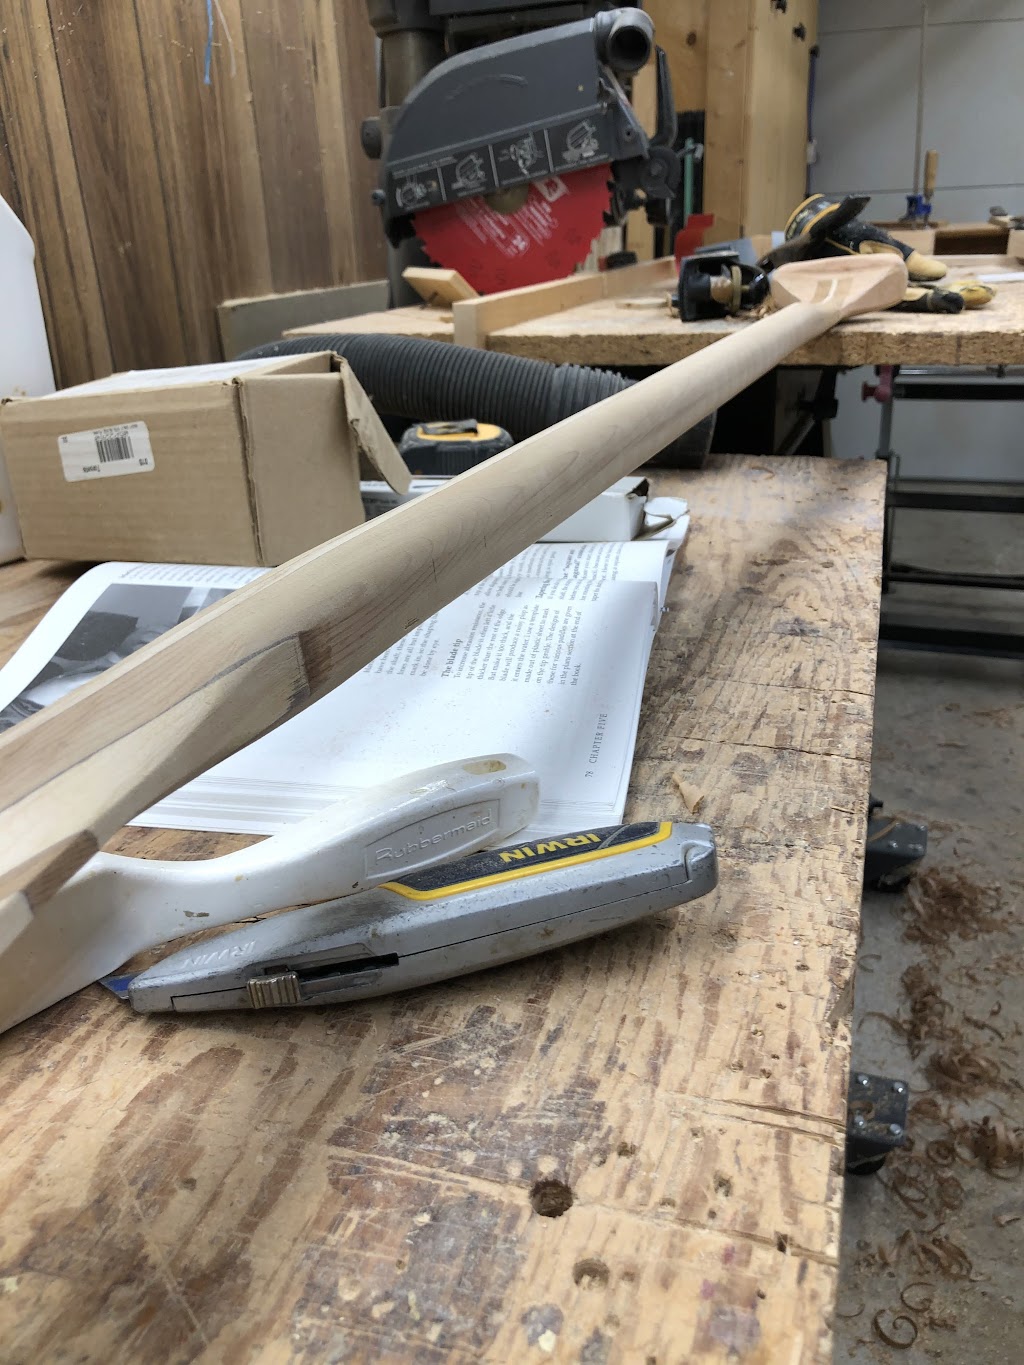
I like the look of a small spine down the shaft, first step is to start by taking most of the extra shaft material off, using a gentle slope from the shoulder (where the shaft meets the blade) extending about 6 " . You can see in the pic that we have lots of material to work with, so creating a slight spine isn't an issue at this point. I like to use a longer hand plane for this, but for a lot of this removal my rarely used power plane is really about the best tool I have found for the bulk removal.

I use light passes with the power plane, using the lines for guidance ... to keep removal fairly even and flat till about this point

With about 1/8" to go from a relatively flat face, start to remove a bit more at the edges, creating a shallow slope from the shaft to the blade edge, in the pic, the left edge is just about where it needs to be, the right edge hasn't been done yet. This is to give a visual to the operation, after all this is carving, you will need to gauge where you in the process, but the guidance lines and shallow passes make this fairly straight forward.

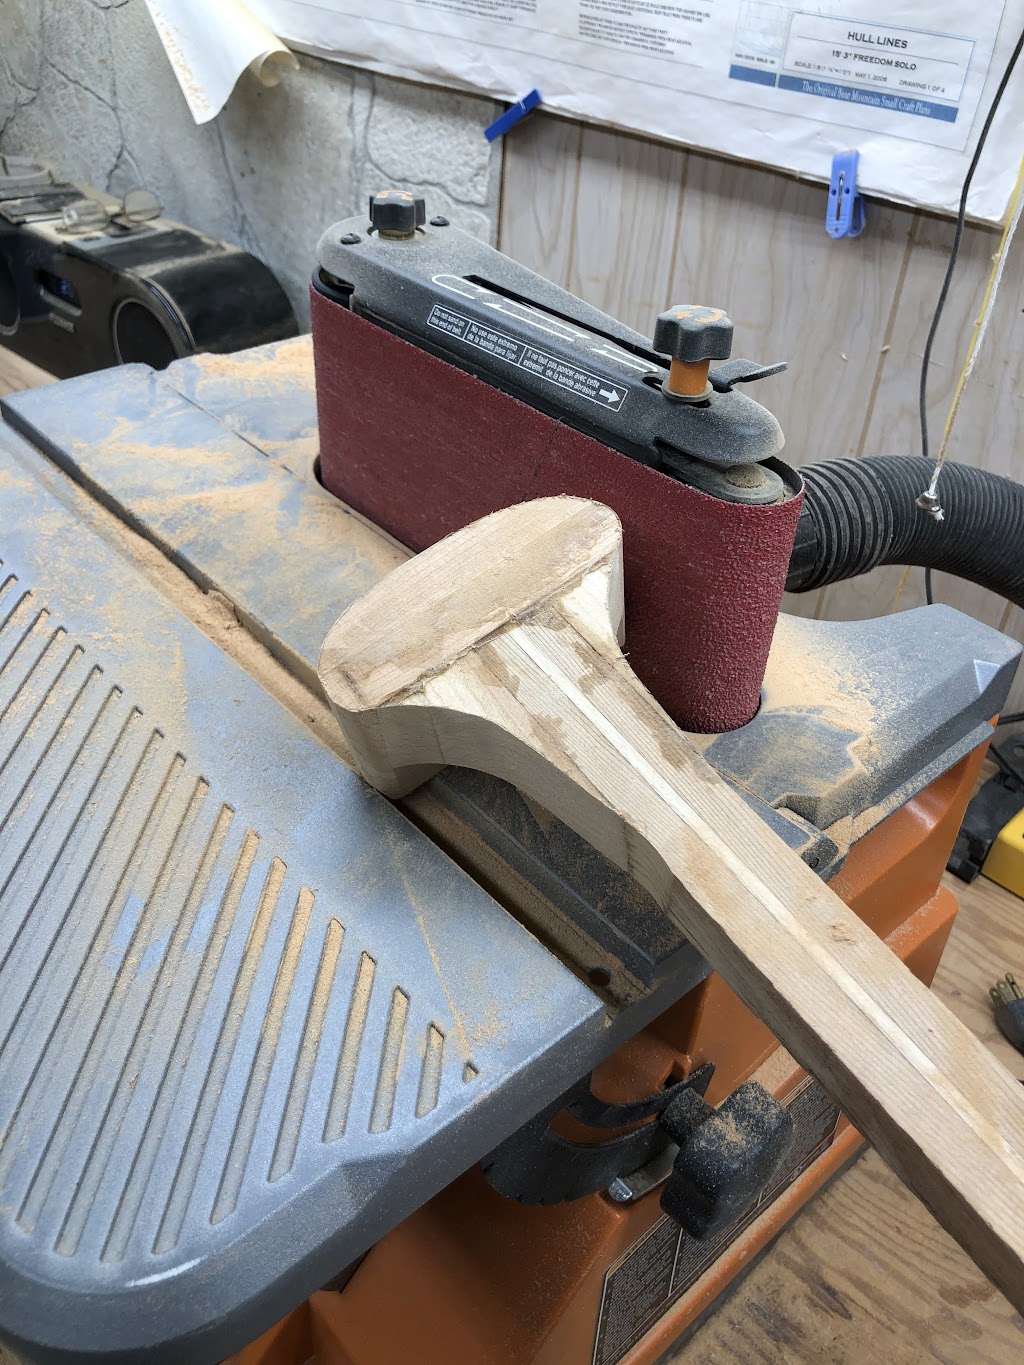
Once you have both sides roughly to the edge guidance lines, the paddle flips and you do the other side, looking at the bottom, you can see that has been carved close to the guidance line. One important point about the carving process, leave some room at the throat area, don't go to the lines, just near. The shaft hasn't been carved yet and this area where the throat and shaft meet, gets carved/shaped to give a graceful transition.
The reason we haven't carved the shaft yet is simple, all this carving requires some form of clamping to keep the paddle still while remove wood, a flat shaft is a lot easier to clamp, likewise we haven't put the handle in place yet, again, a simple rectangular shaft is easiest to clamp.

Repeat the carving process on the other side and you get

And a close up of the throat area, rough but with a little extra material

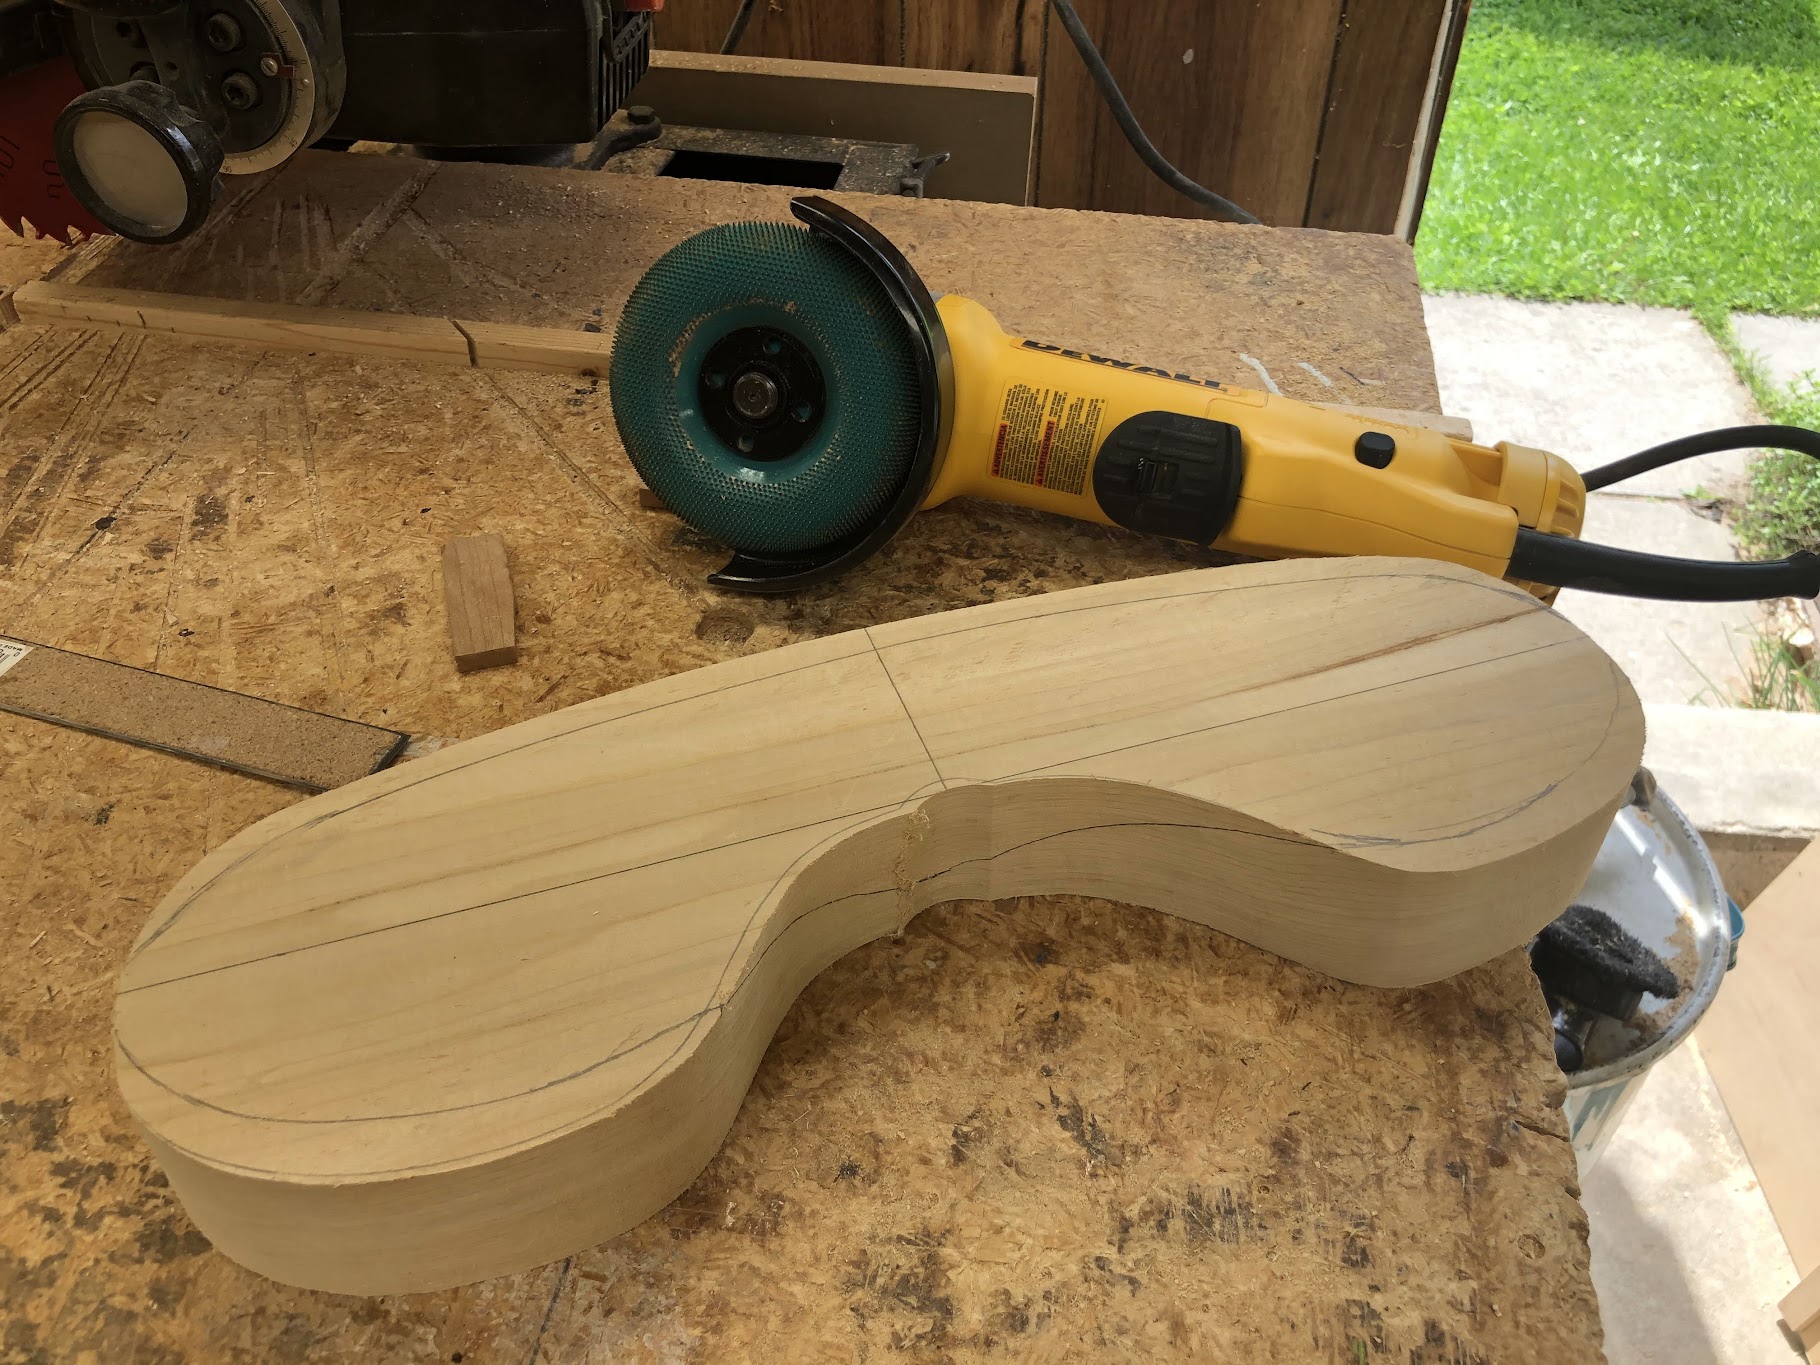
Loading some 100 grit into an ROS, the final shaping of the blade can be done. I like to move from the outside edge to the shaft, lingering a bit in the middle, deliberately doing some extra removal there. This changes that shallow flat line to a shallow convex line between the edge and shaft middle, rounding over the top of the shaft. Use a rasp to rough shape the throat area to transition nicely and sand the area smooth with the 100 grit

The paddle shaping is pretty much done, we have a slight spine down the middle, a slight convex curve from the edge and the throat area has a nice transition

There is one last step that should be done, all this carving and sanding isn't likely going to give you a "flat" surface, it will be a bit wavy and maybe have a few shallow sanding dimples. Load a flat sanding board with 80 grit paper and hand sand the board with the grain, the idea is to remove any wavy areas that are left. This will take some time, back and forth, back and forth, drag your fingers along the surface ... you can feel all those wavy parts, make long strokes, you may need to work on a side for 10-15 minutes, don't rush.
You may be wondering why 100 grit in the ROS when you go back to 80 later, the answer is simply to keep out of trouble, a power sander removes a lot more material a lot faster... using the finer grit takes a bit longer, but you can't get into trouble as quickly.

Just one more comment here about the paddle faces. What is described here works for the regular asymmetrical handle, but I made a point of saying this paddle will have a asymmetrical handle, that means that the blade can be used in either hand, but there is a back and front to the blade. The front is the power face, the part that pushes water ... in this style of grip, I take one more step and flatten the spine and shallow curve more on the power face, so that it is flatter (not flat) than the back part.
I can only explain that last bit, as it is pretty hard to get pics, but hopefully the idea has gotten across.
Next we will be carving twin blades.
Brian
First off, this is the book I started with and it has a lot good information and techniques ... it will give you a good base to grow from, once you go through the process, you quickly develop new ideas and processes to get the job done for your situation. I still use a few of the templates and I have also created some of my own. There are other books available, this just happens to be the one I settled on and I liked what it provided.
Before wood starts flying, we need to draw in a few guidelines, one for the throat area (where the blade turns into shaft) and another set for the blade thickness.
The throat area template comes straight out of the book, I like to use heavy cardboard for this one, because it needs to bend with the blade shape
Put the base of the template in place and draw in the shape centered on the shaft/blade
Next we draw in the guide lines on the paddle blade, these will have 3/16" edges, I setup my Incra marking tool ... take 1/2 blade thickness + 1/2 edge thickness (3/32" in this case) and draw lines from either side of the blade, check that the lines do indeed give the desired 3/16" gap/guideline.
This is how the marked up paddle will/should look before we start removing stuff.
I like the look of a small spine down the shaft, first step is to start by taking most of the extra shaft material off, using a gentle slope from the shoulder (where the shaft meets the blade) extending about 6 " . You can see in the pic that we have lots of material to work with, so creating a slight spine isn't an issue at this point. I like to use a longer hand plane for this, but for a lot of this removal my rarely used power plane is really about the best tool I have found for the bulk removal.
I use light passes with the power plane, using the lines for guidance ... to keep removal fairly even and flat till about this point
With about 1/8" to go from a relatively flat face, start to remove a bit more at the edges, creating a shallow slope from the shaft to the blade edge, in the pic, the left edge is just about where it needs to be, the right edge hasn't been done yet. This is to give a visual to the operation, after all this is carving, you will need to gauge where you in the process, but the guidance lines and shallow passes make this fairly straight forward.
Once you have both sides roughly to the edge guidance lines, the paddle flips and you do the other side, looking at the bottom, you can see that has been carved close to the guidance line. One important point about the carving process, leave some room at the throat area, don't go to the lines, just near. The shaft hasn't been carved yet and this area where the throat and shaft meet, gets carved/shaped to give a graceful transition.
The reason we haven't carved the shaft yet is simple, all this carving requires some form of clamping to keep the paddle still while remove wood, a flat shaft is a lot easier to clamp, likewise we haven't put the handle in place yet, again, a simple rectangular shaft is easiest to clamp.
Repeat the carving process on the other side and you get
And a close up of the throat area, rough but with a little extra material
Loading some 100 grit into an ROS, the final shaping of the blade can be done. I like to move from the outside edge to the shaft, lingering a bit in the middle, deliberately doing some extra removal there. This changes that shallow flat line to a shallow convex line between the edge and shaft middle, rounding over the top of the shaft. Use a rasp to rough shape the throat area to transition nicely and sand the area smooth with the 100 grit
The paddle shaping is pretty much done, we have a slight spine down the middle, a slight convex curve from the edge and the throat area has a nice transition
There is one last step that should be done, all this carving and sanding isn't likely going to give you a "flat" surface, it will be a bit wavy and maybe have a few shallow sanding dimples. Load a flat sanding board with 80 grit paper and hand sand the board with the grain, the idea is to remove any wavy areas that are left. This will take some time, back and forth, back and forth, drag your fingers along the surface ... you can feel all those wavy parts, make long strokes, you may need to work on a side for 10-15 minutes, don't rush.
You may be wondering why 100 grit in the ROS when you go back to 80 later, the answer is simply to keep out of trouble, a power sander removes a lot more material a lot faster... using the finer grit takes a bit longer, but you can't get into trouble as quickly.
Just one more comment here about the paddle faces. What is described here works for the regular asymmetrical handle, but I made a point of saying this paddle will have a asymmetrical handle, that means that the blade can be used in either hand, but there is a back and front to the blade. The front is the power face, the part that pushes water ... in this style of grip, I take one more step and flatten the spine and shallow curve more on the power face, so that it is flatter (not flat) than the back part.
I can only explain that last bit, as it is pretty hard to get pics, but hopefully the idea has gotten across.
Next we will be carving twin blades.
Brian
Last edited by Cruiser on Sun Jan 10, 2021 11:53 am, edited 1 time in total.

Re: New Composite Paddles for 2020
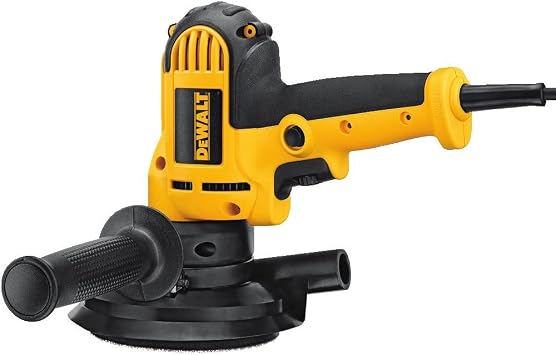
Nice work with the power planer !
A tool you might be interested in is a Dewalt DWE 6401DS, variable speed disc sander.
We have two at the Wood shop. My Oldest son, who just finished his log sided home, put me on to them.
With a 40 grit pad, you can hog off wood like a Beaver. The Variable speed makes it easy to handle, and control !
https://images-na.ssl-images-amazon.com ... SY355_.jpg
I'd say it's too aggressive to use on a hull ! But for shaping paddles, or, inner stems, it might be a good tool !
Keep your paddle wet and your seat dry!
Re: New Composite Paddles for 2020
That looks interesting Jim, might be good to carve the handle shapes and maybe smoothing the transitions ... I will check into it a bit more.
As far as doing the blades, I have found that it is really difficult to keep a flat surface when using any kind of rotary sanding tool, it can hog the wood off, but I would worry that there would be more work trying to get the blade flat again. You would likely end up back at a plane of some kind to get it flat enough to get to the sanding flat stage.
Like most tools, the results are going to be experience and skill dependent, so some one with experience could likely make that tool dance.
Brian
Re: New Composite Paddles for 2020
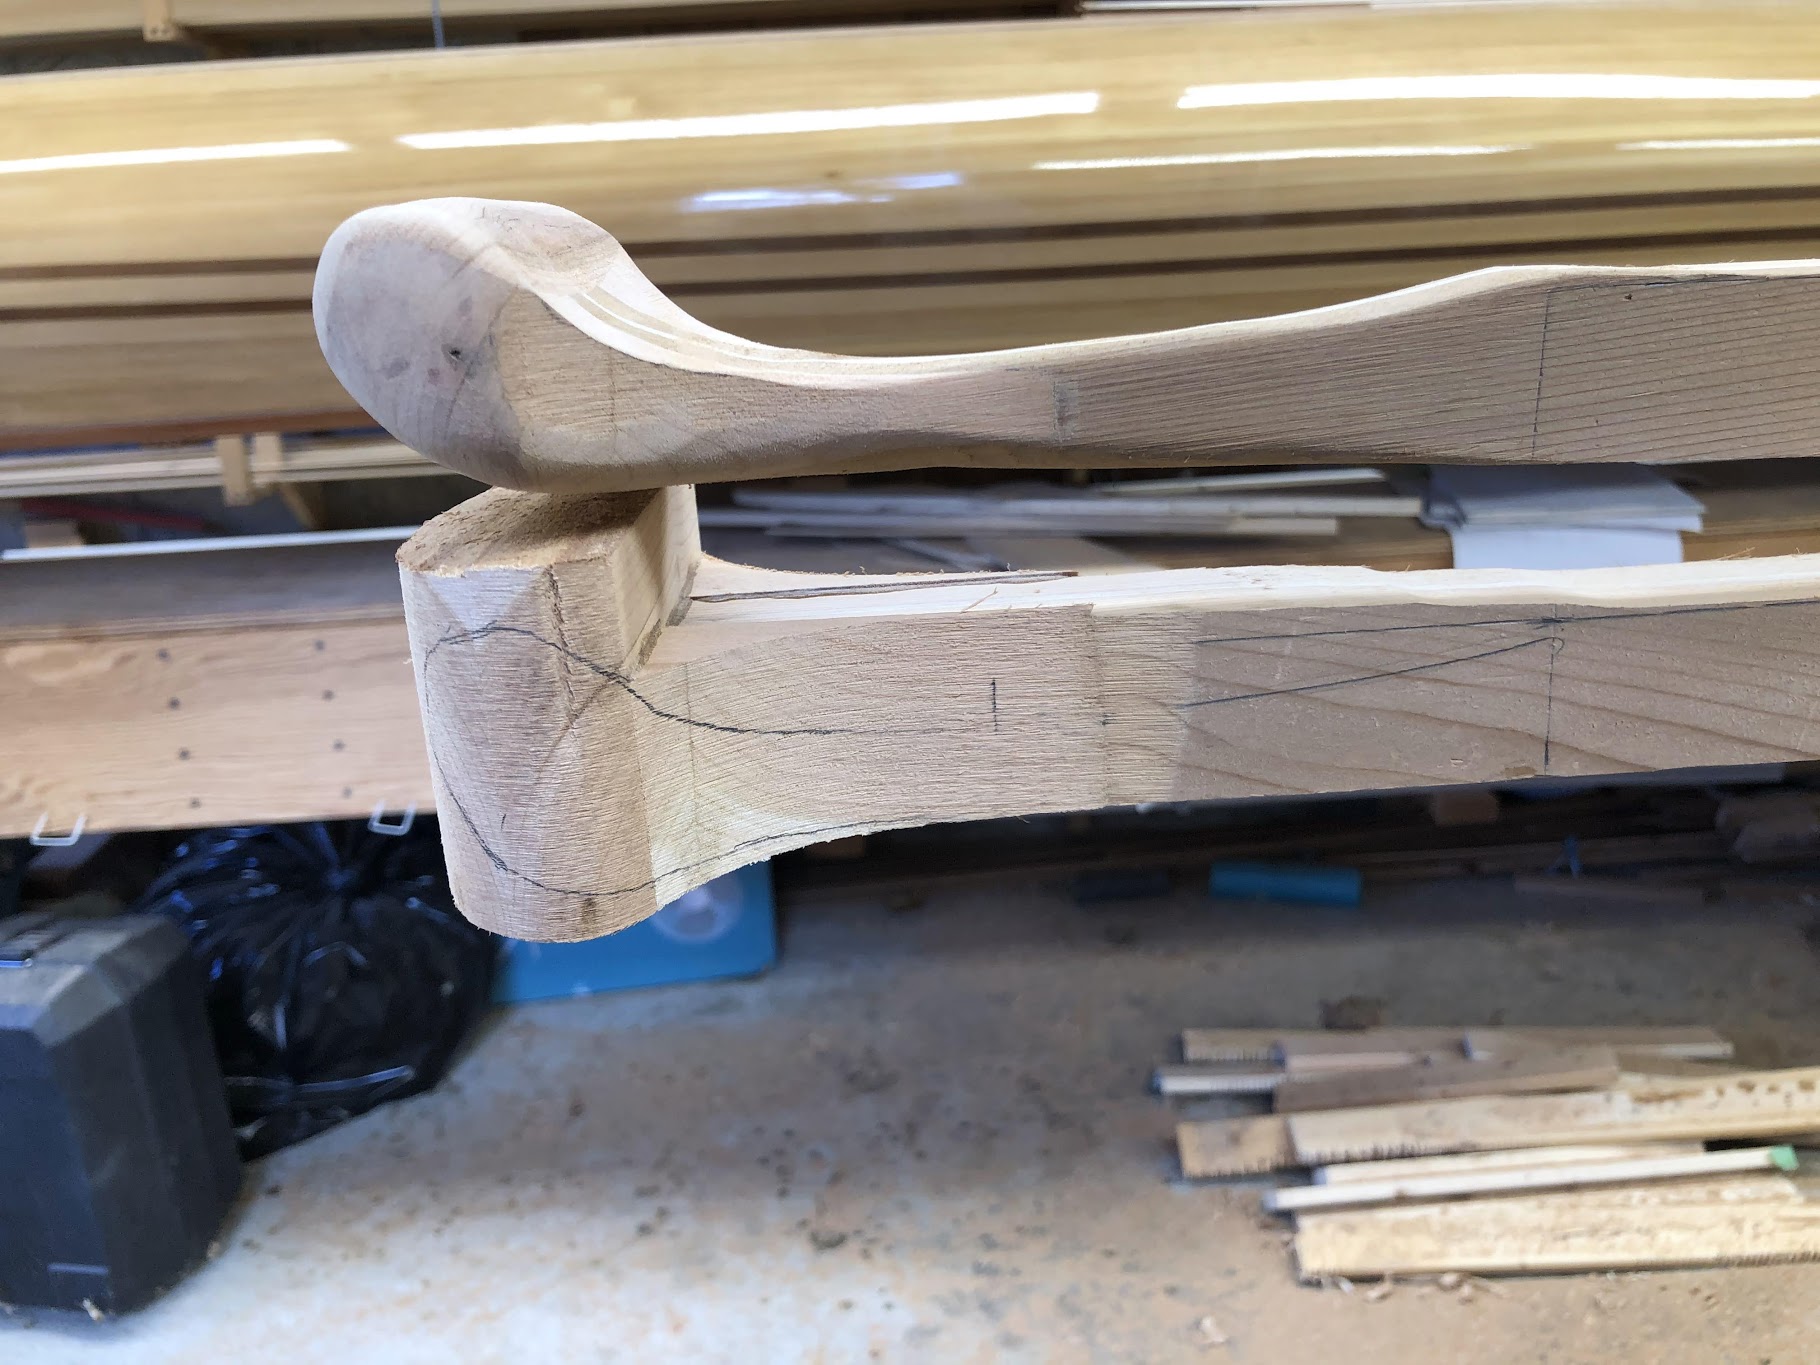
We are ready to attach and shape the handle on a single blade paddle. This is my own asymmetrical design I have been refining, but doing a symmetrical paddle is pretty much the same operations, just adjusted a bit ... the symmetrical operations center the handle and the asymmetrical will be from one side.
Just a word on the shaft sizing, currently we have it at 1 3/8" x 1 1/8", this gives a good sizing/grip at the blade end, but that size really isn't needed at the handle end. So reducing the height at the handle end to 1 1/8" will do 2 things, save a little weight and make the handle transition from oval at the blade to round as it gets to the handle end, which adds a very nice visual aspect.
Before we get to attaching handles, the shaft needs to be cut to length and some reference lines drawn.
The overall length of a paddle can be broken into 2 main parts, the length of the blade and the length of the shaft (at the blade start, the shaft ceases being a shaft and starts being a blade). So when talking about shaft length from a paddle sizing view, we are talking about the distance from the handle top to the start of the blade. So when sizing a paddle, for a paddler, the blade doesn't really participate .... granted the type and size of the blade is important for use, just not for the actual sizing.
Determining that paddle sizing is a source of considerable debate, which I will simply avoid and say that I am making a 34" shaft, which suits me fine. Before we get to doing that measure and cutting the shaft, you need to figure out how you will make your handle and how much length it may add to the shaft length, in this case, the handle will add ~3/4" to the length. Why bother with this little detail, well sizing the shaft is like getting the right size shoe, there is a little leeway, but you need to be close for it to be comfortable ... 3/4" can be the difference between, "WoW" and ">.< Damn it". So if you don't know that shaft length, you should try to figure it out before you start. It could be as easy as measuring a paddle you like and is comfortable, or maybe think is a bit too long and taking off 1/2" or so.
Make a mark at where the blade meets the shaft and measure along the shaft and make a mark at 34", make a second mark at minus 3/4" from that one.
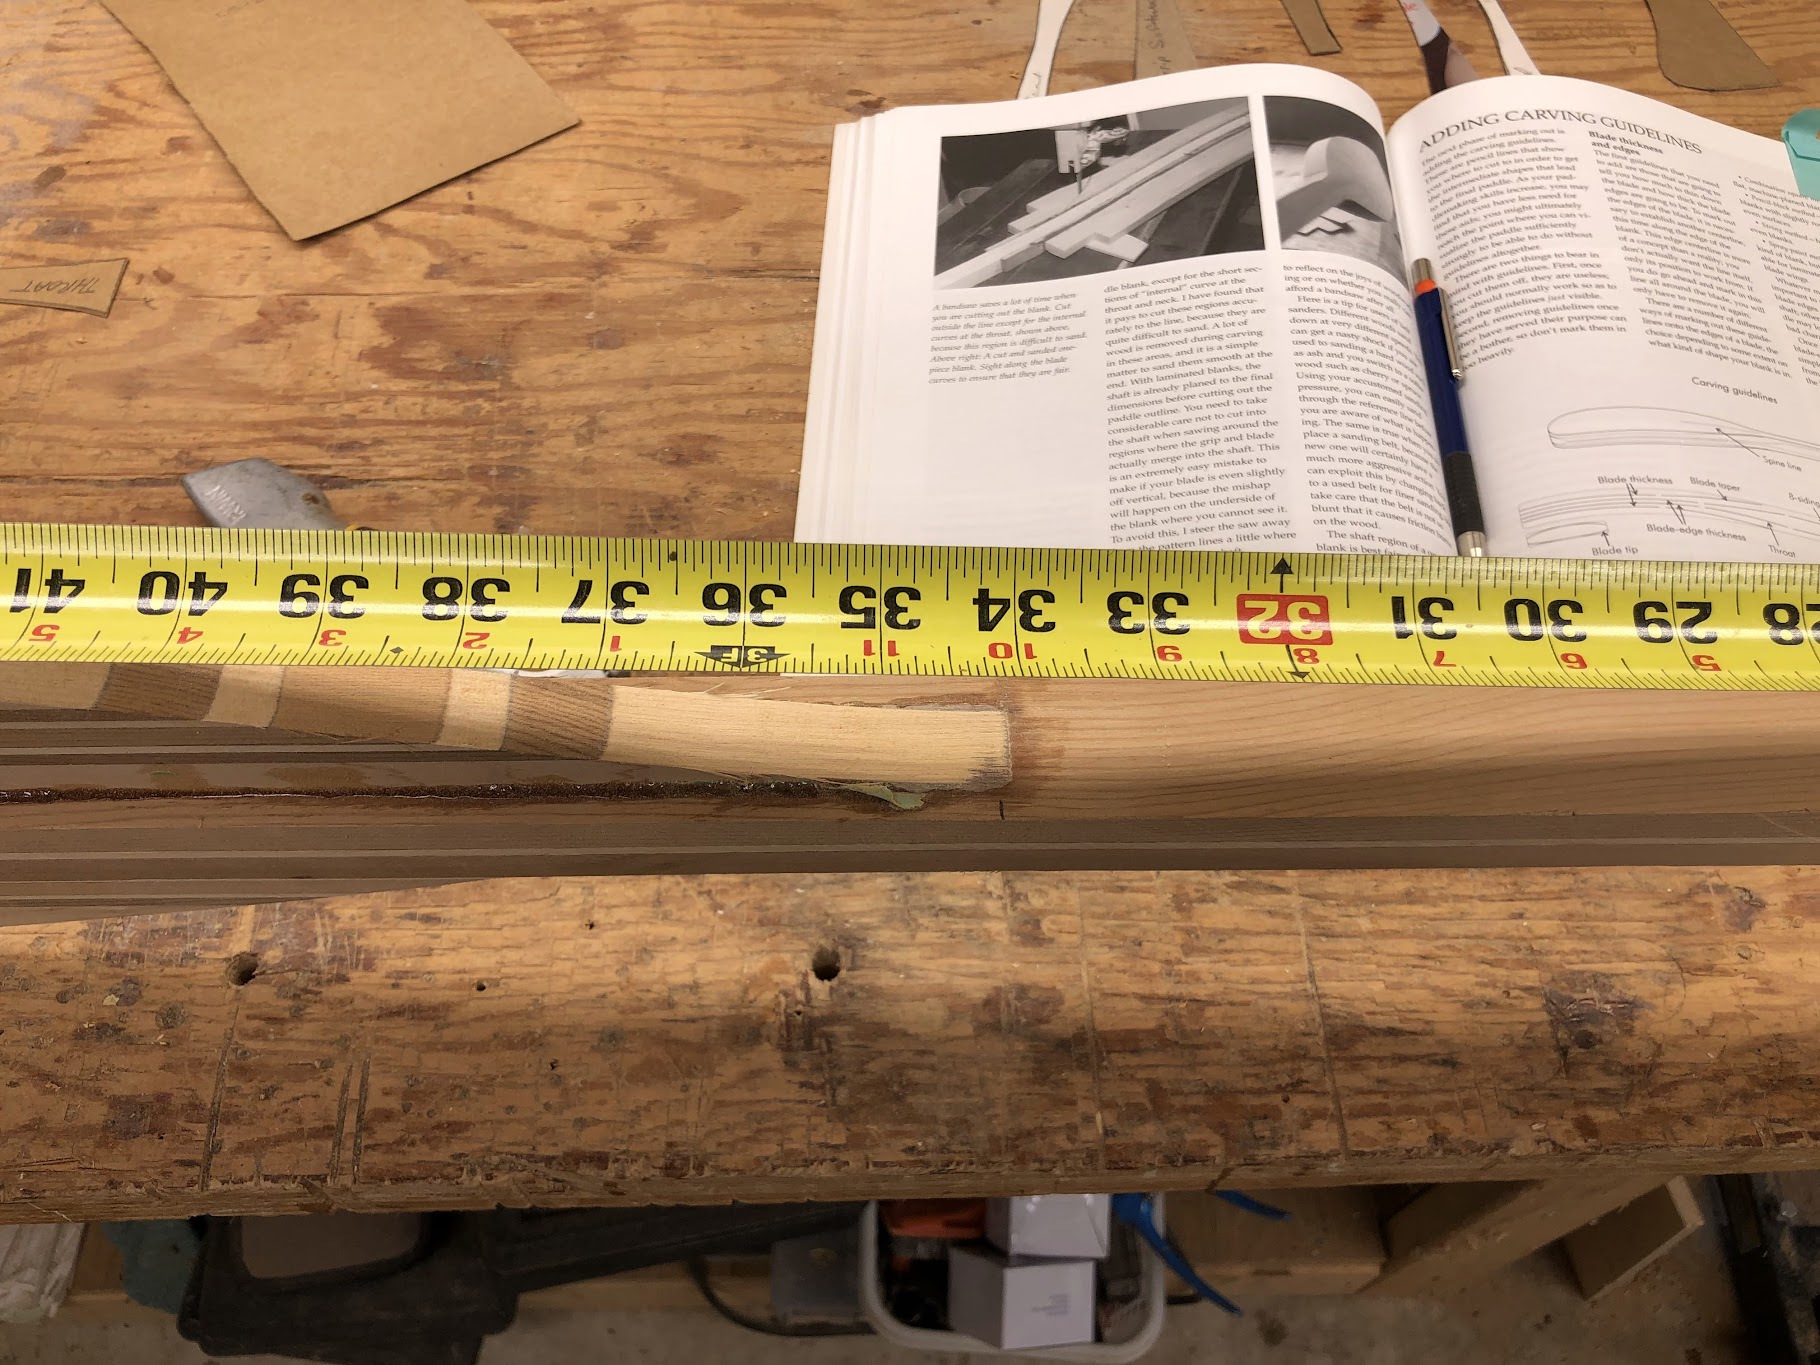
Since we are going to taper the blade, adding that line now is easier, measure up 6" from the blade end and make a mark, go the shaft end mark and measure down 1/4" and mark a mark (this is on the 1 3/8" side), then draw a line between the 2 marks. This is one of the few pics I have and is a little further along in the process, but you can see the taper line drawn in.

The handle will be attached to the sides, so extend that shaft end mark around the blades, so you have marks on the sides to align the handle to. Also a good idea to add a few carving/shaping marks in that end area, before we start gluing on hunks of wood.
Back to the book to get a few forms, I actually just keep the small patterns in the book, the ones I am using are ones I have made, the ones I get are called throat template and BC Version Handle ...

Draw in the throat curve (the curve is made to the taper line we added) and cut the shaft to length ... this is definitely a measure twice, cut once moment

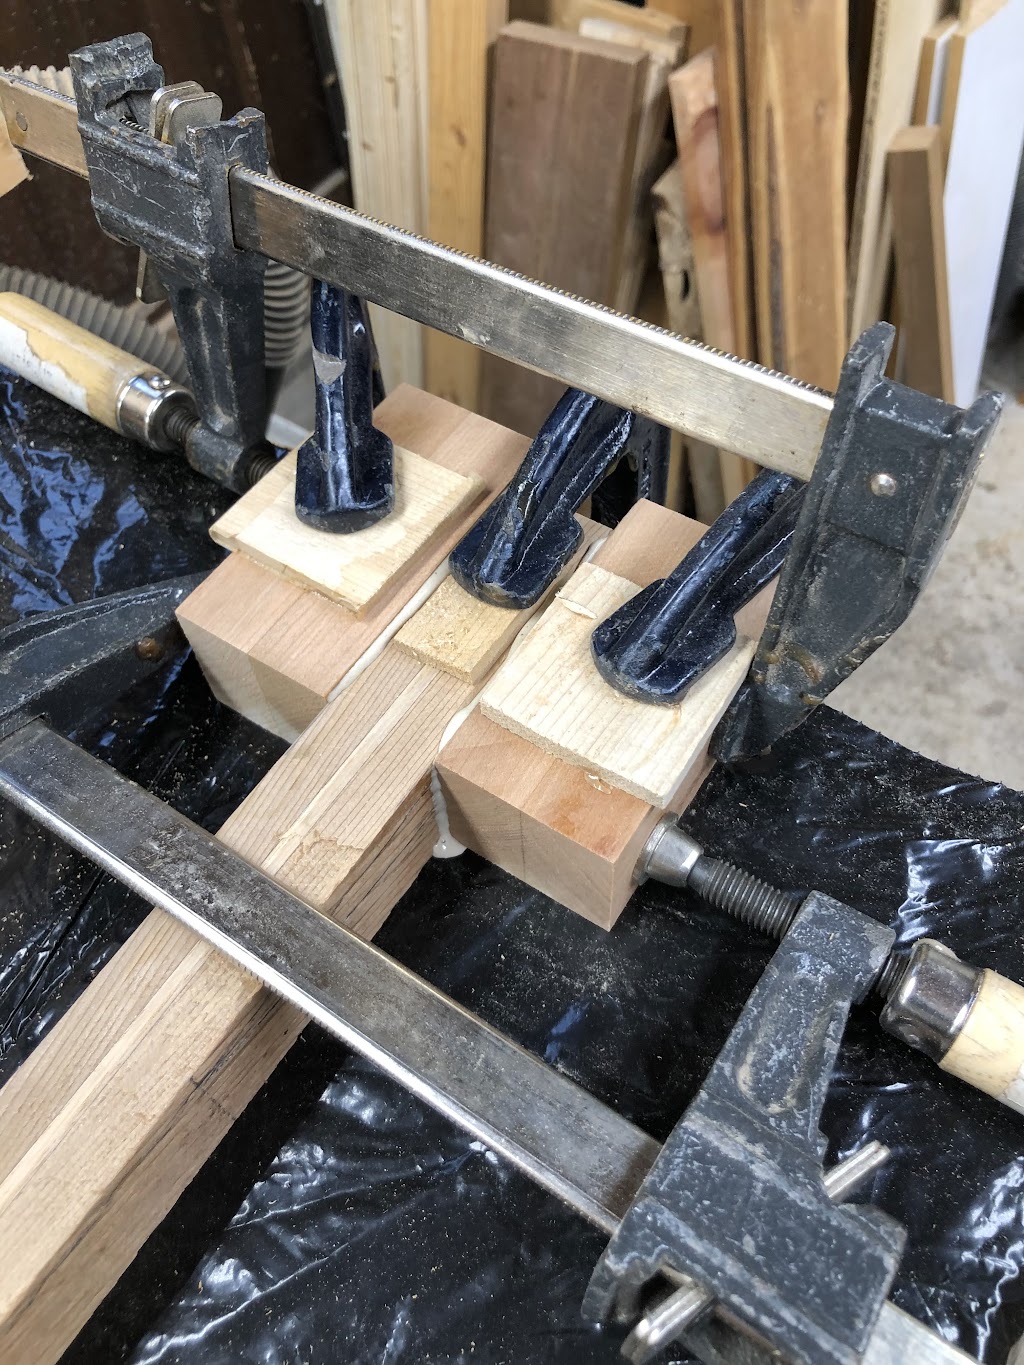
I am using cherry to make the handle, I took ~3/4" pieces and made up 3.5" long x ~1.25" thick x ~1.5" wide blocks .... I glued up a 2 longer pieces and just chopped them on the radial saw .... edges to be glued need to be clean and flat, the rest is mostly carved away so don't spend time cleaning too much
Add the first 2 handle pieces ... there is an orientation to worry about here, if you use a direction specific handle ... the power face is the bottom, if you are going symmetrical, it doesn't matter. Align the blocks to your handle line and leave the rest to overhang the shaft end.
I am using TB III and after an hour I find it is fine to make cuts, mark the shaft end across the blocks. I use a small block of wood to hold the shaft square while I make the end cut. This end cut will give a clean straight surface for the next gluing operation.
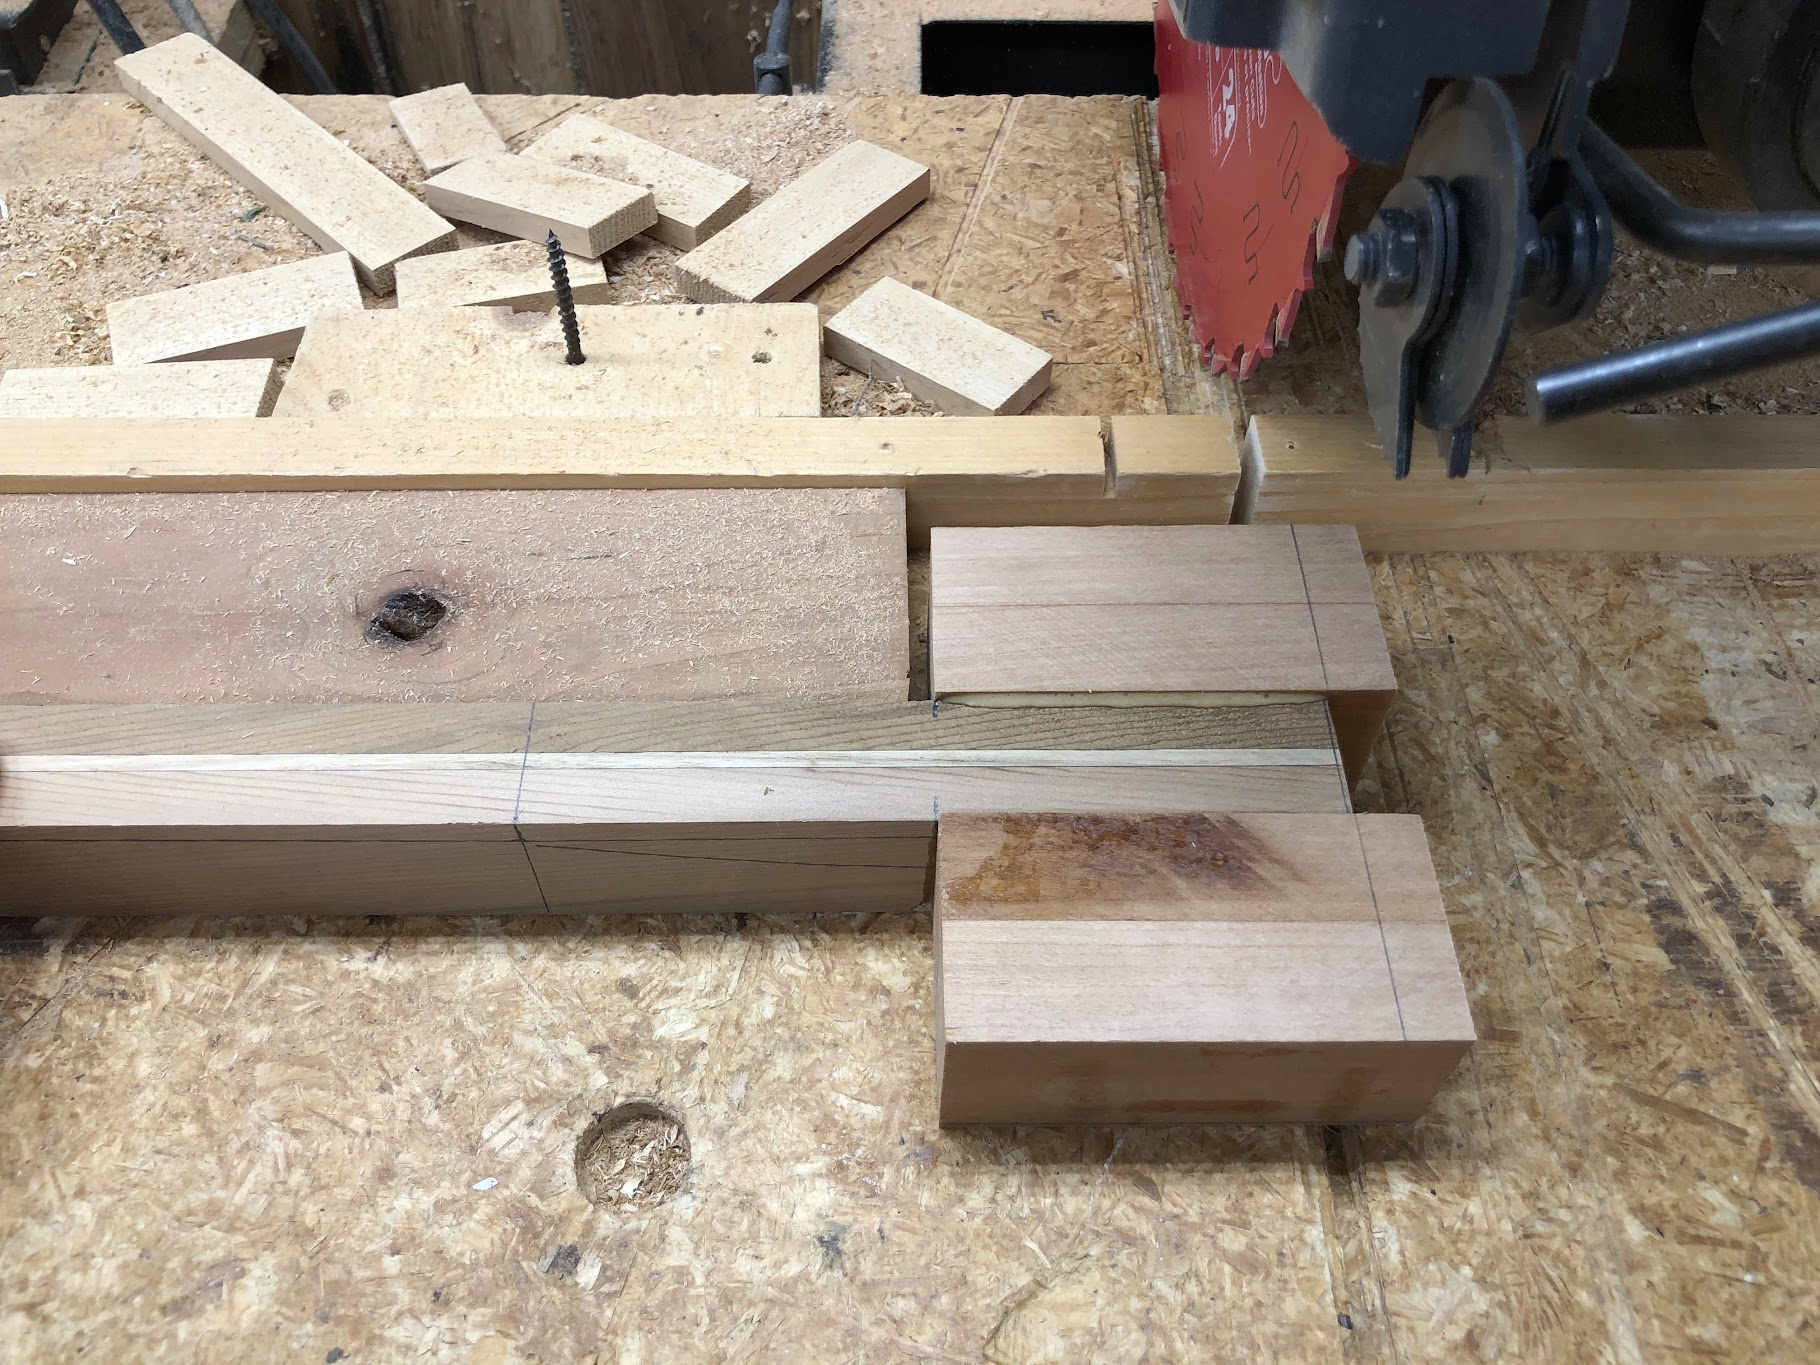
Attach the end cap pieces, orienting them with the wide side to the shaft.

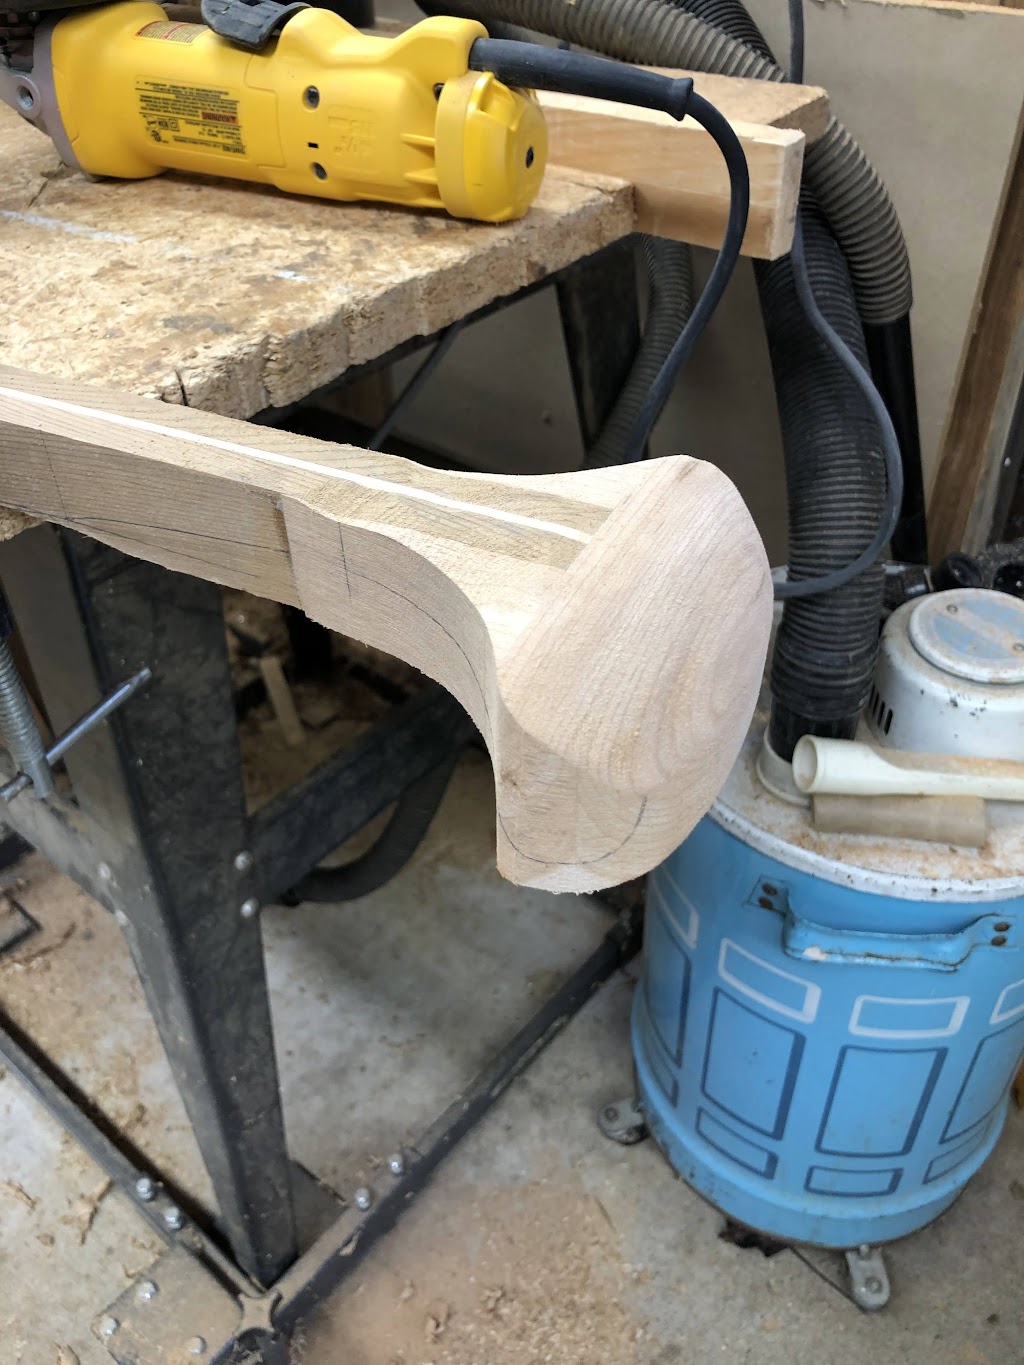
Draw in the handle shape on the flat side or back, using whatever form you decide, this is my own form

I use a jig saw to cut out the first dimension shape

Smooth the cut to the line, I use my vertical belt sander, use what you use to do this kind of operation.
At this point we will cut that taper we marked earlier, I just use the sander again, but a plane works fine

Get out the side shape pattern and trace it out on the side
Initial shaping for the side profile just follows that side profile line we put in earlier, removing wood in a long shallow arc as shown. I will do final shaping and smoothing after the Kutzall gets most of the wood removed ... just don't remove to the line, leave something extra to give you room to final shape.

To do the side shape I use 2 main tools to get the rough shape done, the vertical belt sander and angle grinder equipped with a Kutzall blade. The sander you have seen, this is the Kutzall ... scary first time you use, but it is amazing for removing wood and you get the feel very quickly. If you get one, definitely practice a bit on junk to get the feel.
The key I have found is patience and light cuts.
Do the big back curve on the belt sander as it gives the smoothest transition, then do the convex carving and edges with the KutzAll ... substitute whatever you use for carving, this is just how I do it.
Backside curve from the sander
Initial shaping

A little smoothing and comparison to blank
With and without throat smoothing (rasp/hand sandpaper)

The handles are ready for final sanding/smoothing, but that can wait until we get the shafts shaped/carved.
Next post will cover carving the shafts, the handles for the twins get added after the shafts are shaped ... so I may cover all that in a single post.
Brian
Just a word on the shaft sizing, currently we have it at 1 3/8" x 1 1/8", this gives a good sizing/grip at the blade end, but that size really isn't needed at the handle end. So reducing the height at the handle end to 1 1/8" will do 2 things, save a little weight and make the handle transition from oval at the blade to round as it gets to the handle end, which adds a very nice visual aspect.
Before we get to attaching handles, the shaft needs to be cut to length and some reference lines drawn.
The overall length of a paddle can be broken into 2 main parts, the length of the blade and the length of the shaft (at the blade start, the shaft ceases being a shaft and starts being a blade). So when talking about shaft length from a paddle sizing view, we are talking about the distance from the handle top to the start of the blade. So when sizing a paddle, for a paddler, the blade doesn't really participate .... granted the type and size of the blade is important for use, just not for the actual sizing.
Determining that paddle sizing is a source of considerable debate, which I will simply avoid and say that I am making a 34" shaft, which suits me fine. Before we get to doing that measure and cutting the shaft, you need to figure out how you will make your handle and how much length it may add to the shaft length, in this case, the handle will add ~3/4" to the length. Why bother with this little detail, well sizing the shaft is like getting the right size shoe, there is a little leeway, but you need to be close for it to be comfortable ... 3/4" can be the difference between, "WoW" and ">.< Damn it". So if you don't know that shaft length, you should try to figure it out before you start. It could be as easy as measuring a paddle you like and is comfortable, or maybe think is a bit too long and taking off 1/2" or so.
Make a mark at where the blade meets the shaft and measure along the shaft and make a mark at 34", make a second mark at minus 3/4" from that one.
Since we are going to taper the blade, adding that line now is easier, measure up 6" from the blade end and make a mark, go the shaft end mark and measure down 1/4" and mark a mark (this is on the 1 3/8" side), then draw a line between the 2 marks. This is one of the few pics I have and is a little further along in the process, but you can see the taper line drawn in.
The handle will be attached to the sides, so extend that shaft end mark around the blades, so you have marks on the sides to align the handle to. Also a good idea to add a few carving/shaping marks in that end area, before we start gluing on hunks of wood.
Back to the book to get a few forms, I actually just keep the small patterns in the book, the ones I am using are ones I have made, the ones I get are called throat template and BC Version Handle ...
Draw in the throat curve (the curve is made to the taper line we added) and cut the shaft to length ... this is definitely a measure twice, cut once moment
I am using cherry to make the handle, I took ~3/4" pieces and made up 3.5" long x ~1.25" thick x ~1.5" wide blocks .... I glued up a 2 longer pieces and just chopped them on the radial saw .... edges to be glued need to be clean and flat, the rest is mostly carved away so don't spend time cleaning too much
Add the first 2 handle pieces ... there is an orientation to worry about here, if you use a direction specific handle ... the power face is the bottom, if you are going symmetrical, it doesn't matter. Align the blocks to your handle line and leave the rest to overhang the shaft end.
I am using TB III and after an hour I find it is fine to make cuts, mark the shaft end across the blocks. I use a small block of wood to hold the shaft square while I make the end cut. This end cut will give a clean straight surface for the next gluing operation.
Attach the end cap pieces, orienting them with the wide side to the shaft.
Draw in the handle shape on the flat side or back, using whatever form you decide, this is my own form
I use a jig saw to cut out the first dimension shape
Smooth the cut to the line, I use my vertical belt sander, use what you use to do this kind of operation.
At this point we will cut that taper we marked earlier, I just use the sander again, but a plane works fine
Get out the side shape pattern and trace it out on the side
Initial shaping for the side profile just follows that side profile line we put in earlier, removing wood in a long shallow arc as shown. I will do final shaping and smoothing after the Kutzall gets most of the wood removed ... just don't remove to the line, leave something extra to give you room to final shape.
To do the side shape I use 2 main tools to get the rough shape done, the vertical belt sander and angle grinder equipped with a Kutzall blade. The sander you have seen, this is the Kutzall ... scary first time you use, but it is amazing for removing wood and you get the feel very quickly. If you get one, definitely practice a bit on junk to get the feel.
The key I have found is patience and light cuts.
Do the big back curve on the belt sander as it gives the smoothest transition, then do the convex carving and edges with the KutzAll ... substitute whatever you use for carving, this is just how I do it.
Backside curve from the sander
Initial shaping
A little smoothing and comparison to blank
With and without throat smoothing (rasp/hand sandpaper)
The handles are ready for final sanding/smoothing, but that can wait until we get the shafts shaped/carved.
Next post will cover carving the shafts, the handles for the twins get added after the shafts are shaped ... so I may cover all that in a single post.
Brian
Re: New Composite Paddles for 2020
Rounding the shafts for both the twin and single blades is the exact same process IF you leave the shafts as a regular rectangle. Our singles aren’t, they have that taper, so an extra step will need to be done.
To mark up a regular shaft, first draw a line on the face, perpendicular to the side. Then measure the width at that point and measure along the shaft that distance and draw another mark. Carefully join the corners and you should have this.

One half that diagonal is the correct measurement to draw a line for material removal. Set your measurement tool ( mine is an Incra Gauge) using that and draw in a line from each side. Flip over the shaft do the other side while you have the gauge set, repeat on the other side(s) and you get


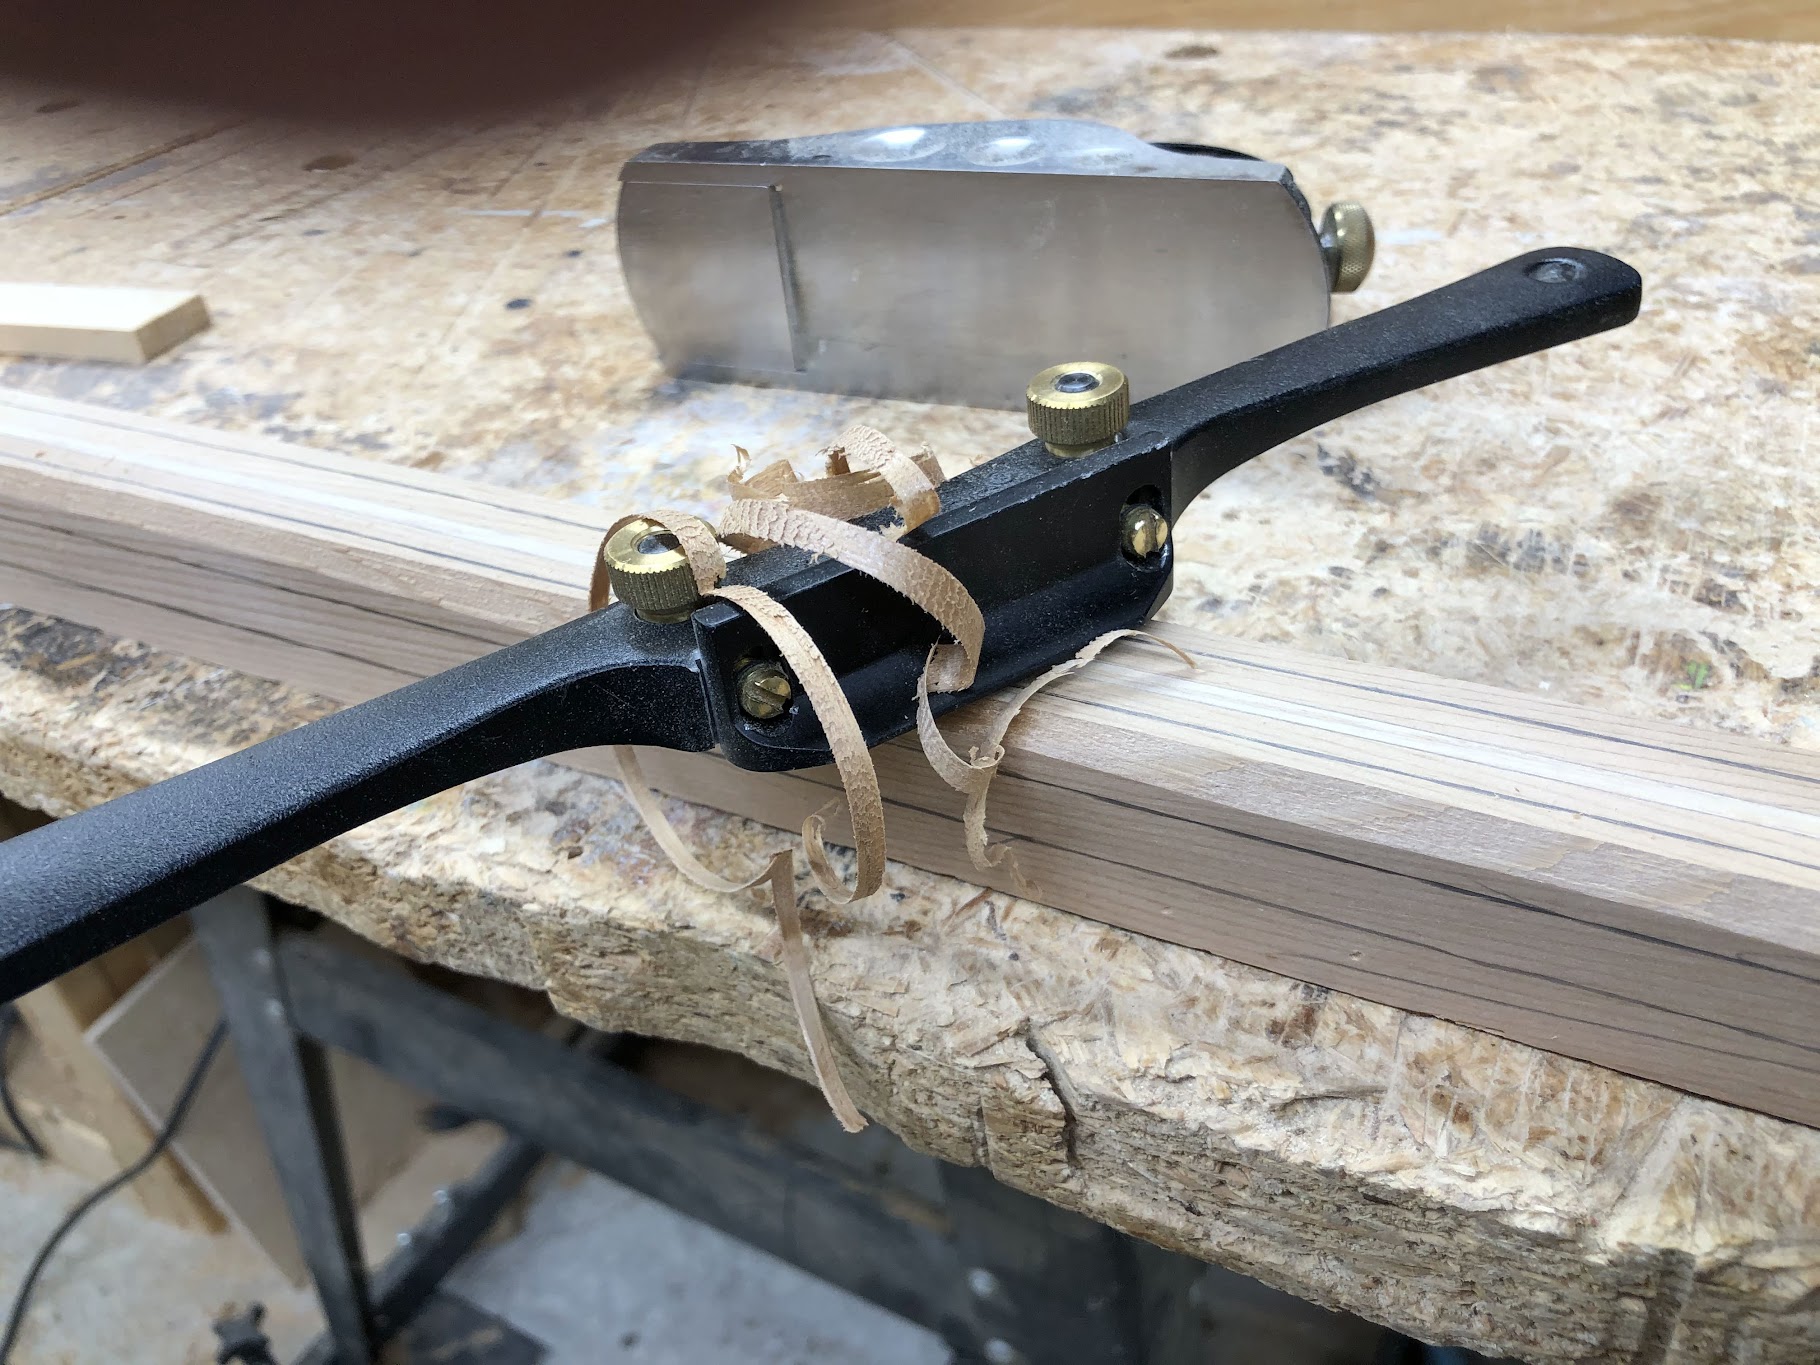
Set your spoke shave/plane for light cuts and remove the corner s using the lines as a guide. If the wood is grabbing/tearing just reverse the planing direction. The shaft wood will likely have a grain direction and you really don’t want to try and go opposite that or you will get tearouts/divets that can quickly mar the shaft. The light cuts help reduce this and also the extent of any tearouts you may get.
You now have a hex shape that looks like this, with 8 small corners instead of 4 larger ones
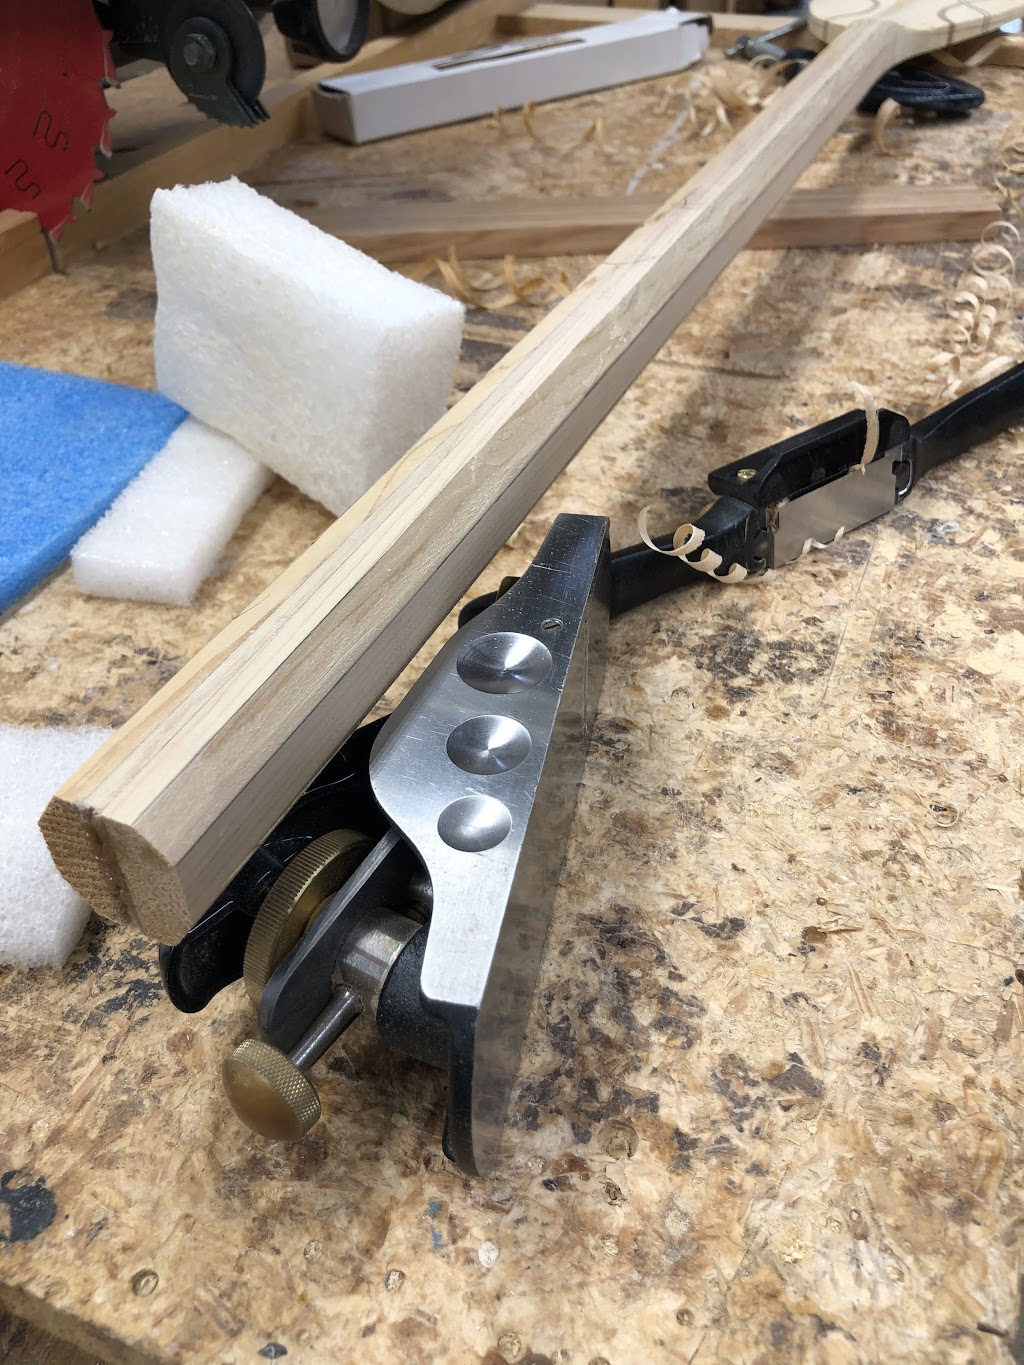
Now lightly plane off those 8 smaller corners, the operative word here is “lightly”, the corners are small and you just want to make the faces about the same size.
This will give you a 16 sided figure, that’s close to round, like this

Before we sand the shaft, let’s go back and do the tapered shaft.
We have a mark 6” up from where the blade begins, so draw one of the “X” boxes as described above, this time though, just make a mark for the line position.

Go down to the other end near the handle and repeat the process

Now use a ruler to connect the marks, this gives guide line that follow the taper …. So the shaft can gradually change along its length.
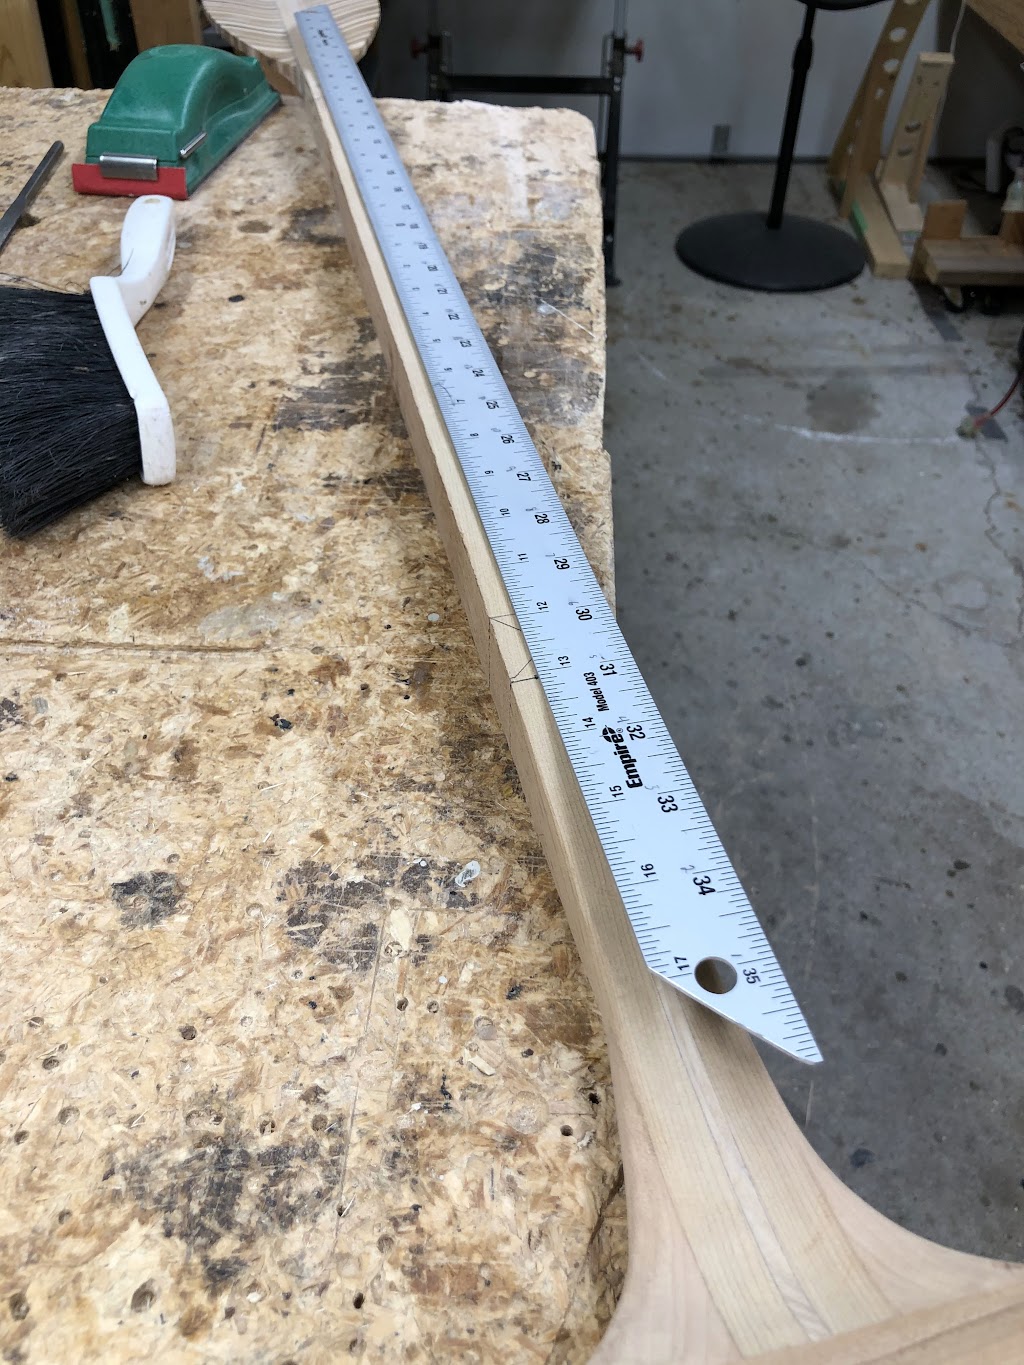
And the final guide lines look like this

And carving away the corners is the same as regular shaped shafts

On to final rounding and finishing of the shafts. First up, figure out your clamping solution, you need access to the entire length of the blade and you don’t want it flopping around. The blade is no longer flat, so remember when you fasten it down, be careful to not stress it … here was my solution, flat wood, foam pad and light clamp at one end. Pair of blacks at the other.


Sanding regime starts with a narrow strip of 80 grit and we start see sawing, gently down the blade, from top, sides, then flip over and repeat . The reason to go lightly is the 80 will scratch the wood, it is going to remove wood and shape the shaft … leaving visible scratches you will have to remove later. The harder you you pull the sand paper, the deeper the scratches and all those scratch have to sanded out with the next grit, go lightly and save some work on the next pass.

Move to a 100 grit strip, do the passes as before, finish by sanding with the grain, holding the paper with a small foam piece. The 100 grit is the start of actually finishing the shaft, the wood removal is done, so we are just getting stuff smooth now. I follow up with 120 and 150, as above and call it finished.
That gives us nicely rounded, ready to be finished shafts …. The twin blade handles are still not quite queued for installation … but soon.
Brian
To mark up a regular shaft, first draw a line on the face, perpendicular to the side. Then measure the width at that point and measure along the shaft that distance and draw another mark. Carefully join the corners and you should have this.
One half that diagonal is the correct measurement to draw a line for material removal. Set your measurement tool ( mine is an Incra Gauge) using that and draw in a line from each side. Flip over the shaft do the other side while you have the gauge set, repeat on the other side(s) and you get
Set your spoke shave/plane for light cuts and remove the corner s using the lines as a guide. If the wood is grabbing/tearing just reverse the planing direction. The shaft wood will likely have a grain direction and you really don’t want to try and go opposite that or you will get tearouts/divets that can quickly mar the shaft. The light cuts help reduce this and also the extent of any tearouts you may get.
You now have a hex shape that looks like this, with 8 small corners instead of 4 larger ones
Now lightly plane off those 8 smaller corners, the operative word here is “lightly”, the corners are small and you just want to make the faces about the same size.
This will give you a 16 sided figure, that’s close to round, like this
Before we sand the shaft, let’s go back and do the tapered shaft.
We have a mark 6” up from where the blade begins, so draw one of the “X” boxes as described above, this time though, just make a mark for the line position.
Go down to the other end near the handle and repeat the process
Now use a ruler to connect the marks, this gives guide line that follow the taper …. So the shaft can gradually change along its length.
And the final guide lines look like this
And carving away the corners is the same as regular shaped shafts
On to final rounding and finishing of the shafts. First up, figure out your clamping solution, you need access to the entire length of the blade and you don’t want it flopping around. The blade is no longer flat, so remember when you fasten it down, be careful to not stress it … here was my solution, flat wood, foam pad and light clamp at one end. Pair of blacks at the other.
Sanding regime starts with a narrow strip of 80 grit and we start see sawing, gently down the blade, from top, sides, then flip over and repeat . The reason to go lightly is the 80 will scratch the wood, it is going to remove wood and shape the shaft … leaving visible scratches you will have to remove later. The harder you you pull the sand paper, the deeper the scratches and all those scratch have to sanded out with the next grit, go lightly and save some work on the next pass.
Move to a 100 grit strip, do the passes as before, finish by sanding with the grain, holding the paper with a small foam piece. The 100 grit is the start of actually finishing the shaft, the wood removal is done, so we are just getting stuff smooth now. I follow up with 120 and 150, as above and call it finished.
That gives us nicely rounded, ready to be finished shafts …. The twin blade handles are still not quite queued for installation … but soon.
Brian
Re: New Composite Paddles for 2020
Putting some type of tip protection on a paddle is almost a given, there are a few types, but these will be getting some re-enforced epoxy tips.
First we make up some tip forms, for the single paddles just use the paddle to trace out the shape, for the twin, use the pattern to trace out the paddle shape on a couple of 1/2" plywood pieces
Roughly cut out the forms outside the lines and sand them to shape

Make sure the blade tips fit the form nicely
The size and shape of the tip (IMO) should cover any of the tip end grain as a minimum and carry around the area of the paddle tip that may encounter rocks or be solidly pushed against. Mine are 3/8" wide and the same thickness as the blade. If I am doing one blade, then I would just mark the start and stop on the blade, use a compass to mark a 3/8" line, in from the edge. Remove that line of the vertical sander and be done. However, I have a batch, so I took the time to make a couple of patterns to draw these lines.
Twin pattern ...

Line drawn and wood removed on twin (single is same)

I place alignment marks on the patterns and the blades, another view of a twin drawn line setup to form

The clamping solution is worked out next. I ended up using 2 different ones on this set, first "C" clamps with a holder bar across the blade, spring clamps holding the form, also notice we have that MDF/melamine board out again for clamping, it is a god base for these operations

Then I move to just spring clamps as it was easier ... point is there are usually several clamping solutions

Once you are ready to do a tip ... start with an unclamped blade, mix up the epoxy, I used a double pump shot ~1.5 oz. then proceed to saturate the tip area with unthickened epoxy, you have 20 minutes or so, so there is no rush. Apply, wait a minute, look, if the tip has absorbed all the epoxy, add more, after about 5 minutes it should be good.
Set it up in the clamps, you can see here that the tip is wetout with epoxy
This set of epoxy tips are going to use glass "rebar" (strands) added to the mix, it should make the epoxy even stronger, they look like this

Time to thicken up the epoxy and apply the tip ... start with the wood flour, add until the colour is a bit darker than you would like .. this will leave the epoxy pretty "runny" as it doesn't take much wood flour to colour it. Add cabosil until it is visibly thicker, check the colour again (cabosil will lighten) once the colour is good, mix in the re enforcing glass strands. It is hard to give a definitive quantity of glass strands to add, but I use about 1/2 the volume of the epoxy you are working with.
Then finish mixing with cabosil/woodflour to a light peanut butter consistency.
Recycling a previous pic, this is the little glue brush I use for doing the tips. They are stiff enough to move "globs" of mix to the form, it should be thick enough that it doesn't flow too well, it will flow, but not enough to pour
Ladle the mix into the form space ... use the brush to ladle the epoxy/glass mix to the void. Also use the brush to make sure there are no air voids in the epoxy added ... use an up and down motion with the brush in the epoxy to make sure it is all well wetted out and to pop any voids. Use the brush to cleanup the paddle epoxy boundary, just brush the epoxy back off the paddle a bit. The brush back is solely to make the next cleanup steps easier.

Once it is setup ( I leave mine overnight) carefully remove from the form and you should have something like this, with excess on the top and fairly flat on the bottom.


It is much easier to carve away the excess epoxy while it is still green, so work out a way to hold down the paddle while you carve
Then start filing ... rasping? This is what the progression will look like


Careful when you reach this point, you do not want to involve the wood in your removal. Any marks you make in the wood part of blade will have to be removed later, so try not to make any.


Square and shape the bottom edge, followed by a flat sanding to make it all pretty again and smooth over any rough marks made by the rasp

We have epoxy tips with glass re enforcement .. first time I have used the glass strands, but i think it is going to work well.
Brian
First we make up some tip forms, for the single paddles just use the paddle to trace out the shape, for the twin, use the pattern to trace out the paddle shape on a couple of 1/2" plywood pieces
Roughly cut out the forms outside the lines and sand them to shape
Make sure the blade tips fit the form nicely
The size and shape of the tip (IMO) should cover any of the tip end grain as a minimum and carry around the area of the paddle tip that may encounter rocks or be solidly pushed against. Mine are 3/8" wide and the same thickness as the blade. If I am doing one blade, then I would just mark the start and stop on the blade, use a compass to mark a 3/8" line, in from the edge. Remove that line of the vertical sander and be done. However, I have a batch, so I took the time to make a couple of patterns to draw these lines.
Twin pattern ...
Line drawn and wood removed on twin (single is same)
I place alignment marks on the patterns and the blades, another view of a twin drawn line setup to form
The clamping solution is worked out next. I ended up using 2 different ones on this set, first "C" clamps with a holder bar across the blade, spring clamps holding the form, also notice we have that MDF/melamine board out again for clamping, it is a god base for these operations
Then I move to just spring clamps as it was easier ... point is there are usually several clamping solutions
Once you are ready to do a tip ... start with an unclamped blade, mix up the epoxy, I used a double pump shot ~1.5 oz. then proceed to saturate the tip area with unthickened epoxy, you have 20 minutes or so, so there is no rush. Apply, wait a minute, look, if the tip has absorbed all the epoxy, add more, after about 5 minutes it should be good.
Set it up in the clamps, you can see here that the tip is wetout with epoxy
This set of epoxy tips are going to use glass "rebar" (strands) added to the mix, it should make the epoxy even stronger, they look like this
Time to thicken up the epoxy and apply the tip ... start with the wood flour, add until the colour is a bit darker than you would like .. this will leave the epoxy pretty "runny" as it doesn't take much wood flour to colour it. Add cabosil until it is visibly thicker, check the colour again (cabosil will lighten) once the colour is good, mix in the re enforcing glass strands. It is hard to give a definitive quantity of glass strands to add, but I use about 1/2 the volume of the epoxy you are working with.
Then finish mixing with cabosil/woodflour to a light peanut butter consistency.
Recycling a previous pic, this is the little glue brush I use for doing the tips. They are stiff enough to move "globs" of mix to the form, it should be thick enough that it doesn't flow too well, it will flow, but not enough to pour
Ladle the mix into the form space ... use the brush to ladle the epoxy/glass mix to the void. Also use the brush to make sure there are no air voids in the epoxy added ... use an up and down motion with the brush in the epoxy to make sure it is all well wetted out and to pop any voids. Use the brush to cleanup the paddle epoxy boundary, just brush the epoxy back off the paddle a bit. The brush back is solely to make the next cleanup steps easier.
Once it is setup ( I leave mine overnight) carefully remove from the form and you should have something like this, with excess on the top and fairly flat on the bottom.
It is much easier to carve away the excess epoxy while it is still green, so work out a way to hold down the paddle while you carve
Then start filing ... rasping? This is what the progression will look like
Careful when you reach this point, you do not want to involve the wood in your removal. Any marks you make in the wood part of blade will have to be removed later, so try not to make any.
Square and shape the bottom edge, followed by a flat sanding to make it all pretty again and smooth over any rough marks made by the rasp
We have epoxy tips with glass re enforcement .. first time I have used the glass strands, but i think it is going to work well.
Brian
Re: New Composite Paddles for 2020
Nice Brian.
Anxious to see how your Mix stands up to actual use.
I've always been curious what Bending Branches use ? It holds up very well, in the paddles I've used.
Anxious to see how your Mix stands up to actual use.
I've always been curious what Bending Branches use ? It holds up very well, in the paddles I've used.
Keep your paddle wet and your seat dry!
Re: New Composite Paddles for 2020
Hi Jim, the twin sets have already seen a couple trips last fall ... I have older paddles done with plain epoxy that have taken quite s few trips and seen more than a few rocks. They all seem to be fine as well. Adding the glass strands was new, using the epoxy is not.
Brian
Brian
Re: New Composite Paddles for 2020
These paddles have a slim profile, and are made almost entirely of softwood, this makes them sleek, light, easy to shape and sand. It doesn't however make the blades as strong as I think they need to be, so let's fix that now by adding some fiberglass to the equation.
First step is to finish sand the blade and shafts to 150 grit, leave the blade edges flat, just do the blade flats and shaft, the blade edges will be dealt with later. I prefer to hand sand at this point, with the grain and using a light hand. Vaccuum, and tac rag the shafts clean and set aside.
I used scissors to cut the fiberglass for the first paddles I did, it was a bit of a pita and chewed up a bit of glass in waste. I took up sewing to make quite a bit of my gear and during my reading I found a reference to using a rotary fabric cutting wheel to cut fiberglass. I have a rotary cutter, I have the cutting mat and hands down this is the fastest, cleanest, easiest way to handle fiberglass cloth cutting IMO.
So first I make up a few cutting templates, adding 1/4" to the outside edge to give a little wiggle room and 1/2" extra at the throat area.
Making the single paddle fiberglass cutting templates ...

the the twin blade template

The fiberglass cloth i am using is 2 oz, which is light and still very strong for this purpose. This pic shows the FG cloth laid out with a template and the rotary cutter ... to cut the piece, just press down on the template and follow the edge with the rotary cutter ... it is very quick and the edges are clean.

I do them all at once, for 3 twins and 2 singles that is 16 pieces, so the templates are worth making (again IMO).

With the paddles ready and the fiberglass cut, we need to look at setting up an area to do the fiberglassing. This is typically one area to apply the FG and a second area to let the paddles cure. I cobbled this together for to use with the twins


and this for the singles


For letting the blade sit and cure I made a bigger version

and the singles will just hang from these regular paddle handle hanger thingies

You may have noticed in the previous pic of where the paddles will be cured, each twin has a piece of green painters tape wrapped around the handle end. This marks where the carbon fiber ferrule sits on the shaft. When we apply the first coat of epoxy, the shaft will be covered up to this point. The reason for this is that when applying any initial finish, where ever you stop will always leave a mark or line when you apply the second coat to cover the rest... if I apply just to the blade area, I will get a line at the area i stop application. This is true with most finishes, the solution is to not stop and carry that first coat up to the handle. Additionally, sealing the wood with epoxy seems to give a smoother final finish and we all love shiny stuff.
Since you will need to know how to place that tape for the handle, I guess this is as good as anywhere to do the math required. The twins are going to be 260 cm or 102.4" or 8.5' ( say 51.2" per shaft)... to keep it simple I will swap over to inches and you can convert as needed.
The ferrule I use is 14" long and the paddle shaft is inserted for 3" ... so it adds 14" - 3" - 3" = 8" to the overall length of the shaft or 4" for each piece. The actual shaft length of each half is 51.2" - 4" + 3" = 50.2" .... so measure from the blade tip and make a mark at 50.2", measure 3" towards the blade from this mark and mark a second mark. The first mark is the cutoff mark, the second mark is where the handle will stop and it is where we stop the epoxy application. Put a piece of painters tape at the second mark, closest to blade, allowing epoxy to be applied to that mark.
Wait until after we do the epoxy work to do the cutoff, having the extra length makes the shaft easier to handle for now.
For the twins we also add tape, but no measuring, just put a ring of tape about 3" from the handle top. We will epoxy up to the point where the handle starts, after that the intention is to use oil.
Setup your epoxy workstation and load up a paddle. Here the bottom fiberglass piece has already been added and the blade has been flipped for the other side. Pretty standard application, I like to pour a narrow stream of epoxy down the center of the shaft, leave it a few seconds to soak and move then it around with a small foam roller, the foam brush is used around the throat area to get the FG to encircle the throat area as best as it can. The excess is squeegeed off carefully using a very low angle, low pressure drag.

Once the the blades have been done and squeegeed, remove the paddle and epoxy to the tape, then place in the holder to cure ... remove that tape at this point, so it doesn't get epoxied in.

Not everyone has done epoxy work, but typically it is a 3 coat regime. Coat one is to adhere the glass and form the composite structure, excess epoxy is squeegeed off as it adds no strength, only weight (and sometimes lumps). A note about squeegeeing it is done after about 20 minutes, when the epoxy starts to thicken.
Allowed to cure for about 2.5 hours (this is manufacturer dependent, check for yours) at which point the finish will dent with a fingernail, but has little tack and the glass weave is very visible.
Apply the second coat and squeegee off any excess, this is called a fill coat and it's job is to fill in the little pockets in the glass weave ... so the squeegee takes everything that isn't in a pocket ... make sure you wait for the epoxy start to thicken (also called "kick") before you squeegee.
Apply the 3rd coat, this is the flood coat and it will bury the the fiberglass deep enough that it will give a smooth coat that can be sanded without getting down to the actual fiberglass ... this one is thick enough to cover , but not thick enough to cause runs ... which can be a little tricky, I think about the amount you use when painting a wall may be a good guide for comparison.
Rack the paddles and allow to cure overnight


In the morning I always check the mix cups, to make sure all the epoxy cured hard

Trim off any excess cloth, I use a utility knife leaned over on its side, if you keep the angle shallow, it won't bite into the wood and will shear off the glass cleanly. Be careful of the cut edges, they are very sharp.

The area around the throat is a little irregular, just trim that where the epoxy to wood bond ends

Use a carbide scraper to level/feather where the fiberglass ends. I find a light pull at an angle to the ridge works best, pulling towards the blade tip.

One done, one to go comparison

The edges need to be cleaned up, so i load some 120 grit sand paper into the flat sander (this is called a "Preppin Weapon")

Use the sand paper to smooth around the throat, knock off the edges of the cut glass around the blade and round then slightly

Sand and round over the epoxy tip as well

Mix up a small batch of epoxy and lightly coat the areas you just sanded, place them in the racks to cure.

The fiberglassing is complete, we just have to wait on a full cure before moving on to varnishing.
Brian
First step is to finish sand the blade and shafts to 150 grit, leave the blade edges flat, just do the blade flats and shaft, the blade edges will be dealt with later. I prefer to hand sand at this point, with the grain and using a light hand. Vaccuum, and tac rag the shafts clean and set aside.
I used scissors to cut the fiberglass for the first paddles I did, it was a bit of a pita and chewed up a bit of glass in waste. I took up sewing to make quite a bit of my gear and during my reading I found a reference to using a rotary fabric cutting wheel to cut fiberglass. I have a rotary cutter, I have the cutting mat and hands down this is the fastest, cleanest, easiest way to handle fiberglass cloth cutting IMO.
So first I make up a few cutting templates, adding 1/4" to the outside edge to give a little wiggle room and 1/2" extra at the throat area.
Making the single paddle fiberglass cutting templates ...
the the twin blade template
The fiberglass cloth i am using is 2 oz, which is light and still very strong for this purpose. This pic shows the FG cloth laid out with a template and the rotary cutter ... to cut the piece, just press down on the template and follow the edge with the rotary cutter ... it is very quick and the edges are clean.
I do them all at once, for 3 twins and 2 singles that is 16 pieces, so the templates are worth making (again IMO).
With the paddles ready and the fiberglass cut, we need to look at setting up an area to do the fiberglassing. This is typically one area to apply the FG and a second area to let the paddles cure. I cobbled this together for to use with the twins
and this for the singles
For letting the blade sit and cure I made a bigger version
and the singles will just hang from these regular paddle handle hanger thingies
You may have noticed in the previous pic of where the paddles will be cured, each twin has a piece of green painters tape wrapped around the handle end. This marks where the carbon fiber ferrule sits on the shaft. When we apply the first coat of epoxy, the shaft will be covered up to this point. The reason for this is that when applying any initial finish, where ever you stop will always leave a mark or line when you apply the second coat to cover the rest... if I apply just to the blade area, I will get a line at the area i stop application. This is true with most finishes, the solution is to not stop and carry that first coat up to the handle. Additionally, sealing the wood with epoxy seems to give a smoother final finish and we all love shiny stuff.
Since you will need to know how to place that tape for the handle, I guess this is as good as anywhere to do the math required. The twins are going to be 260 cm or 102.4" or 8.5' ( say 51.2" per shaft)... to keep it simple I will swap over to inches and you can convert as needed.
The ferrule I use is 14" long and the paddle shaft is inserted for 3" ... so it adds 14" - 3" - 3" = 8" to the overall length of the shaft or 4" for each piece. The actual shaft length of each half is 51.2" - 4" + 3" = 50.2" .... so measure from the blade tip and make a mark at 50.2", measure 3" towards the blade from this mark and mark a second mark. The first mark is the cutoff mark, the second mark is where the handle will stop and it is where we stop the epoxy application. Put a piece of painters tape at the second mark, closest to blade, allowing epoxy to be applied to that mark.
Wait until after we do the epoxy work to do the cutoff, having the extra length makes the shaft easier to handle for now.
For the twins we also add tape, but no measuring, just put a ring of tape about 3" from the handle top. We will epoxy up to the point where the handle starts, after that the intention is to use oil.
Setup your epoxy workstation and load up a paddle. Here the bottom fiberglass piece has already been added and the blade has been flipped for the other side. Pretty standard application, I like to pour a narrow stream of epoxy down the center of the shaft, leave it a few seconds to soak and move then it around with a small foam roller, the foam brush is used around the throat area to get the FG to encircle the throat area as best as it can. The excess is squeegeed off carefully using a very low angle, low pressure drag.
Once the the blades have been done and squeegeed, remove the paddle and epoxy to the tape, then place in the holder to cure ... remove that tape at this point, so it doesn't get epoxied in.
Not everyone has done epoxy work, but typically it is a 3 coat regime. Coat one is to adhere the glass and form the composite structure, excess epoxy is squeegeed off as it adds no strength, only weight (and sometimes lumps). A note about squeegeeing it is done after about 20 minutes, when the epoxy starts to thicken.
Allowed to cure for about 2.5 hours (this is manufacturer dependent, check for yours) at which point the finish will dent with a fingernail, but has little tack and the glass weave is very visible.
Apply the second coat and squeegee off any excess, this is called a fill coat and it's job is to fill in the little pockets in the glass weave ... so the squeegee takes everything that isn't in a pocket ... make sure you wait for the epoxy start to thicken (also called "kick") before you squeegee.
Apply the 3rd coat, this is the flood coat and it will bury the the fiberglass deep enough that it will give a smooth coat that can be sanded without getting down to the actual fiberglass ... this one is thick enough to cover , but not thick enough to cause runs ... which can be a little tricky, I think about the amount you use when painting a wall may be a good guide for comparison.
Rack the paddles and allow to cure overnight
In the morning I always check the mix cups, to make sure all the epoxy cured hard
Trim off any excess cloth, I use a utility knife leaned over on its side, if you keep the angle shallow, it won't bite into the wood and will shear off the glass cleanly. Be careful of the cut edges, they are very sharp.
The area around the throat is a little irregular, just trim that where the epoxy to wood bond ends
Use a carbide scraper to level/feather where the fiberglass ends. I find a light pull at an angle to the ridge works best, pulling towards the blade tip.
One done, one to go comparison
The edges need to be cleaned up, so i load some 120 grit sand paper into the flat sander (this is called a "Preppin Weapon")
Use the sand paper to smooth around the throat, knock off the edges of the cut glass around the blade and round then slightly
Sand and round over the epoxy tip as well
Mix up a small batch of epoxy and lightly coat the areas you just sanded, place them in the racks to cure.
The fiberglassing is complete, we just have to wait on a full cure before moving on to varnishing.
Brian
Re: New Composite Paddles for 2020
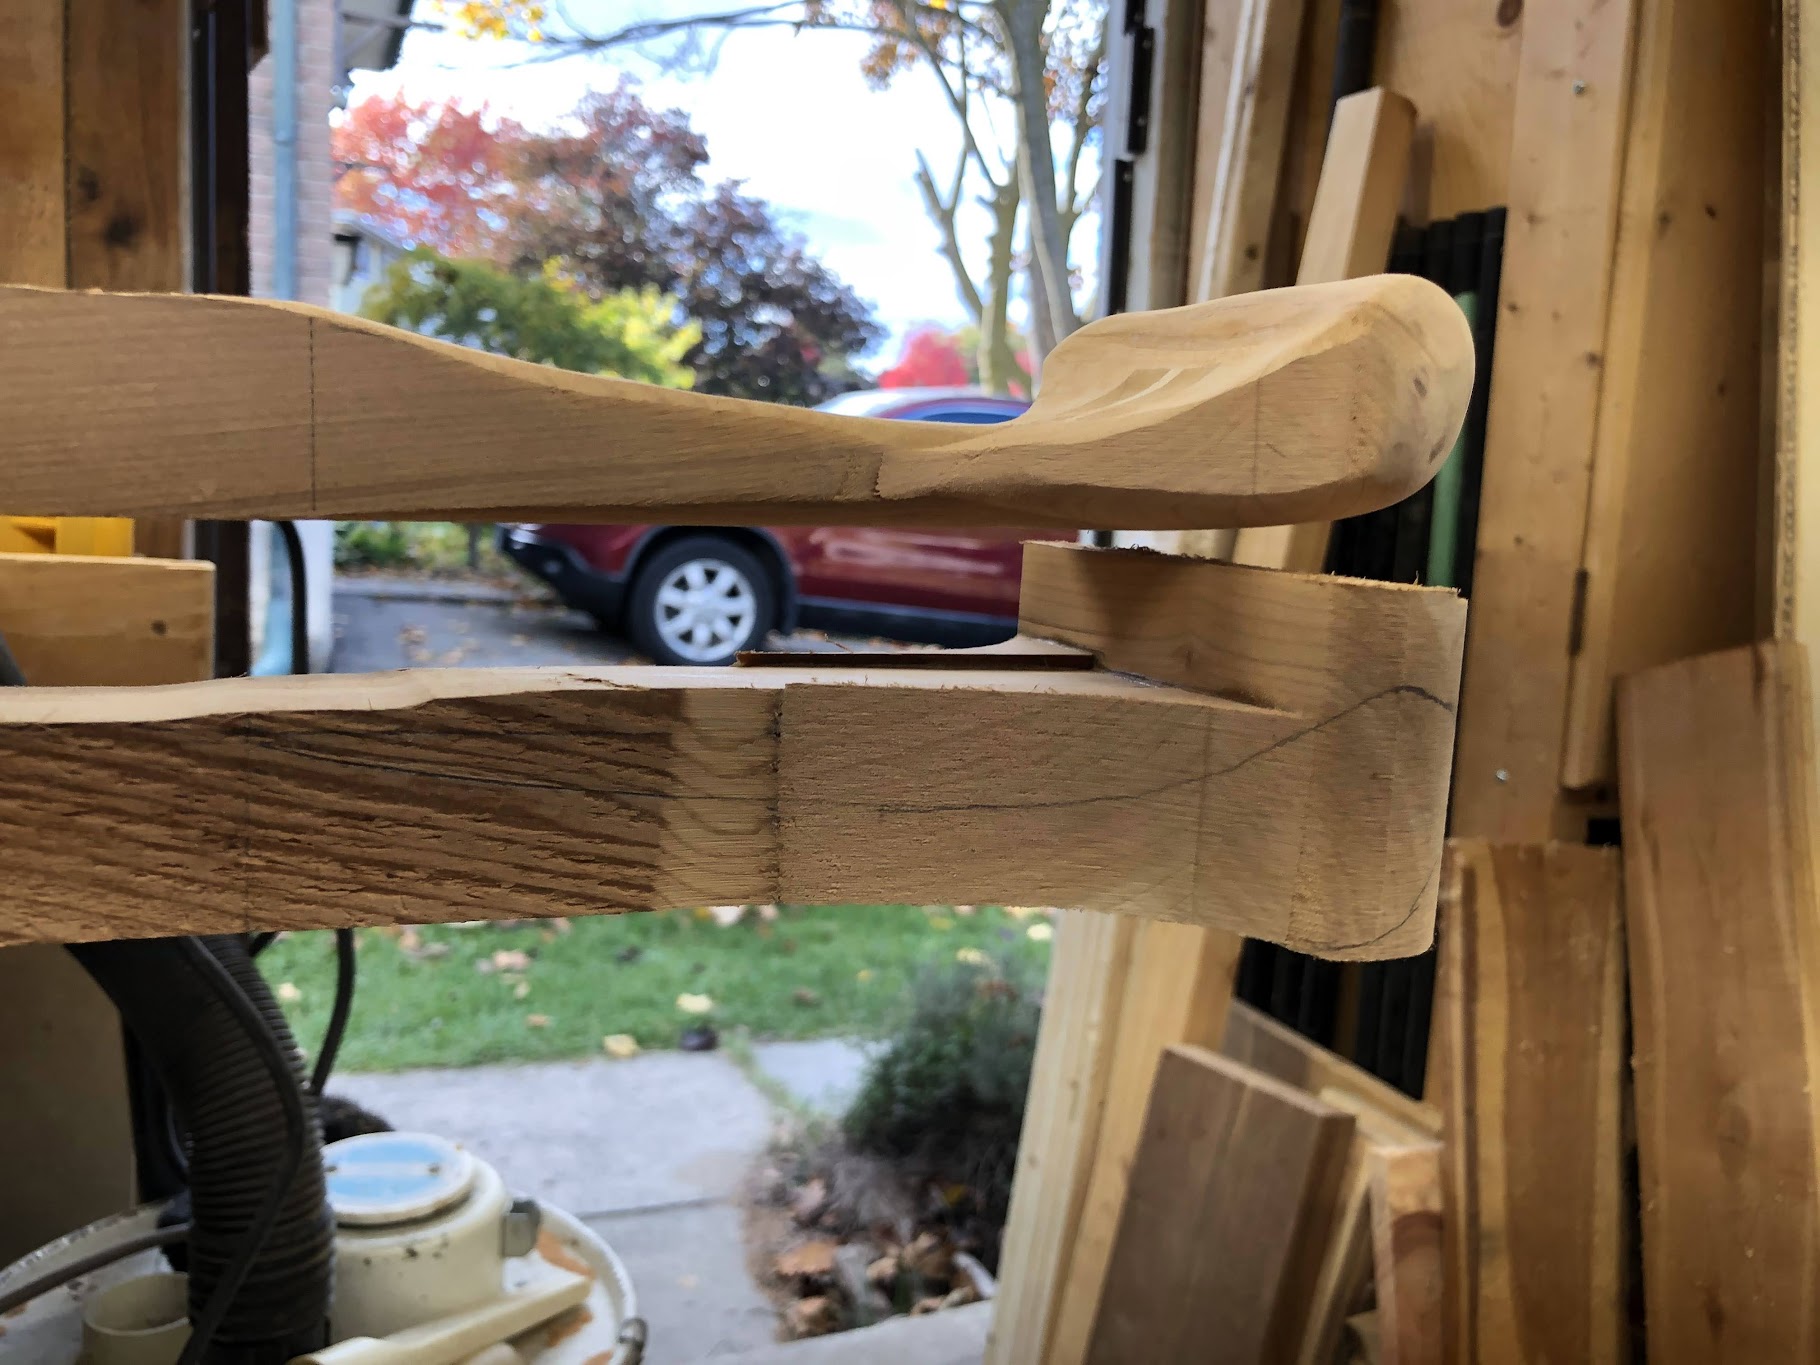
While the batch is waiting on the epoxy to cure (for me 10 days) the single handles can be final sanded. Given all the curves on the asymmetric handle I like to use a small piece of foam with the sand paper, it allows me to follow the contours. Sand the handle out to 220-280 grit ... I like to vacuum them off and "feel" the handles progression as I go along, after all this handle will be in your hand a lot, it should feel like home.

It is finally time to get the ferrules on the twin paddles. Previously we made the cutoff and installation marks on the shafts .... now we make use of them.
- carefully cut the shaft to length (the farthest mark)
- chamfer the end edge with a rasp or coarse sand paper
- fit the unsanded installation portion of the blade to one of the ferrules. The shaft will not likely fit at this point, it is a 1 1/4" ferrule which allows a shaft diameter of about 1 1/8" internally. This shaft has been made to be 1 1/8" x 1 1/4" ... so the 1 1/4" part is not likely to fit, so that is the first part to be fitted.
Try the ferrule and note where the shaft is too big, using 100 grit paper, use the "seesaw" technique to reduce that area, being careful to extend any sanding all along the shaft. In this case I needed to take off 1/16" near the top and near the bottom (keep it centered). So 2 or 3 passes with the sandpaper on one side, then flip the paddle over and repeat on the other. Try the ferrule, repeat the process till you have a snug fit all along the inserted portion.

These are where I get ferrules (have used)
Canada
http://www.noahsmarine.com/ferrule-carb ... 1-1-4.html
U.S
https://duckworks.com/carbon-fiber-doub ... es-medium/
Take an assembled ferrule and add a tape ring at each end.. so that it follows the end as close as possible with no overhang. Put a tape ring around your paddle shaft at the insertion limit point we marked, assemble the paddle and ferrule and lay out on a flat surface, here I use my strongback.

A closer view of the assembly

Now take a ruler and line it up along that ash spine, centering it on both sides of the ferrule and mark a line that goes across the tape. You may need to tape/fasten the rule on either side) if you are doing this solo.

and a close up of the marks. These do not have to be centered on that spine, it is just a convenient reference point, the idea is to get a line across the tape that marks the correct ferrule alignment.

Vacuum the shaft end, clean the inside of the ferrule for 3" in, I use a rag with a bit of odourless mineral spirits
We now have fitted ferrules, alignment marks, cleaned parts, time to attach some ferrules. Mix up a small batch of epoxy, a single pump per paddle is lots. I use a small glue brush to apply the epoxy ... mark a mark on the shaft 3" from the tip of the brush.

Once the epoxy is mixed up, cover the insertion part of the shaft, including the flat face. Then do a light coat inside the ferrule, using that 3" mark as a guide as to how far to coat.
Re coat the shaft and end until it is saturated ... the end won't see daylight again, so it really isn't important to continue adding epoxy here after the second coat.
Once the shaft area is coated/saturated, thicken the remainder of the little batch with cabosil/fumedSilica ... it should be creamy and hold a bit of a peak without flowing (sounds like cooking instructions) ... apply a light coat to the shaft and inside of the ferrule. Not too heavy, the ferrule is a snug fit so not much should be needed.
Slide the ferrule onto the shaft, roughly aligning the marks as you go, so that the marks align when you stop. there will a ring of epoxy goo you may need to wipe off to see the mark for final alignment. Once you have it aligned and to the insertion mark, run your finger around the shaft to remove excess epoxy and seal any spaces in the epoxy, follow with a rag or paper towel to remove the rest of the excess.
Remove the shaft side tape and set aside to cure

After curing remove the tape on the ferrule. This is after curing and if you look close you can almost see the slight fillet around the ferrule

The reason for the order of tape removal is simple, the tape on the shaft can be removed without affecting the alignment, that is not so for the ferrule tape. The tape on the shaft will also likely have epoxy over it from creating that small fillet, so taking it off makes sense, the tape on the ferrule will not get buried and removal later is easy.
The important point here is that if you remove the tape, the alignment marks go with it ... and if the alignment is off, the paddle won't be usable. If you don't feel comfortable pulling the tape, just leave it, the worse that will happen is that a little filing/sanding at the ferrule/shaft boundary will be needed to cleanup the tape.
A little waiting and it's varnish time.
Brian
It is finally time to get the ferrules on the twin paddles. Previously we made the cutoff and installation marks on the shafts .... now we make use of them.
- carefully cut the shaft to length (the farthest mark)
- chamfer the end edge with a rasp or coarse sand paper
- fit the unsanded installation portion of the blade to one of the ferrules. The shaft will not likely fit at this point, it is a 1 1/4" ferrule which allows a shaft diameter of about 1 1/8" internally. This shaft has been made to be 1 1/8" x 1 1/4" ... so the 1 1/4" part is not likely to fit, so that is the first part to be fitted.
Try the ferrule and note where the shaft is too big, using 100 grit paper, use the "seesaw" technique to reduce that area, being careful to extend any sanding all along the shaft. In this case I needed to take off 1/16" near the top and near the bottom (keep it centered). So 2 or 3 passes with the sandpaper on one side, then flip the paddle over and repeat on the other. Try the ferrule, repeat the process till you have a snug fit all along the inserted portion.
These are where I get ferrules (have used)
Canada
http://www.noahsmarine.com/ferrule-carb ... 1-1-4.html
U.S
https://duckworks.com/carbon-fiber-doub ... es-medium/
Take an assembled ferrule and add a tape ring at each end.. so that it follows the end as close as possible with no overhang. Put a tape ring around your paddle shaft at the insertion limit point we marked, assemble the paddle and ferrule and lay out on a flat surface, here I use my strongback.
A closer view of the assembly
Now take a ruler and line it up along that ash spine, centering it on both sides of the ferrule and mark a line that goes across the tape. You may need to tape/fasten the rule on either side) if you are doing this solo.
and a close up of the marks. These do not have to be centered on that spine, it is just a convenient reference point, the idea is to get a line across the tape that marks the correct ferrule alignment.
Vacuum the shaft end, clean the inside of the ferrule for 3" in, I use a rag with a bit of odourless mineral spirits
We now have fitted ferrules, alignment marks, cleaned parts, time to attach some ferrules. Mix up a small batch of epoxy, a single pump per paddle is lots. I use a small glue brush to apply the epoxy ... mark a mark on the shaft 3" from the tip of the brush.
Once the epoxy is mixed up, cover the insertion part of the shaft, including the flat face. Then do a light coat inside the ferrule, using that 3" mark as a guide as to how far to coat.
Re coat the shaft and end until it is saturated ... the end won't see daylight again, so it really isn't important to continue adding epoxy here after the second coat.
Once the shaft area is coated/saturated, thicken the remainder of the little batch with cabosil/fumedSilica ... it should be creamy and hold a bit of a peak without flowing (sounds like cooking instructions) ... apply a light coat to the shaft and inside of the ferrule. Not too heavy, the ferrule is a snug fit so not much should be needed.
Slide the ferrule onto the shaft, roughly aligning the marks as you go, so that the marks align when you stop. there will a ring of epoxy goo you may need to wipe off to see the mark for final alignment. Once you have it aligned and to the insertion mark, run your finger around the shaft to remove excess epoxy and seal any spaces in the epoxy, follow with a rag or paper towel to remove the rest of the excess.
Remove the shaft side tape and set aside to cure
After curing remove the tape on the ferrule. This is after curing and if you look close you can almost see the slight fillet around the ferrule
The reason for the order of tape removal is simple, the tape on the shaft can be removed without affecting the alignment, that is not so for the ferrule tape. The tape on the shaft will also likely have epoxy over it from creating that small fillet, so taking it off makes sense, the tape on the ferrule will not get buried and removal later is easy.
The important point here is that if you remove the tape, the alignment marks go with it ... and if the alignment is off, the paddle won't be usable. If you don't feel comfortable pulling the tape, just leave it, the worse that will happen is that a little filing/sanding at the ferrule/shaft boundary will be needed to cleanup the tape.
A little waiting and it's varnish time.
Brian
Re: New Composite Paddles for 2020
It's time to start getting ready to varnish and make the paddles shiny and presentable.
Since we have used epoxy on the blades and shafts, there is one extra step that needs to be done, washing the paddles to remove any amine blush, that may or may not have occurred in the finish. Get a bucket of warm water with a small shot of dish soap (soap shot is optional, but I use it) and a scrubbing pad (something like a 3M blue, scotchbright), we aren't trying to sand, just clean/scrub the epoxy well. Give the paddles a good scrubbing and rinse with clear water (tape off the single handle area).
For those who haven't used epoxy, under some curing conditions ANY epoxy can create a blush on the surface, it can be visible or not visible ... this blush will not allow the varnish to setup properly, so it needs to be removed. Since removing messed up varnish is a pita, washing the paddles before you start is a good plan IMO.
Just some anecdotal info, I built 4 canoes before I had a blush issue ... and sanding/wiping down a gooey hull is a chore, one that makes you realize that if you run around in a lightning storm, with a metal pole, for long enough, you will get hit. Just because blush hasn't hit you yet, doesn't mean it won't.
Describing and taking pics of the varnishing process is literally like watching paint dry ... so I will keep it brief.
The shaping/sanding/flattening work has been done ... any sanding now is to knock off small bits and rough the surfaces for adhesion. Sanding on all paddles starts at 220 grit, using a foam piece and lightly sanding with the shaft direction. When you finish, all the shiny spots are gone. Vac and tac.

As it happens, I had these 3 products available and decided to try each of them as an initial coat, to evaluate how well they stacked up. Each product has strengths and weaknesses, but I am not a production facility, so i am pretty much focused on what is easiest for me to use and what seems to look best (to me). The Varathane products are less than half the price of the Epiphanes and they dry fast enough that a couple of coats in a day is possible. While drying faster is an advantage in some cases, I found that for me they dried so fast, brush marks where left because they didn't flow enough (I assume that was the reason). So I decided to stay with the Epiphanes for this job.

Unfortunately, three of the paddles, despite being washed down had amine blush left and the varnish failed in several areas on each paddle. So they got sanded down and rewashed, followed by a bit of further sanding.
Epiphanes, cut ~20% mineral spirits, was used for all subsequent applications ... since the wood is already sealed the application recommendation of ~15% was used sort of, I like it a bit higher. I use a 2" JEN foam brush for all of these applications ... I do think they are a better foam brush. The key here is to not waste time, get the varnish on, get it spread, then tip off the spread varnish, the longer you take, the more brush/stroke marks that get left. I do the blade part first, each side is ~30 seconds, then I tip off both sides and move to the shaft. I include the timing, just as a bit of a guide of what I mean by "don't waste time" .
Pic of the twins with varnish, drying in the rack.

Once the initial coat is applied and cured, swap to 320 grit sandpaper, still using the foam piece and a light, lengthwise stroke ... for the twins, I wrap a piece of painters tape around the ferrule edge to prevent slopping varnish or accidentally hitting it with the sandpaper. for the singles, the tape goes around at the epoxy/oil boundary. Vac and tac between coats.
One set of twins between coats.

Three coats of varnish are applied, each one gets smoother and shinier, I am still convinced there is a "voo doo" component to the final varnish finish. If coat 3 doesn't look good enough, i will sometimes resand and apply a 4th coat using varnish cut a little higher to 30% ... most times though it is finished at 3 coats.
This is the finish I typically want on a paddle, not perfect, but nice enough to make a good impression and tough enough to withstand the rigors of paddling.

On the single paddles, near the handle, there will be a line where the varnish stops and the raw wood starts, place some painters tape on the varnish side and apply oil , in this case I am using Tung Oil. For storing the finishes, I found these bags at Lee Valley and I really like them, no skinning, no wasted product and they can be re used ... Once a can goes below 2/3 in the can, I pour them over to the bags. As a bonus, dispensing is a lot easier as well.
The directions say to apply liberally, reapplying in dry spots for 5 minutes, wipe off after 10 minutes .... I change that up a bit, and thoroughly wet sand with 320 grit sandpaper at the 10 minute mark and then wipe off. (tape is removed at wipe off stage)

At 1 day intervals, I add 3 subsequent applications of oil, using a 5 minute soak, thorough wet sand using 400 grit paper, followed by a wipe off.
Buff a bit and you end up with a handle that is as smooth and comfortable as it looks.

There is one more point about the actual design/construction of the blades, that isn't really apparent until you get to the finish stage. When putting wood together, such as the shafts, where a cedar/ash/cedar sandwich is used, the joint can either be blended to disappear or made to pop. Blending a joint is like the cherry handles using TB III, a darker glue which allows the joint to fade and let the cherry be cherry. In the case of the shaft example, a tinted epoxy was used to make the joint "pop" a little and accentuate the different wood layers.

or white on white on white
Moving on to a blade example, the blade on the beavertail was assembled using dark tinted epoxy ... looking at the joints, you can see the dark lines that help define each of the layers. I don't believe it would have that same definition with a plain glue joint.

And even when you have high contrast, the technique still adds some better definition. When I did the sunburst pattern, one blank was glued, but when I ran into timing issues (glue working time too short) i swapped and did the next one with tinted epoxy.
In this pic the upper blade portion is tinted epoxy, the lower portion is glued with TB III .. the actual sun part on both is tinted epoxy. Once pointed out I think there is a visible difference between the halves.

I guess the point here is that sometimes the joint can be a feature, not just something you try to hide.
That concludes the journey ... hopefully there may a few ideas here that trigger you to try and make a few and make them your own.
Happy paddling
Brian
Since we have used epoxy on the blades and shafts, there is one extra step that needs to be done, washing the paddles to remove any amine blush, that may or may not have occurred in the finish. Get a bucket of warm water with a small shot of dish soap (soap shot is optional, but I use it) and a scrubbing pad (something like a 3M blue, scotchbright), we aren't trying to sand, just clean/scrub the epoxy well. Give the paddles a good scrubbing and rinse with clear water (tape off the single handle area).
For those who haven't used epoxy, under some curing conditions ANY epoxy can create a blush on the surface, it can be visible or not visible ... this blush will not allow the varnish to setup properly, so it needs to be removed. Since removing messed up varnish is a pita, washing the paddles before you start is a good plan IMO.
Just some anecdotal info, I built 4 canoes before I had a blush issue ... and sanding/wiping down a gooey hull is a chore, one that makes you realize that if you run around in a lightning storm, with a metal pole, for long enough, you will get hit. Just because blush hasn't hit you yet, doesn't mean it won't.
Describing and taking pics of the varnishing process is literally like watching paint dry ... so I will keep it brief.
The shaping/sanding/flattening work has been done ... any sanding now is to knock off small bits and rough the surfaces for adhesion. Sanding on all paddles starts at 220 grit, using a foam piece and lightly sanding with the shaft direction. When you finish, all the shiny spots are gone. Vac and tac.
As it happens, I had these 3 products available and decided to try each of them as an initial coat, to evaluate how well they stacked up. Each product has strengths and weaknesses, but I am not a production facility, so i am pretty much focused on what is easiest for me to use and what seems to look best (to me). The Varathane products are less than half the price of the Epiphanes and they dry fast enough that a couple of coats in a day is possible. While drying faster is an advantage in some cases, I found that for me they dried so fast, brush marks where left because they didn't flow enough (I assume that was the reason). So I decided to stay with the Epiphanes for this job.
Unfortunately, three of the paddles, despite being washed down had amine blush left and the varnish failed in several areas on each paddle. So they got sanded down and rewashed, followed by a bit of further sanding.
Epiphanes, cut ~20% mineral spirits, was used for all subsequent applications ... since the wood is already sealed the application recommendation of ~15% was used sort of, I like it a bit higher. I use a 2" JEN foam brush for all of these applications ... I do think they are a better foam brush. The key here is to not waste time, get the varnish on, get it spread, then tip off the spread varnish, the longer you take, the more brush/stroke marks that get left. I do the blade part first, each side is ~30 seconds, then I tip off both sides and move to the shaft. I include the timing, just as a bit of a guide of what I mean by "don't waste time" .
Pic of the twins with varnish, drying in the rack.
Once the initial coat is applied and cured, swap to 320 grit sandpaper, still using the foam piece and a light, lengthwise stroke ... for the twins, I wrap a piece of painters tape around the ferrule edge to prevent slopping varnish or accidentally hitting it with the sandpaper. for the singles, the tape goes around at the epoxy/oil boundary. Vac and tac between coats.
One set of twins between coats.
Three coats of varnish are applied, each one gets smoother and shinier, I am still convinced there is a "voo doo" component to the final varnish finish. If coat 3 doesn't look good enough, i will sometimes resand and apply a 4th coat using varnish cut a little higher to 30% ... most times though it is finished at 3 coats.
This is the finish I typically want on a paddle, not perfect, but nice enough to make a good impression and tough enough to withstand the rigors of paddling.
On the single paddles, near the handle, there will be a line where the varnish stops and the raw wood starts, place some painters tape on the varnish side and apply oil , in this case I am using Tung Oil. For storing the finishes, I found these bags at Lee Valley and I really like them, no skinning, no wasted product and they can be re used ... Once a can goes below 2/3 in the can, I pour them over to the bags. As a bonus, dispensing is a lot easier as well.
The directions say to apply liberally, reapplying in dry spots for 5 minutes, wipe off after 10 minutes .... I change that up a bit, and thoroughly wet sand with 320 grit sandpaper at the 10 minute mark and then wipe off. (tape is removed at wipe off stage)
At 1 day intervals, I add 3 subsequent applications of oil, using a 5 minute soak, thorough wet sand using 400 grit paper, followed by a wipe off.
Buff a bit and you end up with a handle that is as smooth and comfortable as it looks.
There is one more point about the actual design/construction of the blades, that isn't really apparent until you get to the finish stage. When putting wood together, such as the shafts, where a cedar/ash/cedar sandwich is used, the joint can either be blended to disappear or made to pop. Blending a joint is like the cherry handles using TB III, a darker glue which allows the joint to fade and let the cherry be cherry. In the case of the shaft example, a tinted epoxy was used to make the joint "pop" a little and accentuate the different wood layers.
or white on white on white
Moving on to a blade example, the blade on the beavertail was assembled using dark tinted epoxy ... looking at the joints, you can see the dark lines that help define each of the layers. I don't believe it would have that same definition with a plain glue joint.
And even when you have high contrast, the technique still adds some better definition. When I did the sunburst pattern, one blank was glued, but when I ran into timing issues (glue working time too short) i swapped and did the next one with tinted epoxy.
In this pic the upper blade portion is tinted epoxy, the lower portion is glued with TB III .. the actual sun part on both is tinted epoxy. Once pointed out I think there is a visible difference between the halves.
I guess the point here is that sometimes the joint can be a feature, not just something you try to hide.
That concludes the journey ... hopefully there may a few ideas here that trigger you to try and make a few and make them your own.
Happy paddling
Brian
Re: New Composite Paddles for 2020
Excellent Brian !
With your permission, I may share this thread. Certainly worth sharing !
With your permission, I may share this thread. Certainly worth sharing !
Keep your paddle wet and your seat dry!
Re: New Composite Paddles for 2020
Thanks Jim, that is a big compliment ... knock yourself out.
Brian
Brian