
Finally finished in 13 months.
Weight, 42 pounds.
Strips WRC .270" with 5/16 r cove and bead.
6 oz fiberglass with 3 coats of MAS epoxy out side and single wetout coat inside. Hull was pre-sealed inside and out.
Seats and thwart are Cherry.
Deck, Spanish Cedar.
Inwales, Mahogany.
Outwales, Ash.
HMG Gloss varnish outside, HMG Matt inside.
http://s12.photobucket.com/albums/a237/ealger/Ranger15/
Ed...
My Ranger 15'
-
Peter Kotowych
- Posts: 145
- Joined: Sun May 09, 2004 8:10 pm
- Location: Midland, Ontario
Ranger
Beautiful job, Ed.
You must be very satisfied with all your efforts.
Good job on the weight, too.
Pete
You must be very satisfied with all your efforts.
Good job on the weight, too.
Pete
I love wood!
Glueing
Kevin, ya know, I don't have a single picture of my glue application. I'll make up a couple of test strips tommorow and post the pictures. Perhaps someone could explain what I'm doing wrong as I can get an image to display in this page as evidenced above?
I use a small 4 ounce plastic squeeze bottle I bought at the local hobby store. It has a small tip and lays down about a 1/16" glue bead. 4 ozs is enough for 6 or 8 strips. Glen uses a plastic squeeze bottle used for hair dyeing. It takes a little practice to get just he right amount of glue. When the strip is layed on and pressure applied, a very slight amount should squeeze out along the entire length, (in theory!).
Also, resist the temptation to wipe off the excess glue right away. Doing so just forces it into the soft cedar and makes a mess. Wait a few minutes until it sets up, then scrape it off with a Pro-Prep. You'll save yourself a lot of sanding and scraping down the line.
I build bead side up and lay the strip in a strip holder along side the strongback cove up while running a small bead down the strip. Some like to build cove up but applying the glue as the bilge is turned is interesting. :eyebrows
Ed...
Ed Alger
-
Pete in the Deep South

- Posts: 46
- Joined: Wed Jun 22, 2005 5:07 am
- Location: Jasper, Ga.
- Contact:
Hi Ed!
Great looking canoe.
I will be posting a few pic and comments of my Huron project soon. I'm in the varnishing stage right now. I like to try new procedures, woods, and designs. However, I think that a beginner would do well to stay with the CanoeCraft directions starting out.
Best regards,
Pete
PS
my photo album is not as impressive as yours...thanks for sharing.
KG4YOL
-
Bryan Hansel

- Posts: 678
- Joined: Fri May 14, 2004 6:36 pm
- Location: Grand Marais, MN
- Contact:
-
davidb54321

- Posts: 214
- Joined: Fri Jan 28, 2005 7:05 pm
- Location: Presque Isle, Maine
- Contact:
Ed,
Fantastic job! You also did an excellent job of documenting your building process. Your photo's are a great asset to the builders on this board.
I hope you enjoy using your canoe as much as you did building it.
Fantastic job! You also did an excellent job of documenting your building process. Your photo's are a great asset to the builders on this board.
I hope you enjoy using your canoe as much as you did building it.
David Bartlett
"I don't fully understand everything I know!"
http://photobucket.com/albums/b81/davidb54321/
"I don't fully understand everything I know!"
http://photobucket.com/albums/b81/davidb54321/
Strip Pattern
Thanks Bryan for the comments. I like to use the "Herringbone" pattern because I think it gives a little more rigidity and also because I like the look. The problem with the herringbone is that I find it difficult to effect unless the area is quite flat. The traverse from the stem is too steep to allow the strips to cross over. Some say it can be done but I've not learned how.
Given a choice, I'd do herringbone all the way but it is a labor of love because the end has to be "grooved" to fit the opposing strip.
Ed...
Given a choice, I'd do herringbone all the way but it is a labor of love because the end has to be "grooved" to fit the opposing strip.
Ed...
Ed Alger

-
Glen Smith

- Posts: 3719
- Joined: Sat May 08, 2004 9:08 am
- Location: Baie-St-Paul, Quebec, Canada
Ed, that is one lovely Ranger and a very good photo report of the building process.
To post an image you must first be viewing the image you wish to post. Then right click and click on "properties", then highlight the "Address" (URL) select "copy" and click on "ok". The image is now ready to post.
In your posted message you click on the box at the top marked "IMG" then you right click and click on "paste"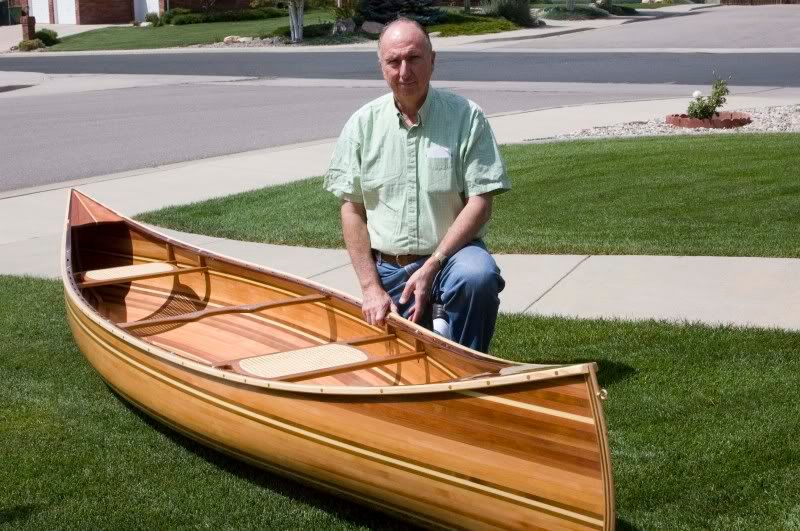 then you can either click on "Close Tags" or on "Img*".
Click on "Preview" to see if the image is showing, if not you must correct something. If the photo is there and you have completed the text, click on "Submit".
To post an image you must first be viewing the image you wish to post. Then right click and click on "properties", then highlight the "Address" (URL) select "copy" and click on "ok". The image is now ready to post.
In your posted message you click on the box at the top marked "IMG" then you right click and click on "paste"
then you can either click on "Close Tags" or on "Img*".Click on "Preview" to see if the image is showing, if not you must correct something. If the photo is there and you have completed the text, click on "Submit".


Ed,
Your Ranger will remain a great example of the excellent craftmanship from builders on this forum. You paid great attention to detail and design. In particular I like the look of the football area, the stripping patter and the seat design. Your work is an inspiration; thanks for sharing the photos with us.
Dale
Ranger
Thanks Dale, and others, for your kind comments. It was a lot of fun.
My 45 years as a mechanical engineer and computer programmer didn't help to reduce the 400 hours it took to put the Ranger together. :big grin
I think what all my experience did was make me too fussy!
Ed...
My 45 years as a mechanical engineer and computer programmer didn't help to reduce the 400 hours it took to put the Ranger together. :big grin
I think what all my experience did was make me too fussy!
Ed...
Ed Alger